TWD Rewind: Bittersweet Brownies (with Peppermint)
December 21, 2011 at 9:29 pm | Posted in cookies & bars, groups, sweet things, tuesdays with dorie | 2 CommentsTags: baking, brownies, chocolate, dessert

I’ve been doing a lot of holiday baking…but it’s all for work…all for strangers. Home baking will largely have to wait until our customers resolve not to eat another slice of almond cake or pint of gelato or whoopie pie until Valentine’s day. (I kind of like the holiday rush, but I love the post-holiday slow-down.) I can’t possibly miss out on the last couple weeks of TWD, though, and this week the group is giving us a chance to make up a recipe we missed. I chose these Bittersweet Brownies specifically because I thought they might lend themselves to a little bit of Christmassy doctoring up…maybe my husband won’t feel so neglected. Instead of espresso powder, I added a few drops of mint extract to the brownies. And I actually do use a dropper for mint extract because things can go from a hint-of-mint to mouthwash pretty easily.
Everything came out right with these brownies. Since it’s the last brownie recipe in the book, maybe that means I’ve learned something. The texture was perfect…rich and fudgy. And of course they were choco-minty. I liked them best right out of the fridge. I’m going to leave one for Santa and see if I get a good present.

For the recipe, see Baking: From My Home to Yours by Dorie Greenspan or read Lethally Delicious, as Leslie chose this recipe last month. Don’t forget to check out the TWD Blogroll and see what everyone else chose to rewind this week!
Tuesdays with Dorie: Puffed Double Plum Tart
December 13, 2011 at 12:01 am | Posted in groups, pies & tarts, sweet things, tuesdays with dorie | 7 CommentsTags: baking, dessert, tarts
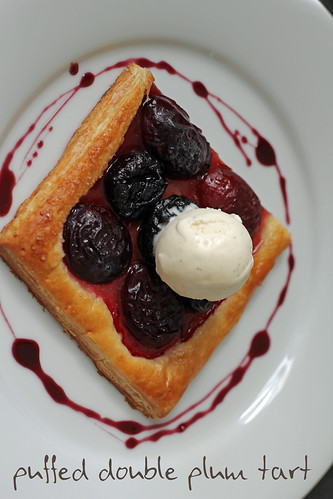
This is one of last recipes left in the rotation from BFMHTY. I may have had to pass on it, cuz there are no plums around right now, but in a rare moment of genius forethought, I made this Puffed Double Plum Tart back in September. Actually, I was just looking for things to do with all my summer CSA plums before they died a long, slow death in my fridge, but whatever.
Why is it called “double plum”? Double plum turns out to equal plums plus prunes. The prunes are jazzed up with a quick red wine poach, and that’s really the most difficult step of this whole thing. Certainly save that sweet winey poaching liquid and reduce it into a quick sauce, so your family is tricked into thinking this was harder than just arranging some plums and prunes atop a square of store-bought puff pastry. I liked this, not only for its ease, but also because red wine steeped prunes are incredibly delicious. So delicious that you could probably skip the fresh plums and make this mid-winter afterall.
For the recipe, see Baking: From My Home to Yours by Dorie Greenspan or read Julie’s blog, Someone’s in the Kitchen. And see TWD founder Laurie’s blog for Unbelievably Good Chocolate Blueberry Ice Cream, this week’s other recipe (which I unfortunately did not make this week, but I look forward to seeing your reviews). Don’t forget to check out the TWD Blogroll!
Tuesdays with Dorie (on Sunday!): Normandy Apple Tart
December 4, 2011 at 9:19 pm | Posted in groups, pies & tarts, sweet things, tuesdays with dorie | 2 CommentsTags: baking, dessert, tarts

This Normandy Apple Tart is everything I think a French tart should be– chic and elegant and deceptively easy. It’s a sweet tart dough with a simple applesauce filling and circles of sliced apples on top. I love the way the apples brown on their tips…so pretty.
Dorie’s applesauce is really good. In fact, I multiplied the recipe, because if you’re gonna make applesauce, you might as well make enough to enjoy even when the tart is finished. It has hardly any sugar and no spices, so the flavor is pure apple. Putting it through a food mill (with the coarse disk) gives it a great texture. When its baked in the tart, it firms enough to make perfectly clean slices.

For the recipe, see Baking: From My Home to Yours by Dorie Greenspan or read Tracey’s Culinary Adventures. Don’t forget to check out the TWD Blogroll!
Tuesdays with Dorie: Sour Cream Pumpkin Pie (or Tart)
November 29, 2011 at 12:01 am | Posted in groups, pies & tarts, sweet things, tuesdays with dorie | 7 CommentsTags: baking, dessert, holiday, pie

This Sour Cream Pumpkin Pie was my Thanksgiving dinner dessert (perfect timing!). Not having pumpkin pie with Turkey Day dinner would be considered absolutely unacceptable for my dad’s side of the family, and even though I didn’t head to Seattle to see them this year, I’m happy to carry on the W family tradition here. The texture of this pie was great…smooth and creamy (especially if you strain the filling into the crust). It’s actually a bit more dairy-heavy than I’m used to for pumpkin pie, but the spicing was nice.
Apparently this recipe works as either a pie or a more dainty tart. The recipe makes a substantial amount of filling, so especially if you chose to bake a tart, be prepared to have extra on your hands. And if you make a pie, you may need a deep-dish plate. (I used my seven-inch glass pie plate, which usually works perfectly for a half-recipe of deep-dish filling. I actually only made a third of the filling, and still had a smidge extra that I couldn’t fit into the crust.) You can always pour extra filling into custard cups and bake them in a water bath– pumpkin custards are yummy, too, and gluten-free guests won’t feel left out of the fun.
For the recipe, see Baking: From My Home to Yours by Dorie Greenspan (it’s also here on Serious Eats) or read Judy’s Gross Eats. And see Tracey’s Culinary Adventures for Normandy Apple Tart, this week’s other recipe (which I did make and will show you later in the week). Don’t forget to check out the TWD Blogroll!
TWD Rewind: Cocoa-Buttermilk Birthday Cake
November 25, 2011 at 12:15 am | Posted in cakes & tortes, groups, layer cakes, sweet things, tuesdays with dorie | 8 CommentsTags: baking, cake, chocolate

This week, we are having a rare rewind week for TWD, a chance to make-up something we missed. There was a time when I was making (and eating) layer cakes left and right. Despite the last couple of weeks, they are kind of a rarity around here now (although I wish they weren’t). In fact, I really made this cake months ago..for Easter…in case the pastel Robin Eggs didn’t give that away. Chocolate cake with a chocolate-malt buttercream…I can see why this would be a good birthday cake. Maybe my husband will make it for me next year? Yeah, probably not….I’ll have to make it for his instead.
I made a half recipe of this cake and baked it in my six-inch pans. Any time I have a cake recipe, I pay close attention to it as it bakes. Sometimes it takes just as long as the full recipe, and sometimes it takes ten minutes less….you just never know. I happened to pull this cake out of the oven at the perfect sweet spot. The cake was so moist and velvety…I wish I remembered how long it was in there for! Hopefully I can repeat that success next time. This cake recipe is really just a scaled-up version of Dorie’s Chocolate-Chocolate Cupcakes. It’s the same thing, but for some reason I liked it much, much more as a layer cake. I think it baked nicer in “real” cake form, but maybe it was really the pairing with the chocolate-malt buttercream that I liked so much. There were some reported troubles with the frosting, but I thought it came out just right, and it was easy to work with. I like when I can get the frosting on a cake without too much mucking about.

For the recipe, see Baking: From My Home to Yours by Dorie Greenspan or look at The Splendid Table’s website (not sure that we had an “official” TWD host/recipe poster that particular week, as it was a recipe for the group’s second anniversary). Don’t forget to check out the TWD Blogroll to see what everyone picked to catch up on this week!
Brown Butter Pumpkin Layer Cake
November 20, 2011 at 8:20 pm | Posted in cakes & tortes, layer cakes, sweet things | 6 CommentsTags: baking, cake, holiday

I know that I’ll be making a pie for Thanksgiving dinner, so I’m getting the craving to stuff my face with cake out of the way ahead of time. I’ve actually been itching to make this Brown Butter Pumpkin Layer Cake ever since I saw it on the cover of Fine Cooking last year. And it was everything I’d hoped for in a spice cake, complete with cream cheese frosting and a crunchy topping.
If you are ambitious, you can make your own pumpkin purée by roasting a squash. If you are lazy, like I am, you can just open a can. The canned stuff works just fine, in my opinion, and you always know what you are going to get. Anyway, you have to go through the extra step of browning butter a couple of times, so why make things too hard on yourself? Actually, making browned butter is no big deal, and it’s totally worth it in terms of flavor. It makes an especially gorgeous addition to the cream cheese frosting, giving it that slightly nutty taste and beautiful taupe color. The browned butter baked into the cake gives the pumpkin and spices extra dimension, and because you use it as a liquid fat, you mix the cake by hand. I love that! I thought about skipping the pecan and pepita topping, but I’m glad I didn’t. It’s crunchy and kind of Cracker Jackey caramelized. I can’t wait to make this again next fall (or possibly sooner…)
P.S.: Don’t forget to enter my BOOK GIVEAWAY, if you haven’t done so already….
Brown Butter Pumpkin Layer Cake— makes 8-12 servings
adapted from Fine Cooking, Issue 107
Steph’s Notes: You can substitute 1-1/2 cups canned pumpkin purée for homemade, if you like. If you do choose to make the purée, you can do so up to 2 days ahead. The frosting amount is a bit on the skimpy side. I made it work, but there wasn’t a lot of extra play around with. If you’d like more leeway, I’d suggest a 1.5x recipe.
for the purée (if not using 1-1/2 cups canned):
2 tsp. vegetable oil
1 medium-large Sugar Pie pumpkin, cut in half from stem to bottom and seededfor the cake:
6 oz. (3/4 cup) unsalted butter; more for the pans
9 oz. (2 cups) unbleached all-purpose flour; more for the pans
1-1/2 tsp. baking soda
1-1/2 tsp. ground cinnamon
1 tsp. ground ginger
3/4 tsp. table salt
1/4 tsp. ground cloves
1-1/2 cups granulated sugar
2/3 cup firmly packed light brown sugar
2 large eggs
1/3 cup buttermilkfor the topping:
1-1/2 Tbs. unsalted butter
2/3 cup pecans
1/2 cup unsalted, raw, hulled pepitas
2 Tbs. firmly packed light brown sugar
1/4 tsp. table salt
for the frosting:
4 oz. (1/2 cup) unsalted butter
8 oz. cream cheese, at room temperature
1/4 cup firmly packed light brown sugar
pinch of salt
5 oz. (1-1/4 cups) confectioners’ sugar
-Make the pumpkin purée (if not using 1-1/2 cups canned): Position a rack in the center of the oven and heat the oven to 350°F. Brush a 9×13-inch baking dish with the oil. Put the pumpkin halves in the dish cut side down and bake until tender when pierced with a fork, about 45 minutes. Let cool. Peel the pumpkin and purée the flesh in a food processor until smooth. You’ll need 1-1/2 cups of the purée for the cake. Refrigerate or freeze any remaining purée for another use.
-Make the cake: Position a rack in the center of the oven and heat the oven to 350°F. Butter and flour two 9-inch round cake pans with removable bottoms (or butter two 9-inch round cake pans, line the bottoms with parchment, butter the parchment, and flour the pans). Melt the butter in a heavy-duty 1-quart saucepan over medium heat. Cook, swirling the pan occasionally until the butter turns a nutty golden-brown, about 4 minutes. Pour into a small bowl and let stand until cool but not set, about 15 minutes.In a medium bowl, whisk the flour, baking soda, cinnamon, ginger, salt, and cloves. In a large bowl, whisk 1-1/2 cups of the pumpkin purée with the granulated sugar, brown sugar, eggs, and buttermilk until very well blended. With a rubber spatula, stir in the flour mixture until just combined. Gently whisk in the brown butter until completely incorporated. Divide the batter evenly between the prepared pans. Bake the cakes until a tester inserted in the center comes out clean, about 28 minutes. Let the cakes cool in the pans for 10 minutes. Turn the cakes out onto racks, remove the pan bottoms or parchment, and cool completely.
-Make the topping (while the cake bakes): Melt the butter in a heavy-duty 12-inch nonstick skillet over medium heat. Add the pecans and pepitas and cook until the pecans brown slightly and the pepitas begin to pop, about 2 minutes. Sprinkle in the brown sugar and salt and stir until the sugar melts and the nuts are glazed, about 2 minutes. Remove from the heat and let the mixture cool in the skillet.
-Make the frosting: Melt the butter in a heavy-duty 1-quart saucepan over medium heat. Cook, swirling the pan occasionally until the butter turns a nutty golden-brown, about 4 minutes. Pour into a small bowl and let stand until the solids settle at the bottom of the bowl, about 5 minutes. Carefully transfer the bowl to the freezer and chill until just firm, about 18 minutes. Using a spoon, carefully scrape the butter from bowl, leaving the browned solids at the bottom; discard the solids. With an electric mixer, beat the butter, cream cheese, brown sugar and pinch of salt on medium-high speed until light in color and the brown sugar has dissolved, 2 minutes. Gradually beat in the confectioners’ sugar and continue beating until fluffy, 1 to 2 minutes.
-Assemble the cake: Put one cake layer on a cake plate. Spread 1/2 cup of the frosting on the layer and top with the second layer. Frost the top and sides of the cake with the remaining frosting. Arrange the topping on top of the cake and serve. The assembled, frosted cake can be covered with a cake dome and refrigerated for up to 2 days. Serve at room temperature.
Tuesdays with Dorie: Alsatian Apple Tart
November 15, 2011 at 12:01 am | Posted in groups, pies & tarts, sweet things, tuesdays with dorie | 6 CommentsTags: baking, dessert, tarts

This Alstatian Apple Tart made me think of cooking school. We made one very similar during my first few weeks at the FCI. That was years ago, but I liked it then and I like it now, too. In fact, it was much nicer to make it at home, where the only judge is yours truly and I don’t have to wear an annoyingly scratchy neckerchief or wobbly paper toque. It’s a pretty easy tart to make…a sweet dough, apple slices and a little custard. I lightened up the custard in the book by only using one egg (and skipping the extra yolk), using a combo of milk and cream (rather than all cream) and skimping on the sugar. My CSA is done for the year, but I’m still trying to use up the apples we got in the final couple pick-ups. I have no idea what kind they are, but they are little, have red skins and were just fine in here. Because this tart has the custard built-in, you don’t even need ice cream!
For the recipe, see Baking: From My Home to Yours by Dorie Greenspan or read Jessica’s blog, cookbookhabit. And see Lethally Delicious for Bittersweet Brownies, this week’s other recipe (which I unfortunately din’t get a chance to make this week). Don’t forget to check out the TWD Blogroll!
Tuesdays with Dorie (on Friday!): Mini Madeleines
November 11, 2011 at 11:21 pm | Posted in cakes & tortes, cookies & bars, groups, simple cakes, sweet things, tuesdays with dorie | 2 CommentsTags: baking, cookies

OK, Tuesday has come and gone (happy 11/11/11, by the way), but I did bake both of this week’s TWD recipes, so I wanted to show you my Mini Madeleines as well. Better late than never, right? I like madeleines…so much that I got a little greedy and swiped one from my photo session…oops.
Good reasons to make madeleines include:
*Little cakes that disguise themselves as shell-shaped cookies– how cute!
*A batter that’s hand-whisked and allowed to rest for as long as a couple of days– how easy!
*A soft crumb that you can flavor a zillion different ways– how tasty!
*Less than ten minutes of baking time– how energy efficient! (alright, that’s a stretch)
If you’ve avoided making them because you don’t have the traditional madeleine baking pan, I’m pretty sure a mini muffin tin would make a fine substitute. I browned my butter for these and used lots of lemon zest. They had great flavor and were nice with chamomile tea.
For the recipe, see Baking: From My Home to Yours by Dorie Greenspan or read Di’s Kitchen Notebook. Don’t forget to check out the TWD Blogroll!
Tuesdays with Dorie: Depths-of-Fall Butternut Squash Pie
November 8, 2011 at 12:01 am | Posted in groups, pies & tarts, sweet things, tuesdays with dorie | 11 CommentsTags: baking, dessert, pie

I’ve noticed this Depths-of-Fall Butternut Squash Pie many times while flipping through the book. Or, I should say that I noticed the title and thought it sounded good. It wasn’t until this weekend that I actually read it and realized it is not a smoothly puréed, single crust pie similar to pumpkin. Nope, this is a pie with real character….lumpy and bumpy under the top crust because everything inside is chunky and retains its texture. It’s stuffed with a hearty combo of butternut squash, apples (or pears, which I didn’t have on hand), nuts and dried fruit. The filling reminded me of mincemeat pie, with its mix of fruit and spices (but sans the suet, thank goodness). The pie is slightly earthy, not too sweet, and totally great with vanilla ice cream!
For the recipe, see Baking: From My Home to Yours by Dorie Greenspan (it’s also on The Splendid Table’s site) or read Valerie’s lovely blog, Une Gamine dans la Cuisine. And see Di’s Kitchen Notebook for Mini Madeleines, this week’s other recipe (which I did make and will show you later in the week). Don’t forget to check out the TWD Blogroll!
Upside-Down Pear Chocolate Cake
November 6, 2011 at 5:26 pm | Posted in cakes & tortes, simple cakes, sweet things | 11 CommentsTags: baking, cake, chocolate, dessert

When did weekends become all about errands and housekeeping? This weekend, in addition to the usual vacuuming, laundry and trips to the market and bank, I did some grout touch-ups to the bathroom (how do I even know how to do that??), removed and cleaned up the couple of A/C units we still had dangling out the windows and did a rather ghetto weatherproofing job to the hatch that leads from our backyard into the basement (it involved a blue tarp and some bricks). Carving out a little baking time on the weekends is a must. For me, even though there are always dishes to wash afterward, it’s pure fun.
While I’ve never been one for most fruit and chocolate combos, I can do pears and chocolate together…Poire Belle Hélène is good stuff, afterall. While I was flipping through the very sweet little book Rustic Fruit Desserts, this recipe for Upside-Down Pear Chocolate Cake caught my eye as a good and unusual way to use up the last of my CSA pears. Making an upside-down cake is always exciting. There’s the big revel– what’s going to happen when you turn it out of the pan?? Here’s what I got with this one: a perfectly moist and caramel-soaked chocolate cake with pears that turned a translucent, shimmering gold. I must say though, that just from tasting the raw cake batter, I knew we were in for a treat. I love the way the pears glisten in the light…this one might show up again for Christmas dinner.

Upside-Down Pear Chocolate Cake– makes a 9-inch cake
adapted from Rustic Fruit Desserts by Cory Schreiber and Julie Richardson
Steph’s Note: Regarding the caramel for the fruit topping– if you have another method of making caramel that you prefer (a dry caramel, for example), feel free to use it here, keeping the amount of sugar the same. This one worked perfectly for me, but do what you are comfortable with.
for the fruit topping:
1 cup (7 ounces) granulated sugar
1/4 cup (4 oz) water
3 firm but ripe pears, peeled, cored, and each cut into 12 slices (1 pound prepped)for the cake:
1/4 cup (2 ounces) unsalted butter, plus more for pan
4 ounces dark chocolate, chopped
1 cup (5 ounces) all-purpose flour
1/3 cup (1 ounce) unsweetened Dutch-processed cocoa powder
3/4 teaspoon baking soda
1/2 teaspoon fine sea salt
3/4 cup (5 1/4 ounces) granulated sugar
2 eggs
1 teaspoon pure vanilla extract
1/2 cup whole milk
-Preheat the oven to 350° F and butter a 9-inch round cake pan (preferably not a springform one).
-To make the fruit topping, put the sugar and water in a heavy saucepan (one with a tight-fitting lid) and stir until the sugar dissolves. Bring the mixture to a boil over medium heat, then cover and cook for 2 minutes. (Covering in this way allows the steam to wash down the sides of pan, which will prevent any sugar crystals from forming.) Uncover the saucepan and continue to boil the sugar, gently and slowly swirling the pan as needed to cook the caramel evenly, until it becomes a dark amber color. Occasionally wash down the sides of the pan with a pastry brush dipped in cold water, if necessary. Carefully pour the caramel into the prepared pan and allow it to harden. The pan will be very hot from the sugar, so take care in moving it if you need to. Fan the pear slices on top of the caramel in a circle around the perimeter, filling in the center with the remaining slices.
-To make the cake, place the butter and chocolate in a small saucepan over low heat and melt, stirring occasionally. Sift the flour, cocoa, baking soda, and salt together in a bowl. Transfer the melted chocolate to a mixing bowl or the bowl of a stand mixer and add the sugar. Using a handheld mixer with beaters or a stand mixer with the paddle attachment, beat on medium speed for about 3 minutes, until light and fluffy. Add the eggs one at time, scraping down the sides of the bowl after each addition. Stir in the vanilla. Stir in the flour mixture in three additions alternating with the milk in two additions, beginning and ending with the flour and scraping down the sides of the bowl occasionally.
-Tip the batter into the prepared pan and use a spatula to move it to the edges and cover the fruit. Bake in the middle of the oven for 40 to 45 minutes, or until the cake bounces back slightly when touched. Cool on a wire rack for 15 minutes, then run a knife or small offset around the edge of the pan and invert the cake onto a plate, leaving the pan on top of the cake for 5 minutes before you remove it. If any pear slices stick to the pan, just lift them out and place them on top of the cake. Serve the cake warm or room temperature.
-Wrapped in plastic wrap, this cake will keep at room temperature for 2 to 3 days.
Baked Fresh Weekly

Blog at WordPress.com.
Entries and comments feeds.
