Tuesdays with Dorie: French Chocolate Brownies
June 3, 2008 at 6:04 am | Posted in cookies & bars, groups, sweet things, tuesdays with dorie | 67 Comments
Next in the queue for Tuesdays with Dorie is the recipe for French Chocolate Brownies, courtesy of Di from Di’s Kitchen Notebook. I first heard of this recipe about a year ago when it was included in a New York Times article about brownies…I saved it and (even though it doesn’t call for nuts) have been wanting to make it ever since. Seems Dorie originally intended these to be a fondant-style cake when she served them at a dinner party for French friends, but they just assumed that their American hostess had made them brownies. Dorie, not missing a beat, went right along with it, and everyone loved them!
Some TWDers noted long baking times and a dry crust as drawbacks of this recipe. Mine came out with quite a nice thin crust layer, and it wasn’t overly crackly either. I made a half recipe in a loaf pan…I took them out at the 45 minute mark, although I admit that I accidentally baked them at 325°F. Oops–I’m not always paying complete attention, but luckily no brownies were hurt due to negligence! Not quite a fudgy brownie, and not quite a cakey one either, these had an almost silky texture that I liked a lot when eaten at room temperature (not so appealing cold, though).
Something really funny that I’ve learned from TWD is that there are a lot of raisin-haters out there. I thought maybe I was the only one, so I feel better knowing I’m actually in good company. This brownie recipe called for rum-flamed raisins to be mixed into the batter, which sounded less than thrilling. I’m all for a good flambé, though, so I decided to ignite some chopped dates instead. The dates worked really well…just kind of melding into the overall sweetness of the brownies, rather than being too conspicuous.

To go alongside these faux French pastries, I made Dorie’s recipe for Faux Crème Fraîche, near the back of the book. It’s just a little vanilla whipped cream with some sour cream folded in, but somehow it made the whole thing très chic.
Open up Di’s Kitchen Notebook or Baking: From My Home to Yours by Dorie Greenspan to find the recipe. (Dorie has also written about it on Serious Eats.) Don’t forget to check out the TWD Blogroll!
Cupcake Hero: Cocoa Cupcakes with Zebra Frosting
May 29, 2008 at 12:49 pm | Posted in cupcakes, events, sweet things | 37 Comments
There has been something conspicuously absent from my diet the last few weeks. Yeah, that’s right, where’s all the chocolate? Trust me, I have noticed this and I aim to correct it now, thanks to Laurie and her cocoa powder-themed May Cupcake Hero event. What’s more, Laurie has a prize from Askinosie Chocolate up for grabs! Even if I’d been stuffing myself with the food of the gods lately, that’s all the incentive I need to make up a batch of cocoa cupcakes.
First things first, I had start with a good cake, and I knew I wanted it to be cocoa all the way through. I poked around for a chocolate cupcake recipe that would incorporate cocoa as well as buttermilk (whenever I have an already open container in the fridge, and I really try to use it up). Of course it was Ina to the rescue! She had one that sounded pretty good in her book Barefoot Contessa at Home, but it made 14 to 15 cupcakes. What a weird amount, and I certainly didn’t want that many…I didn’t even want half that. So I cut it back to a third and somehow still wound up with six cupcakes. I was a math major in college and even though those skills are a little rusty these days, I’m pretty sure six times three doesn’t equal 14 to 15. But six was actually perfect, so don’t think I’m complaining.
The frosting was a little trickier, as I didn’t have any good gimmick planned ahead for my cupcakes. Suddenly last week I realized it would be Memorial Day weekend back in the States (which you can forget all about when you’re so far away that it’s almost winter where you live), and in New York all the Mister Softee trucks would be out in force. I began to feel quite sad thinking about the annoyingly catchy tune broadcast from the trucks’ speakers and my favorite soft-serve twist cones (which I have always called a “zebra” cone). So zebra frosting it was gonna be, in buttercream form, of course!

I used a favorite whole-egg buttercream from Baking Illustrated. The amount yielded in the recipe I provide is likely more than you will need for six cupcakes (it’s probably better suited to 12), but I’ve found that trying to do a really small amount in the KitchenAid doesn’t work well. One egg isn’t enough for the whip to pick up and aerate. Just use what you think you will need and save the rest as plain to flavor and use for another batch anytime with the next couple weeks. Although, if you have a hand-held mixer (I do not), then you may have fine results making just half the provided amount.
The trick to piping it zebra-style is to first set aside half the frosting you are using in one bowl (to be left as plain vanilla). Put the remaining half in another bowl, and to that, whisk in sifted cocoa (a teaspoon at a time) until you get the desired color and taste. Then take a piping bag fitted with a wide tip and hold it wide open in one hand. Spoon in the vanilla frosting down one side of the bag and the chocolate down the other, so that the two are divided down the center. If you look into the bag, it will essentially look like a black and white cookie. You may have to squeeze out the first little bit into a bowl until you get the two halves coming through the tip.
The twisty frosting was oh-so-cute, and the cakes were moist and black as night. I didn’t even recognize the pastel cupcake liners I used! They held up well in the fridge, too. We ate ours over the course of three nights, bringing them up to room temperature first. And I don’t know if it was because we’d been so chocolate-deprived, but we inhaled those cocoa things in all of two bites!
Cocoa Cupcakes– makes 6 regular-size cupcakes
adapted from Ina Garten’s Barefoot Contessa at Home (here’s a link to the original)
4 T (2 oz) unsalted butter, at room temperature
3 T + 2 t granulated sugar
3 T + 2 t light brown sugar, packed
1 medium or large egg, at room temperature
3/4 t pure vanilla extract
1/3 c buttermilk, shaken, at room temperature
2 T + 2 t sour cream, at room temperature
2 t brewed coffee
1/3 c + 1/4 c all-purpose flour
1/3 c good cocoa powder
1/2 t baking soda
1/8 t kosher salt
-Preheat the oven to 350°F. Line cupcake pans with paper liners.
-By hand, or using a hand-held mixer, cream the butter and two sugars until light and fluffy, approximately 5 minutes. Add the egg, then add the vanilla and mix well.
-In a separate bowl, whisk together the buttermilk, sour cream, and coffee. In another bowl, sift together the flour, cocoa, baking soda, and salt.
-Add the buttermilk mixture and the flour mixture alternately in thirds to the butter/sugar/egg mixture, beginning with the buttermilk mixture and ending with the flour mixture. Mix only until blended. Fold the batter with a rubber spatula to be sure it’s completely blended.
-Divide the batter among the cupcake pans. Bake in the middle of the oven for 20 to 25 minutes, until a toothpick comes out clean (keep an eye out so you don’t overbake).
-Cool for 10 minutes, remove from the pans, and allow to cool completely on a rack before frosting.
Zebra Frosting – makes about 2 cups
adapted from a recipe for vanilla buttercream in Cook’s Illustrated’s Baking Illustrated
2 large eggs
1/2 cup (3.5 oz) sugar
1 t vanilla extract
pinch of salt
16 T (8 oz) unsalted butter, softened but still cool, cut into pieces
cocoa powder to taste
-Bring a few inches of water to a simmer in a medium saucepot. In the bowl of a standing mixer, whisk together the eggs, sugar, vanilla and a pinch of salt. Set the bowl over the simmering water (making a double boiler). Whisk gently but constantly until the mixture reaches 160°F. It should be thin and foamy.
-Transfer the bowl to the mixer and whip until light, airy and room temperature. This should take about five minutes. Reduce the speed and whip in the butter, piece by piece. If it looks curdled halfway through, it should come together as you add the remaining butter.
-Once all the butter is incorporated, beat on high speed for about a minute until light and fluffy. You can refrigerate, covered, for a least a couple weeks, or flavor straight away.
-To flavor, eyeball the portion of buttercream you will need for the amount of cupcakes you have. Let come to room temperature if chilled. Set aside half the frosting you are using in one bowl (to be left as plain vanilla) . Put the remaining half in another bowl, and to that, whisk in sifted cocoa, a teaspoon at a time, until you get the desired color and taste.
-Take a piping bag fitted with a wide tip and hold it wide open in one hand. Spoon in the vanilla frosting down one side of the bag and the chocolate down the other, so that a line basically forms down the center, separating the two. If you look into the bag, it will essentially look like a black and white cookie. You may have to squeeze out the first little bit into a bowl until you get the two halves coming through the tip. Then frost your cupcakes in a twisty swirl.
Daring Bakers in May: Opéra Cake
May 28, 2008 at 5:16 am | Posted in cakes & tortes, daring bakers, groups, layer cakes, sweet things | 81 Comments
This May, the Daring Bakers’ challenge had a quartet of hostesses– a four-part harmony, featuring founders Ivonne and Lis and newer members Fran of Apples Peaches Pumpkin Pie and Shea of Whiskful. In voices heard across the world, they sang out this month’s challenge: an opéra cake.
A traditional opéra cake is a thing of delicious beauty, carefully orchestrated with alternating layers of sponge cake, coffee buttercream and ganache, topped off with a dark chocolate glaze. As part of the challenge this month, our hostesses tasked us with rewriting the opéra for spring– the same basic components, but lightened up in flavor and color. For me, part of this challenge lay in that we are fast approaching winter here in Australia. While you can see from the flowers I pinched from a neighbor’s lawn, that I am by no means in a bare, frozen tundra, a lot of the things I may have chosen to flavor this cake are kinda off limits right now.
I’m no stranger to making opéra cake. At the first restaurant I worked for, we used little tiny pieces of the traditional version as a petit four. At least every other day for a few months, I’d make and assemble an opéra (and the scraps are dangerous– I would devour them as I portioned the cake into pieces!). Despite this, I did hem and haw my way through the month, wondering what to do flavor-wise. This past week, though, it was time to get down to business. Looking through my pantry, I realized I could easily make something that would pair perfectly with the Middle Eastern dinner I mentioned I would be making. My opéra would be composed of almond joconde moistened with lemon syrup, pistachio buttercream, lemon-rosewater mousse and white chocolate glaze.

I will make the same confession that I do with every DB challenge– I drastically scaled back the recipe. I made just one pan of joconde (the recipe halves perfectly), and only used half of that to assemble the cake. The rest I froze to use for other things, like the base for a meyer lemon bombe. My one-quarter sized opéra was small, but big enough to give the two of us dessert for three nights, and that’s about my maximum tolerance for any one particular thing.
We were allowed to use any buttercream recipe we liked…I used a whole-egg buttercream that I’ve made before, so as not to be suck with any bothersome extra whites or yolks. To turn it into a pistachio buttercream, I first eyeballed an amount of pistachios and blanched them so I could slip off their brown skins and expose their bright green insides. Then I roasted them in the oven just enough to dry them out, but not to color them, before grinding them in my mini food processor with a little bit of almond meal and drizzle of plain simple syrup. This formed a rough, homemade paste that incorporated easily into the buttercream and gave it pretty green flecks throughout.
I flavored the simple syrup used to moisten the cake layers with a few drops of lemon extract. I also used the lemon extract and rosewater to flavor the white chocolate mousse, which was the cake’s top layer, just beneath the glaze. I did this to taste–enough to make the flavor pronounced, without tasting like I swallowed a jar of perfume. (A chef that I used to work for once said that rosewater reminded him of “grandma’s panty drawer”–what?? And how the hell did he know what that smells like anyway??)
I must say that I was really pleased with how this cake came out. The joconde baked up to be my idea of the perfect height. Too thin and the joconde can be rubbery…too thick and you wind up with an opéra that’s crazy tall. I am quite particular and like all of the layers to be the same height, without feeling like there is too much of one component, and I was able to achieve that here. And the flavors were delicate, but wonderful. I was a little worried that the whole thing would be a bit too girlie for R’s tastes, but he loved it!
I tried sooo hard to get a photo of the whole cake, but it just wasn’t working for me. I couldn’t squeeze the whole thing into the frame without going on a weird angle that made it looked lopsided. That was a bummer, especially since I had bought a new platter to display it on. But it sliced really nicely, so at least I was able to get some good shots of individual pieces.

Last, but certainly not least, the Daring Bakers have dedicated this month’s challenge to Barbara of winosandfoodies.com. Even if you don’t know Barbara, it’s evident through her words that she lives everyday to the fullest and she lives strong. I think we can all sing to that.

If you haven’t had your fill of opera-related metaphors after that post, check out the DB blogroll! And visit Ivonne’s post for the recipe (which was adapted from two sources, Dorie Greenspan’s Paris Sweets and Tish Boyle’s and Timothy Moriarty’s Chocolate Passion).

Tuesdays with Dorie: Pecan Honey Sticky Buns
May 27, 2008 at 4:47 am | Posted in breakfast things, groups, sweet things, sweet yeast breads, tuesdays with dorie | 52 Comments
Oh yeah–pecans and brioche laquered in brown sugar and honey goo. Does it get any better than that? I think not.
Madam Chow of Madam Chow’s Kitchen chose Dorie’s Pecan Honey Sticky Buns for this week’s TWD, but I actually made these awhile ago (luckily I had the forethought to take a few pictures). These sticky buns share the same brioche base as the Brioche Raisin Snails the group made back in March. I had a little extra dough from those snails and I turned it into these sticky buns the following week.
I only made two buns, but they were probably double the size of Dorie’s. I don’t always think that bigger is better, but with sticky buns, I sure do! Since I was so drastically scaling down the recipe, I just eyeballed the ingredients for both the filling and the glaze. I added some chopped toasted pecans to the cinnamony-sweet swirl inside the buns as well.

With a big cup of black coffee, these are a delicious (if not quite nutritious) breakfast! You can find the recipe here on Madam Chow’s Kitchen or in Baking: From My Home to Yours by Dorie Greenspan. Don’t forget to check out the TWD Blogroll!
SHF#43: Meyer Lemon Ice Cream Bombe
May 24, 2008 at 11:28 am | Posted in events, ice creams & frozen, sweet things | 33 Comments
I don’t often make this kind of thing at home. I’ll leave the plated dessert nonsense for work, thanks very much (although this is not even close to restaurant-worthy). But R was in Korea for four days this week, and I had too much time on my hands. Also, I thought he’d like having a special dessert when he came home.
I’ve called this a “bombe,” but if you’d like to think of it as “baked Alaska,” that’s fine, too. I originally thought to do some version of this as a means to use up some extra sponge cake in the freezer and some yolks in the fridge. I could have gone in any number of directions flavor-wise, but I wanted to send Tartelette one more entry for her Sugar High Friday (an event started by Jennifer The Domestic Goddess) citrus extravaganza, so I settled on a meyer lemon ice cream bombe with orange caramel sauce hiding in the center.

If you’re into making ice cream, then this isn’t too complicated if you start the whole process a couple days ahead. Make your ice cream custard and caramel sauce one day, run the ice cream and mold it the next. Then the day of, assemble, make your meringue and plate up! And if you’re not into making ice cream, then I think store-bought would do just fine, and would save a lot of prep. Having cake in the freezer and a silicone semi-spherical mold (like this) in the cupboard helps, too.

The ice cream is snappy, and combined with the meringue, is a bit reminiscent of LMP. The orange juice and zest in the caramel help temper some of its sweetness. This is like a self-contained ice cream sundae, and it’s good!
Meyer Lemon Ice Cream Bombe– makes 6 individual bombes (of this size)
Note: If you don’t have a silicone mold, you can put a large scoop of ice cream onto cut cake circles and just serve the sauce on the side. I don’t give a recipe for the cake here, but I used scraps from the jaconde used in my opéra cake (any relatively thin sponge cake will do).
Day 1: Make the custard base for the meyer lemon ice cream (recipe below; save your egg whites for the meringue) and chill in the refrigerator. Put your ice cream machine canister in the freezer, if necessary. Make the orange caramel sauce (recipe below) and chill. If you don’t already have cake available, make or buy the cake and freeze.
Day 2: Freeze the meyer lemon ice cream base according to your machine’s instructions. Using a spoon, fill the cavities of your dome molds with the ice cream, making sure to nudge it against the side of the molds, and level off each one with an offset spatula or the back of a knife. Lay your silicone molds on a sheet pan and freeze for about 4 hours. Once semi-hardened, using a spoon or a small ice cream scoop, hollow out a cavity in the middle of each mold. This cavity will hold the caramel sauce, so be sure to leave enough ice cream “cushion” around it. Press plastic wrap against the exposed surface of the ice cream and return the molds to the freezer overnight to harden.
Day 3: No more than a couple of hours before serving, cut out cake circles using a round cutter that matches the diameter of the bottom of the mold. Take the tray holding the silicone molds out of the freezer. Using a spoon or a squeeze bottle, fill the cavities in of each bombe with orange caramel sauce. Lightly press a cake circle onto each bombe, and pop out of the silicone mold. Place back on the sheet tray, cake side down (the caramel shouldn’t leak out). Return the tray to the freezer. Prepare the Swiss meringue (recipe below) and use a small offset spatula to cover the bombe. Either brown the meringue with a kitchen blowtorch, or bake in a preheated 500°F oven until meringue is deep brown in spots, turning the sheet pan as needed for even cooking, about 3 minutes. Transfer to plates and serve (or you can return the bombes to the freezer for up to a couple of hours, if necessary).
Meyer Lemon Ice Cream Base
modified from a recipe on Epicurious
Note: The xanthan gum in the recipe is optional, and helps keep ice crystals from forming as the ice cream sits in the freezer. It is a powder and can be found in most health food stores.
1 1/2 c heavy cream
1 c milk
3/4 c sugar
2 T finely grated fresh meyer lemon zest
1/8 t salt
6 large egg yolks
2/3 c fresh meyer lemon juice
pinch of xanthan gum (under 1/8 t)
-Take about half of the sugar and put into the bottom of a 2-quart heavy saucepan. Add the lemon zest and rub into the sugar using your fingers. Add the cream, milk and salt to the pan and bring just to a boil, stirring occasionally. Take off the heat and set aside for about ten minutes to infuse the flavor of the zest.
-Beat yolks and the remaining sugar well in a large bowl, then add hot sweetened cream in a slow stream, whisking. Pour custard into saucepan and cook over moderately low heat, stirring constantly with a wooden spoon, until a candy or instant-read thermometer registers 170°F and custard coats back of spoon, about 10 minutes.
-Pour through a sieve into a clean bowl, then stir in meyer lemon juice. Cool custard, stirring occasionally, then chill until cold, preferably overnight, before freeing in an ice cream machine.
Orange Caramel Sauce
1 c sugar
1 T light corn syrup or golden syrup
pinch of salt
1/4 c water
1/2 c heavy cream, heated
2 T unsalted butter
zest and juice of half an orange
–In a medium saucepan, stir together the sugar, syrup, salt and water until the sugar is completely moistened. Wash down any sugar that is stuck to the side of the pot with a wet pastry brush or wet fingers. (Sugar granules on the side could cause your caramel to crystallize.) Allow it to boil undisturbed until it turns deep amber in color (380°F.). Immediately remove it from the heat and slowly and carefully pour the hot cream into the caramel. It will bubble up, so stand back.
-Use a whisk or wooden spoon to stir the mixture until smooth, scraping up the thicker part that settles on the bottom. If any lumps develop, return the pan to the heat and stir until they dissolve. Stir in the butter and the orange zest and juice. Cool. Store in a jar in the refrigerator.
Swiss Meringue
Note: If you are afraid you will not be able to work quickly enough rather than pull out the full tray, you can remove the unmolded bombes from the freezer and meringue them one by one, returning each one to the freezer before removing the next.
4 egg whites (about 1/2 cup)
1 cup sugar
-Combine sugar and egg whites in large metal bowl or the bowl of a stand mixer. Set bowl over saucepan of gently simmering water and whisk until mixture is hot to the touch and all the sugar has dissolved, about 2-3 minutes. Remove bowl from over water. Using the stand mixer fitted with the whip or a handheld electric mixer, beat meringue at high speed until very thick and billowy and room temperature, about 2-3 minutes.
-Place sheet tray with unmolded, assembled bombes on work surface. Mound 2 heaping tablespoons meringue atop ice cream on 1 cake round. Spread meringue evenly over to cover, sealing meringue to plain cake border and swirling decoratively. Repeat with remaining desserts.
Tuesdays with Dorie: Traditional Madeleines
May 20, 2008 at 3:37 am | Posted in cakes & tortes, cookies & bars, groups, simple cakes, sweet things, tuesdays with dorie | 55 Comments
I’d been crossing my fingers that Tara of Smells Like Home would choose a cookie for this week’s Tuesdays with Dorie recipe. Then Tara picked Dorie’s Traditional Madeleines–score! I know that a madeleine is really cake in cookie’s clothing, but after all the hard-core desserting I’ve been doing (and still have left to do this month), I was happy to have something that’s just a sweet bite.
I have fond voluntary (as opposed to Proustian-ha!) memories of these little scalloped-shaped cuties. Actually my memories are quite recent, as we made madeleines as part of the petits fours plate at the restaurant I last worked for. That recipe uses browned butter and almond flour, and we made a variety of flavors, from lavender to lemon-thyme, depending on what we felt like or what we had available.

Dorie’s recipe is flavored with lemon zest, and even though she doesn’t instruct you to brown the melted butter, I went ahead and did it anyway. Browned butter just has such a beautiful flavor, I used my non-stick mini madeleine pan (which is the only one I have, and trust me, you still need to grease it well) to bake them off, and made half of Dorie’s recipe. Rather than sprinkling them with powdered sugar before serving, I tossed the still-warm madeleines in some finely ground vanilla sugar.
I will say that these make very good little lemony tea cakes. They are soft and light and tasty (do bake them right when you are ready to eat them though, as they stale quickly). But I have one gripe. If we are talking about “tradition” here, then madeleines are supposed to have a bump on their backsides. We learned in culinary school that the bump is desirable, and our instructor said that madeleines are often presented with their bums in the air (rather than scalloped side up) to show them off. Dorie calls for chilling the batter for at least three hours to help form this bump. The same day I made the batter, I baked up half of it after letting it chill for several hours. No bump. The next day, I baked up the remaining batter (it had now been chilling overnight). Two madeleines had the bump…the rest didn’t. Ah well…after conferring with other TWDers, this seemed to happen to most everyone. And as Ulrike pointed out, even the Traditional Madeleines pictured in Dorie’s book don’t have bumps!

If you’d like to try your hand at baking madeleines (and see if you get the coveted golden bump!), you can find the recipe here on Smells Like Home or in Baking: From My Home to Yours by Dorie Greenspan. Don’t forget to check out the TWD Blogroll!
SHF#43: Lemon Yogurt Cake with Marmalade Glaze
May 18, 2008 at 7:57 pm | Posted in cakes & tortes, events, simple cakes, sweet things | 28 Comments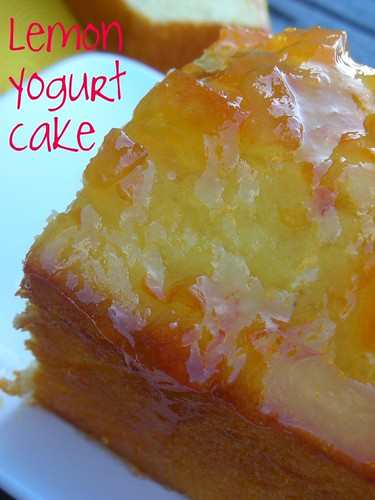
Do you ever find yourself with one or more of the following things in your refrigerator?:
- An extra lemon that you bought a week ago, and is now just rolling back and forth every time you move something around it
- A huge tub of plain yogurt (because the plain only comes in huge tubs, but that’s what you like to eat on your granola) that you don’t know if you’ll be able to finish before it turns icky
- A jar of grapefruit marmalade that looked so beautiful, you had to buy it at the farmers’ market, but now it’s been open forever because it’s actually too thick-cut to be enjoyable on your toast or PB&J
Well, today I realized I had all three and I needed to do something about it. That something was to bake a lemon yogurt cake with marmalade glaze. Yogurt cake is a cousin to pound cake…the cousin you call on when you don’t quite need all those pounds, if ya know what I mean. The yogurt keeps it tender and a little oil keeps it moist. It has a light texture that’s a bit spongier than pound cake.
This is particular recpie is one that my friend P photocopied for me from Bon Appétit magazine a few years ago. I only have the recipe itself, and not the article associated with it, but I noticed that it bears a striking similarity to a recipe I’ve seen in Baking: From My Home to Yours by Dorie Greenspan. After a little Internet research, I found that it is in fact a Dorie recipe– a slightly altered version of what’s in her book. While I’ve made another lemon yogurt cake here before, I’ve actually baked this one a few times, too, with assorted maramalades on top, making my own small tweaks along the way. I prefer to cut down a bit on the oil in the original version and ramp up the lemon. I’ve made those changes in the recipe below, but I link to the original as well.
This cake is happy and sunny; sweet but with a little pucker from the marmalade. And loaf cakes are easy to make, giving you the sugar high you’re after with minimal effort. Speaking of which, I’m sending this over to Tartelette who’s hosting a sweet-tart, citrusy version of Sugar High Friday (started by Jennifer The Domestic Goddess) this month!

Yogurt Cake with Marmalade Glaze– makes one loaf pan
modified from a recipe in Bon Appétit by Dorie Greenspan, February 2005
For the cake:
1 1/2 c all-purpose flour
2 t baking powder
1/4 t salt
1 c plain yogurt (whole-milk or low fat)
1 c sugar
3 large eggs
finely grated peel from 1 lemon
juice of half a lemon
1/3 c vegetable oilFor the glaze:
1/4 c lemon, orange, or grapefruit marmalade
1 t water
-Position rack in center of oven and preheat to 350°F. Generously butter 8 1/2×4 1/2×2 1/2-inch metal loaf pan.
-Sift flour, baking powder, and salt into medium bowl.
-Combine yogurt, sugar, eggs, lemon peel and lemon juice in large bowl; whisk until well blended. Gradually whisk in dry ingredients. Using rubber spatula, fold in oil.
-Transfer batter to prepared loaf pan. Place cake on baking sheet in oven and bake until cake begins to pull away from sides of pan and tester inserted into center comes out clean, about 50 minutes.
-Cool cake in pan on rack 5 minutes. Cut around pan sides to loosen cake. Turn cake out onto rack. Turn cake upright on rack and cool completely. (Can be made 1 day ahead. Wrap and store at room temperature.)
-Stir marmalade and 1 teaspoon water in small saucepan over medium heat until marmalade melts. Brush hot mixture over top of cake. Let glaze cool and set before cutting.
Tuesdays with Dorie: Florida Pie
May 13, 2008 at 4:08 am | Posted in groups, pies & tarts, sweet things, tuesdays with dorie | 57 Comments
“What the heck is Florida Pie?” you ask. It’s basically a key lime pie with a couple of coconutty embellishments, and it happens to the TWD pick o’ the week from Dianne of Dianne’s Dishes. Dorie’s Florida Pie has the standard crumb crust and lime juice/condensed milk filling, but it also has a layer of coconut cream in between said crust and filling, and coconut folded into the meringue topping. I decided to go for mini pies, and half a recipe of filling gave me three babies. Mini pies do have a higher crust to filling proportion than full size pies, so I probably used about 2/3 recipe of crust.
I didn’t stray too far from Dorie’s instructions this time, but I did make a couple tweaks. I used regular (not key) limes and condensed low fat milk in the filling, which worked nicely. And for the coconut cream layer, I used way less cream than she called for, probably just a few tablespoons, and wound up with something more like a tasty goo. I also toasted my coconuts (both the shredded stuff I used in the goo, and the fine desiccated stuff I folded into the meringue), because I think it really brings out the flavor of packaged coconut, which can be pretty lackluster as-is.

“How did it taste?” you ask. Pretty darn good. Next time, I’ll add a little lime zest to the filling. I really like the combination of coconut and lime, but if you aren’t a coconut fan, just leave out the cream layer and keep your meringue unflavored. You’ll still wind up with a fantastic key lime pie. If you’d like to be transported via baking to Key West, Del Boca Vista, or the Floridian destination of your choice, put on your Lilly Pulitzer and check out the recipe here on Dianne’s Dishes, or in Baking: From My Home to Yours by Dorie Greenspan. Don’t forget to go look at the TWD Blogroll!
Tuesdays with Dorie: Peanut Butter Torte
May 6, 2008 at 4:27 am | Posted in cakes & tortes, groups, sweet things, tuesdays with dorie | 65 Comments
There are a few recipes in Baking: From My Home to Yours whose pictures and titles are so alluring, I’ve been surprised no one’s chosen them for TWD yet. Well, the time has finally come for one of these, as Elizabeth of Ugg Smell Food has picked Dorie’s Peanut Butter Torte as our recipe of the week! Kind of like the Snickery Squares, I think Dorie has played candy bar dress-up here, except this time the candy in question is a Reece’s cup. I don’t mean to sound like a buzzkill, but the ingredient list is a little frightening, I have to tell you…Oreos, peanut butter, cream cheese, heavy cream, chocolate and peanuts. April was my busiest posting month to date, so that means it was also a very busy eating month. If I didn’t want to feel my heart racing (in a bad way) with each bite, I knew I had to tweak this torte a bit.
It was a given that was not going to make a full-sized torte. I rarely make a full-sized anything for the two of us. My six-inch springform would be prefect for a half recipe, and I’d still get six pieces out of it, but even a half batch seemed like so much cream and peanut butter. After some intense volume calculations (not really), I decided that I could still use my six-inch pan and get away with just a quarter recipe of the filling. Sure, it wouldn’t be as high as the one in Dorie’s picture, but I didn’t mind if my torte looked more like a tart.
I am a peanut butter fanatic, and I love the sugary, salty, junky stuff. I am sorry to say though that I don’t think the Aussie peanut butter is very good…it’s pale and doesn’t have peanuty specks in it. That may explain why, according to an informal poll taken by yours truly, it doesn’t seem to be a popular food item here (I was even told by someone that my favorite lunch, PB&J, is gross!). No matter–I’ve been “importing” my own peanut butter since my first trip back to the States. My current PB of choice is reduced fat Jif (smooth, never crunchy) so that’s what I decided to go with in this torte.

Back in the US, I wouldn’t think twice about swapping full fat cream cheese for the light Philly they label “Neufchâtel.” Here, though, the light Philly doesn’t have the same consistency at all…it tastes good, but even straight out of the fridge, it’s incredibly soft. Further inspection of the package says that it’s a blend of cream cheese and cottage cheese, so I guess that’s why. I didn’t think my filling would set up properly if I used it, so I went with the light version of a New Zealand brand called Mainland.
I also decided that rather than using Oreos to make my crust, I’d save a few more fat grams and use some almond cookie crumbs that I had in the freezer already. Adding cocoa powder turned them into chocolate crumbs.

I’m happy to report that my filling set up nicely after several hours in the fridge, and although I can imagine how wonderful the full blown PB torte would be, the skimpy version was still great! I loved the chocolate-peanut crunchy bits throughout the filling. Now you know my tricks, but you can find the original version of this recipe in Baking: From My Home to Yours by Dorie Greenspan, and on Elizabeth’s site. Don’t forget to go check out the TWD Blogroll!
Cupcake Hero: Rhubarb-Filled Yogurt Cupcakes for Mother Earth
April 30, 2008 at 5:55 pm | Posted in cupcakes, events, sweet things | 28 Comments
Kermit the Frog summed it up best when he sang, “It’s not easy being green.” I tell ya, you want to buy organic products, but they’re nowhere near local. You take your own tote bags to the grocery store, but you still have to practically wrestle the plastic ones out the the cashier’s hands. You try to recycle as much as possible, but then your neighbor throws her baby’s dirty diapers into the plastics recycling bin (nice!). And it’s expensive, even more so in Sydney than in New York. You should see the amount of cazash I plonk down at the growers’ markets here ($27 for an organic chicken last week!), and the enviro-friendly cleaning products cost a small fortune.
What’s a little frog to do? The best she can, I guess. I’m happy to see that a lot of bloggers have gone green during April to celebrate Earth Day. These may not be the most kid-friendly cupcakes, but I wanted to make something earthy, delicious and maybe even slightly healthy for Cupcake Hero‘s own celebration of the planet. We all know that cupcakes make the world go ’round!
These should be called “rhubarb-filled yogurt cupcakes with lemon butter icing and pistachios,” but that’s a little long, don’t cha think? To make these, I used as many organic and/or local products I could. The exceptions are the baking powder and baking soda (which I think exist in organic form, but I couldn’t find them at the health food store) and the icing sugar (which although not organic, and certainly not local, is unrefined). The pistachios, lemon and rhubarb came from a local farmers’ market, and everything else from either the regular grocery store (which stocks a good range of organics) or the health food store. None of these items even required a car ride…all were picked up within reasonable walking distance from my place. And, while I am the first to admit that my giant collection of cupcake papers borders on the crazy, in efforts to make as little waste as possible, I baked these au naturel .

The cupcakes are delicious, moist and not too sweet. Their brown color comes from Alter Eco’s organic ground cane sugar. This is more like a soft brown sugar than a white granulated one. The cupcakes domed a bit in the oven, which at first had me a little peeved, but then I used it to my advantage, as they appear to have a huge mound of frosting on top, but really the amount is quite modest. My favorite part is hidden inside–the rhubarb compote, which you can modify according to your own sweetness preference. I made a big bunch, because whatever doesn’t get used in the cupcakes is amazing on top of oatmeal or with granola and yogurt. The icing is so simple, and it is great with the rhubarb. The refined icing sugar (I used Billington’s) is less harshly sweet, if you know what I mean, than regular powdered sugar and it is and a beautiful ivory color…I should always use this stuff.

Rhubarb-Filled Yogurt Cupcakes– makes 6 regular-size cupcakes
-Start by making and chilling the rhubarb compote (process below).
-Bake and cool the yogurt cupcakes (recipe below).
-If your pistachios have papery skins on them, blanche them for a minute in boiling water. Drain them, and once cool enough to handle, slip off the skins. Chop them roughly.
-Make the lemon butter icing.
-To fill the cooled cupcakes, use a small knife or round cookie cutter to cut a plug out of the center of each (going in from the top). Save the top bit of each plug. Fill each cavity with rhubarb compote. Cover with the top bit so the filling is not exposed.
-Top with the icing and sprinkle on the chopped pistachios.
Rhubarb Compote
Note: This is more of a process than a recipe, and can be adjusted depending upon the amount of rhubarb you have and how sweet you would like it to be. I’d use at least 6 stalks, and any leftover compote is great on oatmeal or with yogurt.
-Trim off the tops and bottoms of each stalk of rhubarb. Use a pairing knife to peel away any strings. Cut into 1-inch pieces.
-Weigh the cut rhubarb. Measure out sugar equal to 1/4 to 1/3 of the weight of the rhubarb, depending on how sweet you’d like it. If you don’t have a scale, you can eyeball or use cup measurements.
-Put rhubarb pieces and sugar into a heavy-bottomed pot. Add a small splash of water (just to keep the rhubarb from burning) and place over medium heat. Stir frequently to keep from sticking to the bottom.
-Simmer for several minutes until the rhubarb releases its juice and the sugar is dissolved. The rhubarb will soften and break down and the liquid should be reduced (although if you have an excessive amount, you can tip it out). All this will probably take about 10 minutes, unless you are working with a very large quantity.
-Transfer to a container and chill. This will keep for a week or two.
Yogurt Cupcakes– makes 6 regular-sized cupcakes
heavily modified from The 1997 Joy of Cooking
Note: I used salted butter in this recipe, as it is the only organic kind sold here (therefore, there is no added salt in the ingredients list). If you are using unsalted butter, add a 1/4 t salt in with the dry ingredients.
1 c sifted all-purpose flour
1/2 t baking powder
1/4 t baking soda
2 1/2 T salted butter, room temperature
1/2 c sugar
1/2 egg (break egg into a cup, whisk it and pour out half)
1 egg white
1/2 t vanilla
1/2 c plain yogurt (full or nonfat), cool room temperature
-Preheat the oven to 350°F/180°C and spray and flour six cavities of a muffin tin (or line with six paper cups).
-Sift together the flour, baking powder and baking soda. Set aside.
-Beat the butter in a large mixing bowl until creamy. Gradually add the sugar and beat until light in color and texture. (The amount was too small for my stand mixer, so I did it by hand. Handheld electric beaters would also work well.)
-Whisk together the 1/2 egg, egg white and vanilla. Gradually beat into the butter/sugar mixture until thoroughly combined.
-Add the dry ingredients and yogurt in three parts, alternating and beating smooth after each addition.
-Divide the batter in the tin, and cook for about 20-25 minutes, until a toothpick comes out clean. Cool in the tins for a few minutes and then transfer to a rack to cool completely.
Lemon Butter Icing– makes enough to generously frost 6 cupcakes
adapted from Everyday by Bill Granger
4 T butter (salted or unsalted), room temperature
3 3/4 oz powdered sugar, sifted
2 t lemon zest (finely grated)
2t lemon juice
-Beat the butter until very soft and white. Beat in the powdered sugar, lemon zest and juice. (You can adjust consistency with either extra powdered sugar or lemon juice.)
Baked Fresh Weekly

Blog at WordPress.com.
Entries and comments feeds.

