Daring Bakers in December: Gingerbread House
December 25, 2009 at 1:11 pm | Posted in cookies & bars, daring bakers, groups, other sweet, sweet things | 20 Comments
Welcome to my home– my gingerbread home! Let me show you around inside. It’s nothing fancy. Just four walls and some spackling. Oh, and mind your head…the roof has quite a slope.
Anna of Very Small Anna and Y of Lemonpi had us break out our hard hats and toolboxes to construct our very own gingerbread houses for this month’s Daring Bakers’ challenge! As a result, I’m sure you’ll tour some ultra tricked-out gingerbread houses around Food Blog Avenue this Christmas. Mine’s more of a cottage, really…some may say a shack…but I’m quite pleased with it. And it’s now over two weeks old, so I know it’s solidly built!
I used the Scandinavian Gingerbread recipe provided by Y, found an easy template, and started construction. I needed just half a recipe of dough, and I actually added a spoonful of cocoa powder to it, just to make the color a bit darker. Some windows, a sanding sugar snowstorm and a wreath out front, and I was a proud homeowner in just a few hours!
I wish you all a very Merry Christmas, and I’m sure I’ll see you again before the new year!

Scandinavian Gingerbread (Pepparkakstuga)
adapted from The Great Scandinavian Baking Book by Beatrice Ojakangas
1 cup butter, room temperature [226g]
1 cup brown sugar, well packed [220g]
2 tablespoons cinnamon
4 teaspoons ground ginger
3 teaspoons ground cloves
2 teaspoons baking soda
½ cup boiling water
5 cups all-purpose flour [875g]
-In a large bowl, cream the butter and sugar until blended. Add the cinnamon, ginger and cloves. Mix the baking soda with the boiling water and add to the dough along with the flour. Mix to make a stiff dough. If necessary add more water, a tablespoon at a time. Chill 2 hours or overnight.
-Cut patterns for the house, making patterns for the roof, front walls, gabled walls, chimney and door out of cardboard.
-Roll the dough out on a large, ungreased baking sheet and place the patterns on the dough. Mark off the various pieces with a knife, but leave the pieces in place.
-Roll out the dough on a floured bench, roughly 1/8 inch thick (which allows for fact that the dough puffs a little when baked), cut required shapes and transferred these to the baking sheet. You can save any scraps to reroll at the end.
-Preheat the oven to 375’F (190’C). Bake for 12 to 15 minutes until the cookie dough feels firm. After baking, again place the pattern on top of the gingerbread and trim the shapes, cutting the edges with a straight-edged knife. Leave to cool on the baking sheet.
Royal Icing
1 large egg white
3 cups (330g) powdered sugar
1 teaspoon white vinegar
1 teaspoon almond extract
-Beat all ingredients until smooth, adding the powdered sugar gradually to get the desired consistency. Pipe on pieces and allow to dry before assembling. If you aren’t using it all at once you can keep it in a small bowl, loosely covered with a damp towel for a few hours until ready to use. You may have to beat it slightly to get it an even consistency if the top sets up a bit. Piped on the house, this will set up hard over time.
The December 2009 Daring Bakers’ challenge was brought to you by Anna of Very Small Anna and Y of Lemonpi. They chose to challenge Daring Bakers’ everywhere to bake and assemble a gingerbread house from scratch. They chose recipes from Good Housekeeping and from The Great Scandinavian Baking Book as the challenge recipes.
Daring Bakers in October: French Macarons
October 27, 2009 at 11:09 am | Posted in daring bakers, groups, petit fours, sweet things | 41 Comments
Having spent several years working in the restaurant biz, I’ve made a lot of macarons. These sweet little almond-meringue sandwiches are a standard confection on fine-dining petit fours plates, so if I spend long enough at any one place, I know they are bound to come up in the rotation at some point. (I worked for one pastry chef who used to have side-by-side piping races with me everyday…he usually won, but then again, he had years more experience and he would always try to slow me down by making me giggle.) Macarons are also quite en vogue right now, both in pastry shops and in the blogoshpere, but this is their first appearance here…in fact, I had never made them at home before Ami chose them as this month’s Daring Bakers’ challenge.
Macarons can be tricky little things, even when you have made countless batches. Sometimes you pipe them out and are convinced that they will be perfect, only to bake them and have them come out misshapen or with no feet. Other times you are convinced that something has gone wrong, and then they bake up spot-on. And you really never know how it will go when you make a recipe that is not the one you are used to. I will say that this is not my best batch ever, but…ummm…it’s not my worst either. I think I underbaked them a bit, but that is an easy enough problem to fix.
The recipe that follows makes very basic almond macarons. But think of it as just a starting point…you can experiment by combining different nut flours and flavorings or add coloring. Some good filling options include buttercream, ganache, caramel and jam. There are endless possibilities for experimentation here, and that, to me, is the cool thing about macarons.
I took inspiration from what I had in the house to come up with a strawberry cheesecake flavored macaron. I blitzed some freeze dried strawberries (bought at TJs) that I had in the cupboard to a fine dust in my spice grinder. I added a few grams of this powder, along with a tiny bit of powdered red food coloring to enhance the pink hue, in with my dry ingredients. To fill the macarons, since I didn’t feel like making a large batch of buttercream and I didn’t have any cream to make a ganache, I whipped a little cream cheese with some powdered sugar and vanilla bean paste. I piped a little blob of this “cheesecake” mixture onto one half of each macaron and smeared a little strawberry jam on the other half before sandwiching them together.
P.S.: The chocolates you see alongside my strawberry cheesecake macarons are from Bond Street Chocolate, a funky little shop here in the East Village.
French Macarons
adapted from The Last Course: The Desserts of Gramercy Tavern by Claudia Fleming
2 ¼ cups (225 g, 8 oz.) confectioners’ (icing) sugar
2 cups (190 g, 6.7 oz.) almond flour
2 tablespoons (25 g , .88 oz.) granulated sugar
5 egg whites (room temperature; whites that are a few days old are best)
-Preheat the oven to 200°F (93°C). Combine the confectioners’ sugar and almond flour in a medium bowl. If grinding your own nuts, combine nuts and a cup of confectioners’ sugar in the bowl of a food processor and grind until nuts are very fine and powdery. (Steph’s note: Even when using purchased almond four, I like to grind it, along with the full amount of confectoiners’ sugar and any other dry flavorings or colorings, in the food processor to throughly incorporate the dry ingredients.)
-Beat the egg whites in the clean dry bowl of a stand mixer until they hold soft peaks. Slowly add the granulated sugar and beat until the mixture holds stiff peaks.
-Sift a third of the almond flour mixture into the meringue and fold gently to combine. If you are planning on adding zest or other flavorings to the batter, now is the time. Sift in the remaining almond flour in two batches. Be gentle! Don’t overfold, but fully incorporate your ingredients.
-Spoon the mixture into a pastry bag fitted with a plain half-inch tip (Ateco #806). You can also use a Ziploc bag with a corner cut off. It’s easiest to fill your bag if you stand it up in a tall glass and fold the top down before spooning in the batter.
-Pipe one-inch-sized (2.5 cm) mounds of batter onto baking sheets lined with nonstick liners (or parchment paper).
-Bake the macaroon for 5 minutes. Remove the pan from the oven and raise the temperature to 375°F (190°C). Once the oven is up to temperature, put the pans back in the oven and bake for an additional 7 to 8 minutes, or lightly colored.
-Cool on a rack before filling.
The 2009 October Daring Bakers’ challenge was brought to us by Ami S. She chose macarons from Claudia Fleming’s The Last Course: The Desserts of Gramercy Tavern as the challenge recipe.
Daring Bakers in September: Vols-au-Vent with Michel Richard’s Puff Pastry Dough
September 27, 2009 at 12:05 am | Posted in daring bakers, groups, other savory, other sweet, savory things, sweet things | 97 Comments
After more than two years as a Daring Baker (it all started with a mirror cake…), I’m so excited that Liz and Ivonne have asked me to host a challenge! Woo-hoo! But oh no–what to pick?? Looking over past challenges, I realized that we’ve covered a lot of territory! One thing we haven’t made since I’ve been in the group, though, is our own puff pastry (aka pâte feuilletée). Puff is something most of us usually buy at the grocery store, but in order to be really daring, we should try to make our own at least once, right?
Puff pastry is in the “laminated dough” family, along with Danish dough and croissant dough. (In fact, if you participated in the Danish Braid challenge back in June 2008, then you already know the general procedure for working with laminated dough.) A laminated dough consists of a large block of butter (called the beurrage) that is enclosed in dough (called the détrempe). This dough/butter packet is called a paton, and is rolled and folded repeatedly (a process known as “turning”) to create the crisp, flaky, parallel layers you see when baked. Unlike Danish or croissant however, puff pastry dough contains no yeast in the détrempe, and relies solely aeration to achieve its high rise. The turning process creates hundreds of layers of butter and dough, with air trapped between each one. In the hot oven, water in the dough and the melting butter creates steam, which expands in the trapped air pockets, forcing the pastry to rise.
I picked a recipe for homemade puff pastry from Michel Richard, as it appears in the book Baking with Julia by Dorie Greenspan. In order to showcase off the hundreds of flaky, golden, buttery layers in the homemade puff, we formed a portion of it into vols-au-vent– little puff pastry cases designed to hold a filling. They can be made large enough for a full meal, or made small for little one-bite canapés. Vols-au-vent are typically served hot and filled with a creamy savory filling (often poultry or seafood-based), but cold fillings, such as chicken or tuna salad, work, too. Whipped cream or pastry cream with fresh or stewed fruit often goes into sweet versions.

Sizes of and fillings for the vols-au-vent were left up to the individual baker. I made three types: a smoked salmon mousse canapé, a larger main course-size filled with tuna salad and a sweet version with vanilla whipped cream and bright red tristar strawberries.

As it’s a little long, here’s a printable link to the recipe for puff pastry, as well as instructions for forming vol-au-vents and some extra tips. Also, there is a wonderful on-line video from the PBS show “Baking with Julia” that accompanies the book. In it, Michel Richard and Julia Child demonstrate making puff pastry dough (although they go on to use it in other applications). Dont’ be put off by the length of time it takes to make your own puff pastry (most of it is inactive, while waiting for the dough to chill between turns)…it really isn’t that hard to do! I encourage anyone who has never made puff before to take a look at the video, get some good butter, and give it a try!
Thanks so much to everyone who participated in this month’s challenge– I know it required a lot of time and a lot of butter, both of which are precious commodities. I appreciate your feedback and advice in the forums…not to mention your fabulous results!! Also, of course, great big hugs go to Liz and Ivonne, not only for starting this group, but for keeping it alive and fun and so well-organized! Check out the Daring Bakers’ Blogroll for more adventures in puff!
The September 2009 Daring Bakers’ challenge was hosted by Steph of A Whisk and a Spoon. She chose the French treat, Vols-au-Vent based on the Puff Pastry recipe by Michel Richard from the cookbook Baking With Julia by Dorie Greenspan.

Daring Bakers in June: Bakewell Tart
June 27, 2009 at 1:32 am | Posted in daring bakers, groups, pies & tarts, sweet things | 40 Comments
June’s Daring Bakers’ challenge is Bakewell Tart, brought to us by Jasmine of Confessions of a Cardamom Addict and Annemarie of Ambrosia and Nectar. This traditional English tart consists of a sweet shortcrust pastry, which is spread with jam or curd and topped with almond frangipane.
The day before this challenge was announced, I had gotten strawberries and rhubarb as part of my weekly Greenmarket haul. I made them into a compote with my morning granola in mind, but after reading the challenge, I knew it would be perfect for the jam component of the tart. This was pretty easily assembled, and tasted great (especially with whipped cream)! Next time, I’ll use a tart ring with higher sides, so I can fit in more frangipane– I love that stuff!

Check out of Confessions of a Cardamom Addict and Annemarie of Ambrosia and Nectar for the Bakewell Tart recipe, and visit the Daring Kitchen site to see what everyone else is up to!
The June Daring Bakers’ challenge was hosted by Jasmine of Confessions of a Cardamom Addict and Annemarie of Ambrosia and Nectar. They chose a Traditional (UK) Bakewell Tart… er… pudding that was inspired by a rich baking history dating back to the 1800’s in England.
Daring Bakers in May: Strudel, Two Ways
May 27, 2009 at 2:23 am | Posted in daring bakers, groups, other savory, other sweet, savory things, sweet things, veggies | 43 Comments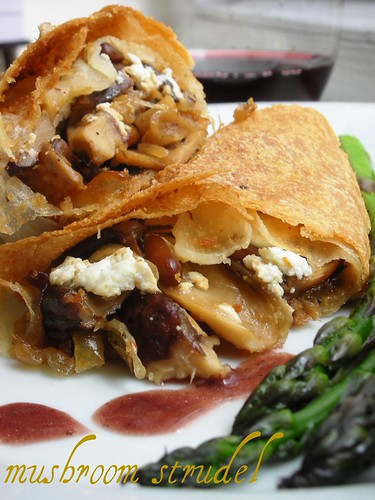
Courtney of Coco Cooks and Linda of make life sweeter! picked a fantastic Daring Bakers’ challenge this month– strudel! Just thinking about strudel makes me long to re-visit Vienna and Budapest, cities that I travelled to long ago. At just nineteen, it was too bad I didn’t know then what I know now about pastries. Actually, maybe it was a good thing– I would never have seen the sights because I would have been sitting in coffee houses all day long!
Prior to this, the only time I’ve made true strudel dough was while studying at the FCI. I vividly remember my partner in strudel-making crime, S, and I struggling with a huge ball of dough, stretching it gently over our hands to eventually cover our entire worktable. I also vividly remember that taking more patience and concentration than I’m normally willing to put in, so whenever I’ve made strudel at home, I’ve gone the lazy route and used store-bought phyllo instead!
My dessert schedule is rather full on at the moment, so I thought something savory would be the smartest way to get this challenge done. Mushrooms immediately came to mind as a tasty strudel filling, and here I used a combination of crimini, shitake and trumpet. I sautéed them first, mainly so I knew they would be cooked through and seasoned properly, but also to release their liquid so the pastry wouldn’t turn soggy. Caramelized onions, garlic, pine nuts and goat cheese all sounded like good things to add to ‘shrooms, and went into the mix. I have to say that I just winged my filling measurement-wise, and was quite please to have a bit left-over…it will make tomorrow morning’s omelette that much better.
There are only two of us here at home, so I just made a half-recipe of the dough. It was a really easy amount to deal with, and I stretched it solo on a clean tea towel with no problems at all– very little patience and concentration required, thank you! My strudel-for-two was a cinch to fill and transfer as well. The mushrooms and goat cheese made a wonderful, hearty filling…perfect for a cool spring day like today. A glass of red wine and some asparagus on the side…much to R’s dismay, I was belting out “I am Sixteen Going on Seventeen” at the dinner table (OK, so that was probably just the wine)!
I had only planned to make the mushroom strudel, but I had the teensiest bit of dough left after rolling it, so I made a couple of two-bite apple strudels as well. Since they were so small, to make the filling, I just grated half an apple, squeezed most of the liquid out, and tossed it with dark brown sugar, cinnamon and chopped pecans. And the only way to eat apple strudel? Mit schlag, of course!

This was a really fun recipe to make, and it’s very adaptable. Sweet and savory possibilities are limitless, although I’m sure you’ll find heaps of inspiration on the Daring Kitchen site. I’m listing the recipe for the dough below, but you can find more information on Coco Cooks and make life sweeter!
Strudel Dough
from Kaffeehaus – Exquisite Desserts from the Classic Cafés of Vienna, Budapest and Prague by Rick Rodgers
1 1/3 cups (200 g) unbleached flour
1/8 teaspoon salt
7 tablespoons (105 ml) water, plus more if needed
2 tablespoons (30 ml) vegetable oil, plus additional for coating the dough
1/2 teaspoon cider vinegaryour prepared filling of choice
5 tablespoons butter, melted
1 1/2 cups (350 ml) fresh bread crumbs
-Combine the flour and salt in a stand-mixer fitted with the paddle attachment. Mix the water, oil and vinegar in a measuring cup. Add the water/oil mixture to the flour with the mixer on low speed. You will get a soft dough. Make sure it is not too dry, add a little more water if necessary. Take the dough out of the mixer. Change to the dough hook. Put the dough ball back in the mixer. Let the dough knead on medium until you get a soft dough ball with a somewhat rough surface.
-Take the dough out of the mixer and continue kneading by hand on an unfloured work surface. Knead for about 2 minutes. Pick up the dough and throw it down hard onto your working surface occasionally. Shape the dough into a ball and transfer it to a plate. Oil the top of the dough ball lightly. Cover the ball tightly with plastic wrap. Allow to stand for 30-90 minutes (longer is better).
-It would be best if you have a work area that you can walk around on all sides like a 36 inch (90 cm) round table or a work surface of 23 x 38 inches (60 x 100 cm). Cover your working area with table cloth, dust it with flour and rub it into the fabric. Put your dough ball in the middle and roll it out as much as you can. Pick the dough up by holding it by an edge. This way the weight of the dough and gravity can help stretching it as it hangs. Using the back of your hands to gently stretch and pull the dough. You can use your forearms to support it.
-The dough will become too large to hold. Put it on your work surface. Leave the thicker edge of the dough to hang over the edge of the table. Place your hands underneath the dough and stretch and pull the dough thinner using the backs of your hands. Stretch and pull the dough until it’s about 2 feet (60 cm) wide and 3 feet (90 cm) long, it will be tissue-thin by this time. Cut away the thick dough around the edges with scissors. The dough is now ready to be filled.
-Put the rack in the upper third of the oven and preheat the oven to 400°F (200°C). Line a large baking sheet with baking paper (parchment paper). Spread about 3 tablespoons of the melted butter over the dough using your hands (a bristle brush could tear the dough, you could use a special feather pastry brush instead of your hands). Sprinkle the buttered dough with the bread crumbs. Spread your filling about 3 inches (8 cm) from the short edge of the dough in a 6-inch-(15cm)-wide strip.
-Fold the short end of the dough onto the filling. Lift the tablecloth at the short end of the dough so that the strudel rolls onto itself. Transfer the strudel to the prepared baking sheet by lifting it. Curve it into a horseshoe to fit, if necessary. Tuck the ends under the strudel. Brush the top with the remaining melted butter.
-Bake the strudel for about 30 minutes or until it is deep golden brown. Cool for at least 30 minutes before slicing. Use a serrated knife and serve either warm or at room temperature. It is best on the day it is baked.
The May Daring Bakers’ challenge was hosted by Linda of make life sweeter! and Courtney of Coco Cooks. They chose Apple Strudel from the recipe book Kaffeehaus: Exquisite Desserts from the Classic Cafés of Vienna, Budapest and Prague by Rick Rodgers.
Daring Bakers in April: Goat Cheesecake
April 27, 2009 at 2:16 am | Posted in cakes & tortes, cheesecakes, daring bakers, groups, sweet things | 48 Comments
I was this close (picture me squinting while holding my thumb and index finger about a milimeter apart), this close to skipping this month’s Daring Bakers’ challenge. See, I have done cheesecake one, two, three, four times here already. One of those was even with the DBs last year. I thought about it for awhile, and then I decided that since Jenny from Jenny Bakes basically gave us free reign to modify her chosen cheesecake recipe, I may as well make some tweaks and play along.
I’ve had goat cheesecake in restaurants before, but never at home, so I thought I’d give it a shot. Fresh goat cheese is pretty similar in consistency to cream cheese, and I figured I could do a straight-out swap with the two. I settled on a combo of half goat cheese and half cream cheese…that way it wouldn’t taste too barnyardy.
R and I are just a family of two, so we didn’t need a several pound cheesecake on our hands (or our hips). I scaled back the recipe to a third of its original size, and decided to bake off little individual cakes. I used 4-ounce aluminium foil cups, and got four servings from the batter.
I think cheesecake is quite a heavy, rich dessert, and I don’t like it further bogged down with too many add-ins. A little fruit sauce spooned on top suits me just fine. Here, I made an easy spiced cherry compote. I simply took a jar of tart cherries in light syrup, stained the syrup into a pot and reduced it a bit with half a cinnamon stick and a couple of cardamom pods. Once off the heat, I fished out the spices and stirred the cherries back in.
This was quite a nice change of pace. The cheesecakes had what I would call a “delicate goatiness.” Not too overpowering, and nice with the cherry sauce. Check out Jenny Bakes for the original recipe, and visit the new Daring Kitchen site to see what everyone else is up to!

Goat Cheesecake- makes 4 individual-size cheesecakes
modified from Abbey’s Infamous Cheesecake
Note: I used Anna’s Almond Cinnamon Thins in the crust and 1/3 less fat cream cheese (that “Neufchâtel” stuff) in the cheesecake base.
for the crust:
2 oz graham cracker or wafer cookie crumbs
1/2 oz butter, melted
1/2 t sugar
pinch of saltfor the cheesecake:
4 oz cream cheese, room temperature
4 oz fresh (not aged) goat cheese, room temperature
1/3 c sugar
pinch of salt
1 egg
1 t lemon juice
1/3 c heavy cream
1 t vanilla extract (or small amount of vanilla bean seeds)
-Preheat oven to 350°F (Gas Mark 4 = 180°C = Moderate heat). Begin to boil a large pot of water for the water bath.
-Spray four 4-ounce ramekins or aluminum foil cups with non-stick cooking spray. Mix together the crust ingredients and press into the bottom of the cups. Place cups on a sheet tray and bake for about 8 minutes, just to set the crusts. Remove sheet from oven and set crusts aside.
-Process the cream cheese and goat cheese in a food processor until smooth (don’t forget to scrape!). Add the sugar and pinch of salt; mix and scrape again. Do the same with the egg, then add the lemon juice, heavy cream and vanilla bean seeds or extract and process until smooth and fully combined.
-Spoon batter into prepared crusts and gently tap the sheet tray on the counter a few times to bring all air bubbles to the surface. Remove the cups from the sheet tray and place them in a small roasting pan or a baking dish. Pour boiling water into the larger pan until halfway up the side of the cheesecake cups.
-Bake 20 to 25 minutes, until they are almost done – this can be hard to judge, but you’re looking for the cakes to hold together, but still jiggle in the center. You don’t want them to be completely firm at this stage. Close the oven door, turn the heat off, and let rest in the cooling oven for another 20 minutes. This lets the cakes finish cooking and cool down gently enough so that they won’t crack on the top.
-After 20 minutes, remove pan from oven and lift the cups carefully out of water bath. Let them finish cooling on the counter, and then cover and put in the fridge to chill. Once fully chilled, they are ready to serve.
The April 2009 challenge is hosted by Jenny from Jenny Bakes. She has chosen Abbey’s Infamous Cheesecake as the challenge.
Daring Bakers in March: Lasagne of Emilia-Romagna
March 27, 2009 at 2:00 am | Posted in daring bakers, groups, pasta, savory things | 47 Comments
The Daring Bakers did something a bit unusual this month– we baked lasange! Our hosts Mary of Beans and Caviar, Melinda of Melbourne Larder and Enza of Io Da Grande chose Lynne Rossetto Kasper’s (from The Splendid Table) Lasagne of Emilia-Romagna. This rich lasagna has layers of homemade spinach pasta, country-style meat ragù, béchamel and Parmigiano-Reggiano. OK, I know that photo is of my unbaked lasagna, but I confess to only having assembled it this afternoon. By the time we sat down for dinner, it was too dark for pictures, so this will have to do.
I make lasagne frequently, and I’ve made my own pasta on occasion, but I’ve never made spinach pasta (what makes this a “lasagne verdi”) before. Since I’ve already confessed to procrastination, I may as well get it all out in the open and also confess to laziness– I used some shortcuts when making the pasta. First, I used frozen spinach (thawed and squeezed well). Next, I made my dough in the food processor and then finished the kneading by hand. Finally, I rolled it with my pasta machine (taken to the thinnest setting) rather than with a rolling pin. Hey–it’s still handmade, if you ask me. The dough came together nicely in the processor. The egg alone wasn’t quite enough liquid to bind it, so I added a couple spoonfuls of the spinach-squeeze water. Let me tell you, the dough was a gorgeous green!
I went with four layers of pasta in total, but I still had several sheets left over. There are so many things that can be done with extra pasta sheets (and I’m sure you’ll see that other DBers have made raviloi, manicotti, etc with their leftovers), but I’m lazy, ya know, so I just took a knife and cut them into thick “rags.” I’ll cook them up like regular fresh noodles and toss them with sauce later in the week.

I’ve made béchamel (white sauce) a thousand times, and can probably do it in my sleep. It’s my go-sauce for things like mac and cheese and pot pies, so I had no problems there. I’m not one for making meat ragù, though, so this was new to me. I don’t eat red meat, and usually go vegetarian with pasta sauces. Here, I decided to swap out the veal, pork and beef in the recipe for a combination of spicy Italian chicken sausage (the raw kind for the butcher) and mushrooms (crimini and reconstituted dried porchini). I minced my onion, carrot and celery base in the food processor, and then did the same with the mushrooms. It made a delicious, thick ragù, and my husband, who certainly is a carnivore, thought it tasted great.
This was such a fun challenge. Silky fresh pasta layered with béchamel, cheese and a tender ragù cooked down in milk, made for a very decadent, lush lasagna. Even though I made just a half-recipe (in an 8″ x 8″ baking dish), between the lasagna and the leftover pasta, I have a few nights’ worth of dinners for my efforts. That’s not bad at all! Visit Beans and Caviar, Melbourne Larder or Io Da Grande for the recipe. And check out the brand spankin’ new Daring Kitchen site– it’s gorgeous, and has lots of fun features to keep you entertained for hours! Thank you, Lisa and Ivonne!!
The March 2009 challenge is hosted by Mary of Beans and Caviar, Melinda of Melbourne Larder and Enza of Io Da Grande. They have chosen Lasagne of Emilia-Romagna from The Splendid Table by Lynne Rossetto Kasper as the challenge.
Daring Bakers in February: Flourless Chocolate Cake & Fresh Mint Ice Cream
February 28, 2009 at 2:02 am | Posted in cakes & tortes, daring bakers, groups, ice creams & frozen, sweet things | 40 Comments
I skipped out on last month’s Daring Bakers’ Challenge, so I wasn’t about to miss this one– especially since our hosts Wendy at wmpesblog and Dharm at Dad – Baker and Chef chose something exceptionally decadent. Actually, they chose two exceptionally decadent things: a flourless chocolate cake (called “Chocolate Valentino”) and homemade ice cream.
It may surprise you that a cake worthy of a restaurant plate has just three ingredients: chocolate, butter and eggs. Since chocolate is the star of the show here, use the best stuff you can. The recipe calls for semisweet chocolate, but I only had bittersweet so I threw a couple tablespoons of sugar into the meringue component. This sweetened it up a bit and also made the meringue more stable. I should also note that making the cake is just as easy as remembering the three ingredients! Melt the butter and chocolate together, add in the yolks, whip the whites to a meringue, fold them in, and bake. Keep a close eye on the cake in the oven, as mine baked quickly…but then again, I did just make a half recipe. This cake is so dense and chocolatey– it’s a really special dessert, but not at all hard to make.

To tell the truth, I think a rich cake like this pairs better with a light whipped cream than it does with an equally rich ice cream. But ice cream was part of the challenge, and it is really one of my favorite things to make. We were given the option of making either a traditional custard-based ice cream or an eggless Philadelphia-style one. I happened to have several yolks leftover from the coconut cake I had made a few days before, so that meant a French-style ice cream for me. I also had some fresh mint in the fridge…since I love the combination of chocolate and mint, I thought that would be a good way to go.
I have made a lot of ice cream at home (incidentally, I use the KitchenAid ice cream attachment and have had good results with it), and something I’ve learned is that if you start with a good vanilla ice cream recipe as your base, you can easily modify it for other flavors. For my mint ice cream, I used the custard-based classic vanilla recipe provided by Dharm, and rather than steeping the milk with a vanilla bean, I steeped it with a couple handfuls of fresh mint leaves. I also increased the sugar by two tablespoons, but this was just a matter of personal taste. Getting the mint flavor right can be a little tricky. The more mint you use, and the longer you infuse it, the more herbal the ice cream will be. That may sound obvious, but I’ve made several batches in the past that have tasted almost grassy. I was going for a subtler flavor here so I was careful when adding the mint, and made sure to taste the milk after it had steeped.
Check out the DB blogroll! And visit Wendy or Dharm for the recipes for both the Chocolate Valentino cake and the ice creams.
The February 2009 challenge is hosted by Wendy of WMPE’s blog and Dharm of Dad ~ Baker & Chef. We have chosen a Chocolate Valentino cake by Chef Wan; a Vanilla Ice Cream recipe from Dharm and a Vanilla Ice Cream recipe from Wendy as the challenge.

Daring Bakers in December: French Yule Log
December 29, 2008 at 5:29 pm | Posted in cakes & tortes, daring bakers, groups, other sweet, sweet things | 41 Comments
This month’s challenge is brought to us by the adventurous Hilda from Saffron and Blueberry and Marion from Il en Faut Peu Pour Etre Heureux. They have chosen a French Yule Log by Flore from Florilege Gourmand. Now, now…before you go thinking that we did that last December, let me assure you that this is a very different dessert altogether.
This yule log is a truly impressive, multi-layered affair. Almond dacquoise, chocolate-caramel ganache, praline feuilletine, and vanilla crème brulée…all nestled between layers of dark chocolate mousse, and capped off with a super-shiny glaze. Sounds lush, right? It certainly is. (The ganache layer, by the way– amazing!! Also the crispy feuilletine…I could have eaten the whole layer by itself, before it even made it into the log.)
This is kind of an investment in time and ingredients, but taken separately, each component is actually quite easy and quick to prepare. I spread my work over three days. On day one, I made the ganache, feuilletine and brulée layers. (I can see the feuilletine layer being a bit of a pain, but I had it easy, because I was able to purchase gavottes and praline paste through work.) On day two, I made the dacquoise and mousse and assembled the layers, leaving it to freeze overnight. On the last day, all that was left was to unmold and prepare the glaze. I used a standard loaf pan (lined with plastic wrap) to mold my log. The finished dessert is quite large…it’s probably about ten servings. And we will enjoy each and every one.
Sorry that I don’t have more (or better) pictures to share, but my apartment is like a cave with the low winter sun, or lack thereof! I have to take what I can get. Let me assure you that this dessert is as decadent as it sounds, so if you’re up for a challenge, visit Hilda’s post for the recipe.
Daring Bakers in October: Pizza & Toppings
October 29, 2008 at 4:12 am | Posted in daring bakers, groups, savory things, yeast breads | 39 Comments
October’s Daring Bakers’ Challenge is hosted by Rosa of Rosa’s Yummy Yums, and it’s the third recipe the group has made from The Bread Baker’s Apprentice: Mastering The Art of Extraordinary Bread by Peter Reinhart. Judging from the other two, we will all have had spectacular results with this month’s PIZZA! I completed the recipe so early in the month (which is quite unusual for me), that I’ve actually had too long to think about what I’d say. In my head, this became quite a long, rambling post…sorry…I understand if you don’t have the patience!
I don’t know anyone who doesn’t like pizza. I do have a couple of good friends who don’t eat cheese, but they still love cheese-less pizza. As a New Yorker, I prefer pizza that has a chewy, puffy, nicely browned and slightly salty outer crust. I think the crusty edge part is just as good as the topping part– you’ll never see me leaving a heap of chewed-around crusts on my plate! I had a bit of a hard time with pizza in Sydney, where the preference seems to be an ultra-thin crust, with really no outer edge to speak of. Eventually, we found Pizza Mario in Surry Hills (it’s an accredited member of l’Associazione Verace Pizza Napoletana), which gets my vote as Sydney’s best!
I make pizza often at home, but I’ve had mixed results. My best work came out of the oven in my last apartment in Brooklyn. It was an old gas Magic Chef with a bottom heating element (I could see the flames under the oven floor) that got my stone ripping hot. The bottom crust was always brown and crisp. In Sydney, we had electric ovens with top heating elements in all three apartments, and no matter how long I preheated my stone, or where I placed it in the oven, I could never get the bottom to brown nicely. It became quite frustrating, and I tried many dough recipes and little technique modifications along the way. (It may also be the stone itself, as my old one went into storage accidentally and I had to get a different one in Sydney. I’ve read about making pizza on the bottom side of a super-hot cast iron skillet under the broiler…sounds promising, but my skillet is kind of small.) I’m definitely crossing my fingers for a gas oven in the future!
I made half a recipe of dough, from which I formed two largish pizzas. This is a well-hydrated dough, and requires an overnight rest in the fridge. I can be held for up to three days, though, so I decided to make one pizza for dinner one night, and the other the next night. I know that Rosa wanted us to shape the dough by tossing it “like a real pizzaiolo,” but mine was much too sticky. I had a hard time even with just the hand-stretching. Despite the stickiness, the dough had a wonderful, soft feel, and I could tell by touch that the recipe would be a good one.

As far as pizza toppings go, I am a minimalist…I don’t like too many different things, or too much of any one thing, either, to weigh down or sog out the crust. I usually do tomato sauce, mozzarella and basil– black olives, too, if I’m feeling crazy– so I thought I’d try a couple of “unusual” topping combinations for my challenge. Inspired by a favorite at the aforementioned Pizza Mario, I made a pizza topped with potato, rosemary and Maldon salt with the first night’s dough. Before baking, I simply sliced a red-skinned potato super-thin with a Japanese mandolin, spiraled the slices on the dough, sprinkled on the rosemary and salt, and drizzled olive oil all over it. The next night, I slowly caramelized a sliced onion in a little olive oil and butter to top my second pizza. Then I scattered on bits of gorgonzola picante and some more rosemary.
I just realized, looking back at the DB details to type up this post, that we were supposed to use both toppings and sauce. Well, we can just consider olive oil to be the sauce on these, because I used copious amounts of the stuff on both pizzas!

The pizzas were a hit! Potato pizza may sound like starch on starch, but it’s really so delicious. If you’ve never tried it, I recommend giving it a go sometime. The sweet onions with the sharp gorgonzola was a perfectly balanced match on the second pizza (and, in the oven, some of the onions got a little crispy on the edges– the best part!). And the dough was wonderful– just the kind of bready crust I like! I unfortunately had the same problems browning the underside, but I expected that, and I’ll try it again when I’m settled in New York.
Rosa was originally to host this challenge with Sher from What Did You Eat?, and it was Sherry’s idea to make this recipe. Sherry passed away in July, but Rosa decided to go ahead with her choice, honoring her friend and her accomplishments as a cook and baker. So don’t call for pizza delivery this weekend! Make your own instead, and get the recipe on Rosa’s site. Don’t forget to check out the DB blogroll!
Baked Fresh Weekly

Blog at WordPress.com.
Entries and comments feeds.
