Tuesdays with Dorie BWJ: Mocha Brownie Cake (or Baileys Brownie Cake!)
March 18, 2014 at 12:01 am | Posted in BWJ, cakes & tortes, groups, layer cakes, sweet things, tuesdays with dorie | 32 CommentsTags: baking, brownies, cake, chocolate, dessert, holiday

For Saint Patrick’s Day, I turned the Mocha Brownie Cake from Marcel Desaulniers into a Baileys Brownie Cake. Oh yeah! It was as easy as just replacing the coffee in the ganache with Baileys…plus a swig more to taste. I’m lucky I’m a fast baker, because I pushed the clock on this one. All those resting and chilling times didn’t really register when I read through the recipe. Thanks to my BFF, the freezer, I managed to get a photo while it was still light(ish) out.
I made a half recipe in six-inch form. It only took about 35 minutes to bake (I watched it closely, cuz no one likes a dry brownie). The cake is a cake-brownie hybrid. It starts out with whipped eggs– sort of like those Best-Ever Brownies we made awhile back– and also has baking powder for lift. I was kind of nervous to cut the cake into three layers, but it rose nicely in the oven and after it was chilled and firm, it was really no problem to slice…it helped that it was a small cake, I’m sure.
The filling and glaze is a dark chocolate ganache flavored with coffee (or Baileys for me, thanks). Delicious! I just realized after reading another blogger’s post that I completely forgot to add the extra sugar in the ganache. Oh well– it doesn’t need it, especially if you like your chocolate on the dark, bitter side (or you use sweet Baileys to make it). Even thought the recipe said to make sure the ganache was still pourable when filling the layers, mine was definitely spreadable– the consistency of thick custard. I didn’t see any problem with using it that way, and in fact it set up nicely. I didn’t need to build the cake up in a springform pan and it was ready to glaze quickly. I did reheat the remaining ganache so I’d have a shiny, pourable glaze for over the top. And then I sprinkled the cake with green luster dust for extra shimmer.
I’m really impressed with this actually. It looks great cut (use a hot knife) and it totally satisfies my ever-present chocolate craving. Also, it’s a heck of a lot easier to put together than Marcel D’s “Death by Chocolate Cake,” which I made once and is waaaay more involved.
For the recipe, see Baking with Julia by Dorie Greenspan. Don’t forget to check out the rest of the TWD Blogroll!
Confetti Layer Cake and a BOOK GIVEAWAY!
March 11, 2014 at 6:06 pm | Posted in cakes & tortes, layer cakes, sweet things | 50 CommentsTags: baking, birthday, cake, dessert, giveaway
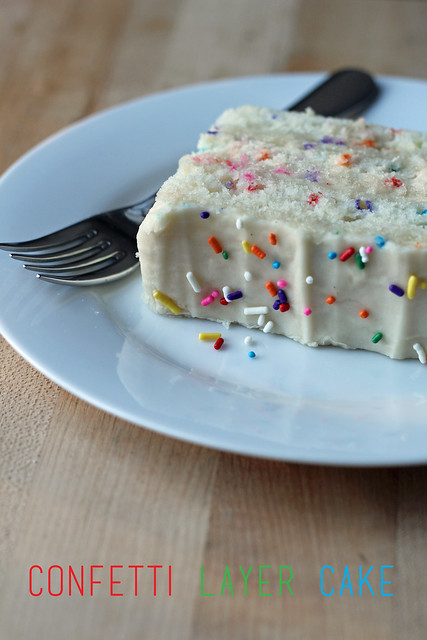
Sometimes I just want a piece of birthday cake…even if it’s no one’s birthday. Know how that is? I do feel I’m embarrassingly late to the imaginary party with this confetti cake. I don’t even know if I’ve ever had the Pillsbury version. And it seems everyone’s made a homemade one but me (till now). What I thought was some magical secret to the colored bursts of confetti is really just jimmies stirred into cake batter. A cute book called Sprinkles!, which helps turn all things sparkly or rainbow-colored, showed me that. My own sprinkles collection borders on the absurd. Apparently I really needed this book– I’m filing it in the “self-help” section of my bookshelf.
Back to the cake! The base here is a delicate white cake flavored with almond extract, although it would be also great flavored with lemon, so I included that as an option. The sprinkles folded into the batter explode in the in oven (not in a dangerous way, I promise!) into little pops of color scattered throughout each slice. I think any frosting you like with white cake would work well here, so use your favorite. I made an American-style powdered sugar buttercream with a blob of cream cheese added in to temper the sweetness just a bit. The sides of the cake are exposed to show off the fun inside, and don’t forget the extra sprinkles on top!
The kind folks at Quirk Books sent me a copy of Sprinkles!, and now I want to jazz up your baking by sending a copy to one of you. Just leave me a comment (one per person, please) on this post before 4:00 pm EST on Tuesday, March 18 and I’ll randomly choose a winner from the list. Be sure your e-mail address is correct so I can contact you if you’re chosen.
***Giveaway Winner Update: I used random.org to generate a random comment number to find the winner. It selected comment 24, so congratulations to Barb T. I’ll be in touch and sending your book soon!***

Confetti Layer Cake– makes a 9-inch triple layer cake
adapted from Sprinkles! by Jackie Alpers
Steph’s Note: Obviously I didn’t bake my cake in 9-inch rounds. I scaled it back to a third and baked it as a quarter-sheet (adjusting baking time accordingly), which I then cut into three strips and frosted.
1 1/2 cups milk
9 large egg whites, lightly beaten
1/3 cup applesauce or Greek yogurt
1 tablespoon vanilla extract
1/2 teaspoon almond extract or lemon extract
4 1/2 cups cake flour, sifted, plus extra for flouring pans
2 tablespoons baking powder
1 1/2 teaspoons salt
1 cup (2 sticks) unsalted butter, at room temperature
2 cups sugar
1/2 cup rainbow jimmies, plus extra for decoration4 cups (approximately) your favorite buttercream or cream cheese frosting
-Preheat oven to 350°F. Line three 9-inch round cake pans with parchment circles, grease, then dust with flour.
-In a medium bowl, stir milk, egg whites, applesauce or yogurt and extracts. Into another bowl, sift together flour, baking powder and salt.
-Beat butter and sugar with an electric mixer on medium speed until light and fluffy, about 5 minutes. Reduce speed to low; add flour and milk mixtures alternately, starting and ending with the flour. Fold in the 1/2 cup sprinkles.
-Divide batter among pans. Bake until a tester inserted in the centers comes out clean, 25 to 30 minutes.
-Cool cakes in pans set on wire racks for 5 minutes. Run a knife around the sides of each pan, then invert cakes onto a cutting board. With a serrated knife, carefully cut off the tops and “crusts,” exposing the confetti sprinkles (this is optional).
-Place first layer on a plate. Spread 3/4 cup frosting evenly over top. Repeat with second and third layers, leaving the sides exposed. Decorate the perimeter of the top with the remaining jimmies. Serve, or refrigerate up to 3 days.
Tuesdays with Dorie BWJ: Buttermilk Scones
March 4, 2014 at 12:01 am | Posted in biscuits/scones, breakfast things, BWJ, groups, tuesdays with dorie | 18 CommentsTags: baking, breakfast, scones
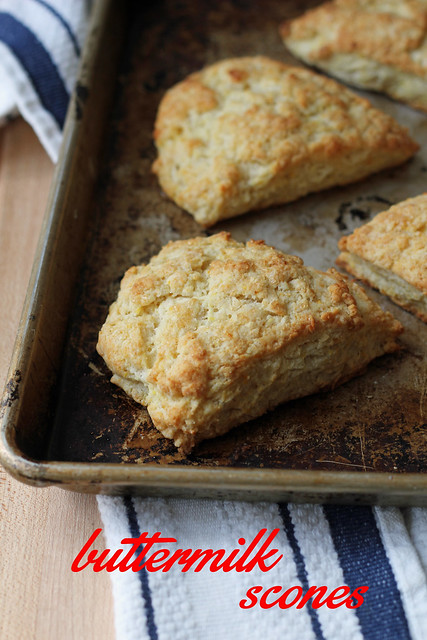
In order for me to get most breakfast pastries on the table for anything even resembling acceptable breakfast time, I usually have to get started the night before. While I’m still in my jammies, I’m a disorganized mess. I generally can’t handle measuring, mixing, baking and cleaning all before I’ve had my Chemex of coffee…so for something like scones, I get the dough made the night before and just set the pieces on a sheet tray in the fridge overnight to bake in the morning. Always works great. For some reason, though, I decided last minute to make Marion Cunningham’s Buttermilk Scones on Saturday morning instead of Sunday, and thankfully they came together really easily the morning of. By the time the oven was preheated, I had the dough made and cut and the dishes (only a few) washed. I actually used my KitchenAid to mix the scones, since I got used to doing them that way at the shop I worked for up until October. I just kept a close eye on the size of the butter bits, and then skipped the extra hand-kneading Marion gave hers at the end. These scones were delicate, just sweet enough, great with jam and easy to make. This recipe’s definitely going to be made again.
For the recipe, see Baking with Julia by Dorie Greenspan (it’s also here). And there’s even a video of Julia and Marion making these together (there’s an interesting option shown using a rolled dough technique…I may try that next time). Don’t forget to check out the rest of the TWD Blogroll!
Tuesdays with Dorie BWJ: Chocolate-Mascarpone Cheesecake
February 18, 2014 at 6:43 pm | Posted in BWJ, cakes & tortes, cheesecakes, groups, sweet things, tuesdays with dorie | 23 CommentsTags: baking, cheesecake, dessert

I wouldn’t want to eat David Ogonowski’s Chocolate Mascarpone Cheesecake in any type of weather other than the type we’ve been having (i.e., “two blizzards a week” weather). It’s true hibernation food…if you told me it was a thousand calories a slice, I wouldn’t be surprised. This is a dense and creamy cheesecake with cream cheese, of course, mascarpone and sour cream. Oh, and there’s chocolate, too, although frankly it gets a little lost in all the dairy. Adding a dark chocolate ganache layer on top of the cooled cake is an option, but might send this cake over the top.
The recipe doesn’t call for a crust. Well, actually, it calls for baking the cheesecake without a crust and then patting cookie crumbs onto the bottom and sides once it’s set. My inner baker’s voice told me that was weird and that I’d probably have some sort of disaster in the process, so I went ahead and made a real crust for mine. I had a baggie of homemade chocolate-hazelnut cookie crumbs in the freezer that need to be used up (and I love crumb crusts!) anyway. Also, I’ve always liked making my cheesecake batter in the food processor rather than in a stand mixer. Faster mixing and fewer lumps.
For the recipe, see Baking with Julia by Dorie Greenspan. Don’t forget to check out the rest of the TWD Blogroll!
Tuesdays with Dorie BWJ: Onion Bialys
February 11, 2014 at 12:01 am | Posted in breakfast things, BWJ, groups, savory things, tuesdays with dorie, yeast breads | 15 CommentsTags: baking, bread

A toasted bialy with salty butter is my idea of a very fine breakfast. I’m sure a number of my fellow Americans have never heard of a bialy– I hadn’t before I moved to New York City. Then after about six years of living here, someone *finally* brought a sack of them in from Kossar’s at the first restaurant I worked for, and I was hooked. I now know that I can find bialys at almost every bagel shop in the city, but they’re usually pulled out of a plastic bag, and I get the feeling that they aren’t made fresh in-house. To get my fix, I stock up at Kossar’s anytime I have errands to run on the Lower East Side. I was pumped to be making Lauren Groveman’s Onion Bialys for TWD this week! BTW, I feel like every other week we’re making another recipe from Lauren Groveman…
I’d call bialys cousins of the bagel, although they are not boiled, they are flatter than bagels (despite the fact that mine came out looking like balloons), and instead of holes they have awesome caramelized onion-filled centers…so on second thought, even though they have a similar dough, they are really not really like bagels at all. Speaking of the dough, it was soft and lovely (I didn’t need all the flour called for) and easy to work with. Of course my bialys took off in the oven, but I’m sure it was my fault. I did prick the heck out of the centers, but next time I’ll hand stretch them a little more, too. I don’t really care– they tasted great and had perfect texture. Fresh from the oven, they are even better than Kossar’s!
For the bialy recipe, see Baking with Julia by Dorie Greenspan. Don’t forget to check out the rest of the TWD Blogroll!
Dahlia Triple Coconut Cream Pie
February 8, 2014 at 2:35 pm | Posted in pies & tarts, sweet things | 15 CommentsTags: baking, dessert, pie

I grew up in Virginia. Just as soon as I moved up to Boston for college, my family moved out to Seattle. I go visit once or twice a year (I was just there a couple of weeks ago, in fact), so have a fondness for Seattle. Being a born Southerner, I also have a fondness coconut and for cream pies, and, interestingly enough, Seattle has a legendary combo of the two– Dahlia Bakery’s (and Lounge’s) Triple Coconut Cream Pie. It is dangerously good, and I’ve been holding off making it at home until I had a real excuse. The Seahawks’ Sunday performance was good enough for me.
This pie has a coconut crust, a coconut filling and toasted coconut on top…hence the whole “triple” thing. You’ll notice the recipe instructions are…ummm….lengthy. Nothing’s hard, though, especially if you break it up a bit. With a multi-step pie like this, I like to get ready the day before by processing my crust, letting it chill a bit and then getting it in the pan. That way it can really set in the fridge overnight, which not only helps it hold a better crimp while baking, but it means a lot less work the following day. Another crusty trick I have up my sleeve is that after the crust is fully baked, but still piping hot, I paint a touch of egg white on the bottom. It gives it a little barrier of protection from the soft filling and helps keep it crisp. Usually the residual heat coming off the pie shell will set the egg white straight away, but you can always pop it back in the oven for about a minute to make sure. You can also make the coconut pastry cream a day ahead if you’d like…just keep it airtight in the fridge overnight with some plastic wrap pressed on the surface.
This coco pie is soft but crisp, rich but light. It’s no wonder, really, that Dahlia has sold something like 350,000 of these things.

Dahlia Triple Coconut Cream Pie— makes a 9-inch pie
adapted from The Dahlia Bakery Cookbook: Sweetness in Seattle by Tom Douglas and Shelley Lance
for the coconut pastry dough–makes a 9-inch piecrust
Steph’s Notes: The crust must be baked and cooled before you can fill your pie. If you’d like, you can “seal” the bottom your just-out-of-the-oven hot crust with a little thinly brushed on egg white…this will help keep it crisp when it’s filled. I also like to go ahead and toast the coconut chips for garnish while I have the oven on during this step. 400° is a little high for coconut, so I do this while the oven is coming up to temp or after I’ve turned it off and it’s coming back down (watching closely so it doesn’t burn).
1 cup plus 2 tbsp flour (165 g), plus extra for rolling dough
1/2 cup (50 g) shredded sweetened coconut
1/2 cup (113 g or 1 stick) cold unsalted butter, cut into 1/2-inch dice
2 tsp sugar
1/4 tsp kosher salt
1/3 cup (75 g) ice-cold water, or more as needed
-In the bowl of a food processor fitted with a metal blade, combine flour, coconut, sugar and salt and pulse two or three times to combine. Add the diced butter and pulse to form coarse crumbs. Gradually add water, 1 tablespoon at a time, pulsing each time. Use only as much water as needed for the dough to hold together when pressed gently between your fingers (don’t work dough with your hands, just test to see if it is holding). The dough will not form a ball or even clump together in the processor, it will be quite loose.
-Place a large sheet of plastic wrap on the counter and dump the coconut dough onto it. Pull plastic wrap around dough, forcing it into a rough flattened round with the pressure of the plastic wrap. Refrigerate 30 to 60 minutes before rolling.
-When ready to roll dough, unwrap round of coconut dough and place it on a lightly floured board. Flour rolling pin and your hands. Roll out dough in a circle about 1/8-inch thick. Occasionally lift dough with a bench knife or scraper to check that it is not sticking, and add more flour if it seems like it’s about to stick. Trim to a 12- to 13-inch round. Transfer rolled dough to a 9-inch pie pan. Ease dough loosely and gently into pan. You don’t want to stretch dough at his point, because it will shrink when it is baked.
-Trim any excess dough to 1- to 11/2-inch overhang. Turn dough under along rim of pie pan and use your fingers and thumb to flute the edge. Dock the bottom of the shell with a fork. Refrigerate unbaked pie shell for at least 1 hour before baking (this prevents the dough from shrinking in the oven).
-When ready to bake piecrust, preheat oven to 400°F. Place a piece of parchment in pie shell, with sides overhanging the pan, and fill with dried beans or wieghts (this prevents the bottom of the shell from puffing up during baking). Bake piecrust for 20 to 25 minutes, or until pastry rim is golden. Remove pie pan from oven. Remove paper and beans and return piecrust to oven. Bake for an additional 10 to 12 minutes, or until bottom of crust has golden brown patches. Remove from oven and allow pie shell to cool completely.
for the coconut pastry cream:
1 cup (230 g) milk
1 cup (230 g) canned unsweetened coconut milk, stirred
2 cups (170 g) shredded sweetened coconut
1 vanilla bean, split in half lengthwise
2 large eggs
1/2 cup plus 2 tbsp. (125 g) sugar
3 tbsp. (26 g) AP flour
4 tbsp. (57 g or 1/2 stick) unsalted butter, at room temperature
– In a medium saucepan over medium-high heat, combine milk, coconut milk and shredded coconut. Using a paring knife, scrape seeds from vanilla bean and add both scrapings and pod to milk mixture. Stir occasionally until mixture almost comes to a boil.
-In a medium bowl, whisk together eggs, sugar and flour until well combined. Temper eggs by pouring a small amount (about 1/3 cup) of scalded milk into egg mixture while whisking. Then add warmed egg mixture to saucepan of milk and coconut. Whisk over medium-high heat until pastry cream thickens and begins to bubble. Keep whisking until mixture is very thick, 4 to 5 minutes more. Remove saucepan from heat. Add butter and whisk until it melts. Remove and discard vanilla pod.
-Transfer pastry cream to a bowl and place it over another bowl of ice water. Stir occasionally until pastry cream is cool. Place a piece of plastic wrap directly on surface of pastry cream (to prevent a skin from forming) and refrigerate until completely cold. The pastry cream will continue to thicken as it cools.
for the whipped cream topping:
Steph’s Notes: This is a ton of whipped cream! If you’d like to be a little less extravagant here, cut it in half and you’ll still have plenty of topping.
2 1/2 cups (600 g) heavy cream, chilled
1/3 cup (63 g) sugar
1 tsp vanilla extract
-In an electric mixer fitted with a whisk attachment, whip heavy cream with sugar and vanilla extract to peaks that are firm enough to hold their shape.
for the garnish:
2 oz (57 g) unsweetened chip or large-shred coconut (about 1 1/2 cups), or shredded sweetened coconut (about 2/3 cup)
a chunk of white chocolate (4-6 oz ,to make 2 oz of curls)
-Preheat oven to 350°. Spread unsweetened coconut chips (or large-shred coconut, or sweetened shredded coconut) on a baking sheet and toast in the oven for 7 to 8 minutes, watching carefully (coconut burns easily) and stirring once or twice until lightly browned. Remove from the oven and allow to cool.
to finish the pie:
-When pastry cream is cold, fill pastry shell, smoothing the surface with a rubber spatula.
-Transfer whipped cream to a pastry bag fitted with a star tip and pipe it all over the surface of the pie (or just mound it on top and swirl with a spoon).
-Sprinkle toasted coconut over top of pie. Use a vegetable peeler to scrape about 2 ounces of white chocolate curls on top of the pie (or you can cut pie into wedges, garnish each wedge individually on the plate) and serve.
-Store the pie in the refrigerator.
Tuesdays with Dorie BWJ: Vanilla Chiffon Roll
January 28, 2014 at 7:40 pm | Posted in BWJ, cakes & tortes, groups, layer cakes, sweet things, tuesdays with dorie | 21 CommentsTags: baking, cake, dessert

I start this post with a warning: after I made Mary Bergin’s Vanilla Chiffon Roll, I took a look in the sink and internally freaked out. I think I used every bowl, whisk and spatula I own to make the cake and mousse filling, not to mention the food processor and all its bits and pieces. Well, I was really glad that this cake was totally worth that mountain of dirty dishes I had to tackle! And also that assembly was much easier than washing up. The soft vanilla chiffon cake was really easy to roll around its delicious chocolate-walnut mousse filling. I didn’t get any tears or cracks…just a little sticking, which was easily disguised with a dusting of cocoa and powdered sugar.
I made a half recipe of the cake in a quarter sheet pan. I think it took a few minutes longer to fully bake than the time indicated for the full-sized cake, so go with your good judgment if it looks underdone. I noticed when I watched the video that there was a lot of leftover mousse in Mary’s bowl after she filled her cake, so I decided that I’d just make a third of the mousse recipe (I keep typing “mouse” BTW). The full cake supposedly yields six servings…if you’re feeding giants…I easily cut six slices from my smaller cake. Once this roulade has had time to chill out in the fridge, it’s really divine, not to mention classy. I loved the chocolate-walnut mousse (and was psyched to use my special black walnuts and fancy walnut oil for it). If I had had any extra left, I most certainly would have polished it off with a spoon.
For the recipe, see Baking with Julia by Dorie Greenspan (it’s also here, along with a video). Don’t forget to check out the rest of the TWD Blogroll!
Tuesdays with Dorie BWJ: Country Bread
January 14, 2014 at 3:51 pm | Posted in BWJ, groups, savory things, tuesdays with dorie, yeast breads | 20 CommentsTags: baking, bread

I’m just back from a week-long course at Penn State studying the science and federal regulation of large-scale ice cream manufacture…”from cow to cone,” as the main professor said. OMG–so fun, but also really hard (especially since I hadn’t studied chemistry or physics since high school and didn’t know squat going in about the mechanics of freezers or homogenizers). Now that I geeked-out on ice cream for a week, it only makes sense that I’m back here with Joe Ortiz’s Country Bread (huh?).
This made one monster loaf! The dough polished off what was left of both my yeast and my bread flour. I was expecting the crumb to have larger air holes, but now that I think about it, given the whole wheat and rye flour in the dough, it makes sense that it had a denser structure. I made a good breakfast with it this morning, and it’ll be a great soup-dunker, too.

For the bread recipe, see Baking with Julia by Dorie Greenspan. Don’t forget to check out the rest of the TWD Blogroll!
TWD BWJ Rewind: Challah
December 31, 2013 at 11:06 am | Posted in BWJ, groups, sweet things, sweet yeast breads, tuesdays with dorie | 12 CommentsTags: baking, bread

Happy New Year! Have you made any resolutions for 2014? Normally I wouldn’t, but I have a couple of “situations” that I should get under control STAT. Resolving to use up my current kitchen cupboard and my bathroom beauty products before buying more is something that has to happen. I do not need four eye creams or six bottles of hot sauce open at once. I don’t have the storage space for that, and the clutter on my counters is driving me bananas!
What does Lauren Groveman’s Challah have to do with this? It’s going to help jam population control (five jars open in the fridge, with four more in the cupboard…sheesh). The group made this bread in early December, but I didn’t have my act together that week. I’m glad I got it together, though, because it’s delish. I just made one loaf, which was a half-recipe, and it’s a huge beauty! A three-strand braid is so simple to do and it really looks great, but maybe one day I’ll be brave enough to try my hand at five or six. Maybe. Even though I’m notoriously stingy with egg wash (I never want to use up a whole egg for it, and unless I have a bit of extra egg left over from something else, I usually pilfer a tiny bit from the eggs in the recipe), it still came out with a gorgeous crust. And the insides are perfectly soft and slightly sweet. I’m looking forward to challah French toast in a couple of days…topped with jam sauce, of course.
For the recipe, see Baking with Julia by Dorie Greenspan. Note that this challah recipe uses melted butter, if that’s a concern for you (although I suspect it could be replaced with oil). Don’t forget to check out the rest of the TWD Blogroll to see if anyone else did a rewind this week, and see the links page from challah week at the beginning of December!
Tuesdays with Dorie BWJ: Gingersnaps
December 17, 2013 at 10:58 am | Posted in BWJ, cookies & bars, groups, sweet things, tuesdays with dorie | 13 CommentsTags: baking, cookies, dessert

Last week I was in paradise, now I’m back to reality. I’m trying to brighten up the Brooklyn dreariness with a tree and some holiday-spiced cookies. How convenient that David Blom’s Gingersnaps are up for TWD this week. Cutout cookies are fun, I think. Sticky doughs can be tricky to work with and get soft quickly, but I’ve found that rolling out dough on parchment and then chilling the rolled sheet for 10 or so minutes before punching out shapes makes the process a lot easier.
I heard that these cookies tasted more like molasses than ginger, so I doubled the spices in my batch. I also reduced the water called for in the recipe to just 1 tablespoon, as I didn’t think the dough needed so much extra moisture. Since I was trying to boost the spiciness, I skipped the molasses glaze and sprinkled my stars with sanding sugar instead. While I baked these a few minutes longer than the recipe called for, they were still a little more chewy than snappy. They never quite dried out in the center.
These may not be my ideal gingersnaps (those are from Miette, although I’ve only had them in the shop and have not tried their recipe in my own kitchen), but they were tasty enough and the recipe was small enough that I don’t mind too much. They were good with tea.
For the recipe, see Baking with Julia by Dorie Greenspan (it’s also here). Don’t forget to check out the rest of the TWD Blogroll!
Baked Fresh Weekly

Blog at WordPress.com.
Entries and comments feeds.
