Leftover Lime Curd Tart
October 15, 2007 at 10:39 am | Posted in pies & tarts, sweet things | 10 Comments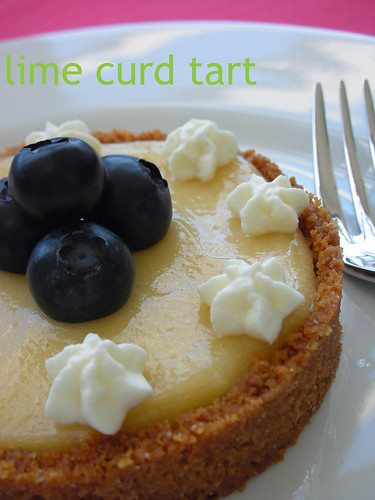
What you do when you’ve started a new job and are working your tail off and don’t have time to cook, bake or post (I will stop there otherwise this will just get all whiny)? You reincarnate what’s already kicking around in the fridge and then post about it two weeks later.
After eating our fill of cherry-lime rickey cupcakes at the end of September, I had a bit of the lime curd filling left. There were also those graham cracker crumbs that had been in the freezer for God knows how long (and even after this, I still have some in there!). I eyeballed a quick crumb crust using sugar and cinnamon to taste and enough melted butter to hold it all together, and then baked off a couple of mini tart shells. I filled the cooled shells with lime curd and added berries and whipped cream on top. Voilà– dessert made in record time.
Stop the Traffik: White Chocolate and Almond Tartufi
October 7, 2007 at 4:40 pm | Posted in events, ice creams & frozen, sweet things | 17 Comments
I haven’t always given as much thought as I do now about where my food comes from, but over the last few years I have tried to become a better educated and more responsible shopper and eater. This is not just in terms of nutrition and what is in my food, but also in terms who is growing, making and selling it, and what is involved in its production. When I saw that R khooks was hosting a Stop the Traffik Chocolate Competition to promote awareness of child labor on cocoa plantations, I definitely wanted to contribute a submission.
How do you know the cocoa beans in the chocolate you are buying haven’t been harvested by the hands of children or forced laborers? One way is to look for the fairtrade label, showing that the product complies with international standards regarding fair prices, labor conditions and environmental sustainability, among other things. There are several brands of fairtrade chocolate that are pretty easy to find, so I went to my local healthfood store to have a look. I saw an organic brand called Cocolo that I hadn’t tried before, and picked up a couple bars of their dark chocolate and a bar of white chocolate with almond crunch. Then I spent some time wondering what I’d do with them. I broke off a teeny sample of each. Truthfully, all white chocolate makes my teeth hurt a little, and eaten straight-up this one was no exception, but the crunchy almond bits were what attracted me to it. At 58%, the dark chocolate was a bit sweeter than I would normally use, but it was smooth and I knew I could put it to good use. My plan for the chocolates would take a couple days from start to finish, but I decided to make tartufi– delicious little balls of chocolate-coated ice cream with a cherry hidden in the center.

First I made a regular custard-style ice cream base, adding in chopped white chocolate and almond extract after it was off the heat. I like to make my base the night before I plan to spin my ice cream, so it can have time to chill really well before I use it. And since I don’t have a self-freezing ice cream machine I put my canister in the freezer at the same time. This way, every thing is good to go the next morning, and I can even churn the ice cream while I’m getting ready for work.
Once I had my white chocolate and almond ice cream made, I put it away to firm up before scooping. It’s a good idea to put a plastic lined sheet tray in the freezer as well, so you have a cold suface ready to go when you form your tartufi. It will take several hours of chilling before the ice cream will hold a round shape (although if you find you’ve jumped the gun and they get a bit melty, just put your ice cream scoops back in the freezer for a couple hours and gently reshape). About ten minutes before scooping, I macerated some drained canned dark cherries with a couple drops of almond extract. I used a spring-loaded 1 3/4-inch scoop to make nice round balls of ice cream, tucking a cherry into each one as I scooped. Then they went back into the freezer overnight.

While there is a lot of wait-time involved in making tartufi, the only challenging part is coating them in chocolate. I saw one recipe that advised skewering each tartufo with a toothpick and dunking them one-by-one in the melted dark chocolate. I managed this for my first one, but after that, the ice cream was sliding around on the toothpick and the chocolate was getting too cold. Potential disaster! On to plan B, which was using a couple spoons to gently coax the glaze onto each ball. There is also plan C, which is just to put a nice spoonful of glaze on top of each tartufo, and let it drip down around it. I did for that about half of my tartufi. While they were not completely encased in chocolate, they still looked pretty.
Made with lousy ice cream, tartufi can be pretty lackluster. But with great-flavored homemade ice cream, I can’t even tell you how *seriously fabulous* these are. And they taste even better knowing you have made them with fairtrade chocolate!

If you want to read more on cocoa production and fairtrade standards, here are a few places to start: Stop the Traffik, Fair Trade Certified and FLO International.
White Chocolate and Almond Tartufi– makes 15 pieces
-Make the ice cream and chill it until it is quite firm (recipe below). Place a plastic-lined sheet tray in the freezer for later.
-About 10 minutes before scooping, drain 15 canned dark cherries. Put into a small bowl and toss with a couple drops of almond extract. Set aside to macerate.
-To form each tartufo, scoop a round ball of firm ice cream (I used a spring-loaded 1 3/4-inch scoop), inserting one cherry in the center as you scoop. Place onto the chilled plastic-lined sheet tray. Repeat for each one, and then return to the freezer for several hours or overnight. You may have extra ice cream (which is delicious as is)…you can can save it in case your scoops melt a little on you. If that is the case, re-form with the ice cream scoop, using extra ice cream if needed, and re-chill before dipping.
-Once your scoops have chilled firm, make the chocolate glaze (recipe below). Pour into a cup or a deep bowl. Use the technique that works best for you to coat the scoops in the chocolate. You can either dip them with a skewer, use two spoons to turn them in the glaze or simply spoon the glaze over them. Gently re-heat glaze if you need to.
-As you go, sprinkle each tartufo with toasted chopped almonds before the chocolate sets.
-Return to freezer for at least an hour before eating.
White Chocolate and Almond Ice Cream– makes about a quart
300g heavy cream
300g whole milk
pinch of salt
100g sugar
3 large egg yolks
1/2 t cornstarch
100g white chocolate, chopped (I used white chocolate with bits of almond)
1 t almond extract
pinch xanthan gum (optional, can be found in healthfood stores)
-In a small, heavy bottomed saucepot, combine the milk, cream, salt and half the sugar. Bring to a simmer.
-Meanwhile, whisk the egg yolks, cornstarch and remaining sugar together in a medium bowl until pale and thickened. Also, place your chopped white chocolate into a separate medium bowl and set aside.
-Once the liquid reaches a simmer, temper the yolk mixture and return the whole thing to the pot, whisking. Place over low heat and use a spatula or wooden spoon to stir constantly. Do not boil it, but get it thick enough to coat the back of the spoon/spatula and hold a line if you wipe your finger through it. This will take several minutes.
-Pass through a fine sieve into the bowl containing the white chocolate. Let it sit for a minute or two to melt the chocolate. Whisk to combine and add in almond extract. Also add in the xanthan gum if using (I didn’t measure, just threw in a good pinch. The tiniest amount will help keep your ice cream from getting icy while in freezer, but this is optional.)
-Chill over an ice bath until room temperature. Then cover and refrigerate overnight. (The next day, give it a taste before you churn it and add more almond extract if the flavor is not strong enough for you.)
-Spin chilled base according to your ice cream maker’s instructions. Transfer to an airtight container and freeze for several hours until firm.
Dark Chocolate Glaze
200g dark chocolate, chopped
1 1/2 T unsalted butter
1/2 t vegetable oil
-Melt chocolate with butter and oil over a double boiler or in the microwave, stirring well to combine. This glaze will set crunchy when chilled.
Daring Bakers in September: Cinnamon and Sticky Buns
September 30, 2007 at 1:56 pm | Posted in breakfast things, daring bakers, groups, sweet things, sweet yeast breads | 56 Comments
What smells better than bread, cinnamon and sugar baking in the oven? Not a whole lot, really. And that’s why I was so pumped to see that Daring Baker Marce, aka Pip in the City, chose cinnamon/sticky buns for the September DB challenge! She went with a recipe, which you can see here, from Peter Reinhart’s The Bread Baker’s Apprentice. The recipe gives instructions for making a cinnamon-swirled dough that can be customized into either basic cinnamon buns with a white fondant glaze or sticky buns with a caramel/nut topping.

We could pick either variation (cinnamon or sticky), but why make one when you can make both? I thought they would be a great weekend breakfast, but I didn’t want to wake up at 4:00 AM on Saturday to start the long dough making and proofing process. The recipe says that unbaked, formed buns can be retarded for up to two days in the refrigerator, and since I’ve successfully employed this method with other types of bread dough, I thought I’d make this my plan of attack.
On Friday evening, I made the dough (using mostly AP flour combined with about 1/2 cup of bread flour) and gave it it’s first rise. The dough really a cinch to make, and once risen, was beautifully silky smooth and easy to roll up with cinnamon sugar and form into large buns. Half of my rolls were put, just as they were, into a baking dish for cinnamon buns. The other half were put into a separate dish slathered with a sugar, butter and pecan mixture that would bake up into a gooey sticky bun topping. (In other words, I prepared the recipe through Step 4 of the instructions.) Then they both when into the refrigerator for a good night’s rest.
On Saturday morning I pulled out the cinnamon buns to come to room temperature and proof for a couple hours before baking. On Sunday morning I did the same thing with the unbaked sticky buns. I admit that I did get up early both days to do this!

The baked and slightly cooled cinnamon buns got a healthy drizzle of powdered sugar and milk glaze, flavored with a vanilla. The warm sticky buns were turned out to reveal a buttery caramel topping. Both variations were great with a cup of coffee, but which were better? I’d say the sticky buns. The cinnamon rolls were a bit dry inside, but with the sticky buns, the topping oozed into the dough, eliminating any dryness problem there.

I don’t make this kind of thing often (my real buns don’t need this kind of breakfast every week), but when I do, I normally make a sort of hybrid variation of the two…I make a cinnamon swirl using brown sugar instead of granulated and add chopped nuts to it. The brown sugar makes the cinnamon buns bake up caramely and gooey on the inside. Then the baked buns are frosted with a heaping amount of glaze. I’d like to retry Reinhart’s dough recipe using that filling.
Thanks for a great challenge Marce, and if you want to see some more hot buns, be sure to visit the ever-expanding Daring Bakers’ Blogroll!

CH#1: Cherry-Lime Rickey Cupcakes
September 29, 2007 at 5:03 pm | Posted in cupcakes, events, sweet things | 8 Comments
I can’t really pretend to wax nostalgic about 1950s soda shops. Sure, I’ve been to couple of old-school diners and lunch counters in NYC, but they aren’t exactly the type of place where I picture my dad shared a malted with his best girl on a Saturday night as Bobby Darin sang out from the jukebox. I totally have a thing for soda fountain drinks though. Besides a good egg cream, there is another classic I adore– the cherry-lime rickey. Since Laurie from quirky cupcake has just kicked off a new event called ‘Cupcake Hero,’ and this month’s theme ingredient is lime, I thought I’d take a stab at recreating a cherry-lime rickey (non-carbonated, of course) in cupcake form.
I started with a basic vanilla cupcake, flavored with a bit of lime zest. Lots of other bloggers have had great success with Billy Reece’s Vanilla, Vanilla Cupcake recipe (he made it on the Martha Stewart Show awhile back), so i thought I would give it a try myself. It was easy to make, and the cupcakes baked up fluffy and nice–don’t overfill them though!
While the cupcakes were baking, I made a batch of lime curd and parked it in the fridge to chill. Then I whipped up some vanilla buttercream, portioned out what I needed for the cupcakes at hand, and refrigerated the rest for another time. To give the buttercream flavor, I added a bit of cherry jam, some chopped cherries and some chilled lime curd. I filled my cooled cupcakes with cherry jam and lime curd, topped them with cherry buttercream, and added a little garnish. A cherry-lime rickey cupcake…coolsville. I dig it.

Cherry-Lime Rickey Cupcakes– makes 12 regular-size cupcakes
-Start with a batch of baked and cooled vanilla cupcakes flavored with lime zest. (I used Billy’s Vanilla, Vanilla Cupcakes. Not wanting 30 cupcakes, I did a half batch and mixed in the zest of one lime at the end.)
-Make and chill the lime curd (recipe below).
-Make the vanilla buttercream (recipe below). Flavor it with a spoonful of cherry jam, 1/4 cup of lime curd and a handful of chopped cherries (fresh or canned).
-To fill the cupcakes, use a small knife or round cookie cutter to cut a plug out of the center of each (going in from the top). Save the top bit of each plug. Put a small blob of cherry jam at the bottom of each cavity, then fill the rest up with lime curd. Cover with the top bit so the curd is not exposed.
-Top with buttercream and garnish with a cherry and a lime slice.
Lime Curd– makes about 1 2/3 cups
2/3 cup sugar
3 eggs
1/2 cup strained lime juice
zest of 1 lime
pinch of salt
4 T unsalted butter
-Bring a few inches of water to a simmer in a medium saucepot. In a heatproof bowl, whisk together the sugar, eggs, lime juice and zest and a pinch of salt. Set the bowl over the simmering water (making a double boiler).
–Whisk frequently until thickened. Becasue it’s over a double boiler, you can walk away for a minute or so if need be.
-Remove from the heat and whisk in the butter, a bit at a time, until it is fully incorporated.
-Pass through a fine sieve into a clean bowl or container. Press plastic wrap directly on surface and refrigerate until cold. Either use it up or transfer to an airtight container, keeping plastic wrap on the surface for storage. This way, it can keep in the fridge for about a week.
Vanilla Buttercream– makes about 2 cups
adapted from Cook’s Illustrated’s Baking Illustrated
2 large eggs
1/2 cup (3.5 oz) sugar
1 t vanilla extract
pinch of salt
8 oz unsalted butter, softened but still cool, cut into pieces
-Bring a few inches of water to a simmer in a medium saucepot. In the bowl of a standing mixer, whisk together the eggs, sugar, vanilla and a pinch of salt. Set the bowl over the simmering water (making a double boiler). Whisk gently but constantly until the mixture reaches 160°F. It should be thin and foamy.
-Transfer the bowl to the mixer and whip until light, airy and room temperature. This should take about five minutes. Reduce the speed and whip in the butter, piece by piece. If it looks curdled halfway through, it should come together as you add the remaining butter.
-Once all the butter is incorporated, beat on high speed for about a minute until light and fluffy. You can refrigerate, covered, for up to five days.
HHDD#15: Butterscotch Tart
September 27, 2007 at 7:54 pm | Posted in events, pies & tarts, sweet things | 24 Comments
I had been wondering what to do with the chocolate tart dough in my freezer, leftover from last month’s Daring Bakers’ Challenge. Then along came Hay Hay It’s Donna Day hosted by Sarina the TriniGourmet! Sarina picked tarts for this month’s theme, so I it was the perfect time to use that stuff up.
In my excitement over the latest cookbooks with glossy pages and beautiful photos, I sometimes forget about the old classics that are also on my bookshelf. James Beard’s American Cookery may be paperback, and may just have a few black and white illustrations of old-school kitchen gadgets, but it is not to be neglected. It is one of the most useful books I have. Flipping through it while my husband was watching something uninteresting on TV the other night, I came across his recipe for butterscotch pie. Butterscotch is a real favorite of mine…my first choice for a sundae topping, without a doubt. I thought that if I took his custard filling and the dough I already had, I could make some pretty nice little tartlettes. Finished off with a little whipped cream, it made a great old-fashioned dessert.
Although you can use your favorite tart dough (chocolate or plain), or even a crumb crust, you can find the recipe for the dough I used at Veronica’s Test Kitchen. As is, it is quite a big batch (enough for three 9.5-inch tarts), but can easily be scaled back to make a half or a third of the quantity. Blind bake the chilled dough in the tart or tartlette pans, docked and weighted, until fully cooked. Let the crust cool completely before filling. If it will take you a couple of days to finish the tart/tartlettes, I have a tip to keep your crust from getting soggy under the custard filling. You can lightly “paint” the insides of a cooled chocolate crust with some melted chocolate and put it in the refrigerator for the chocolate to set. This acts as a barrier between the filling and crust. For a plain crust, you can get a similar result by lightly painting the insides with egg wash while still hot (just out of the oven, so the egg wash doesn’t remain raw). If you plan to finish the tart the day it is made, or if you are using a crumb crust, you can skip this step.

Butterscotch Pie- makes one 9-inch pie or tart or twelve 3.5-inch tartlettes
adapted from James Beard’s American Cookery
3-4 T butter
1 1/4 cups light brown sugar
3 cups whole milk, light cream, or half milk and half evaporated milk
2 eggs
7 T all-purpose flour
1/4 t salt
1 t vanilla extract
splash of dark rum (optional–my modification)
fully baked crust or tartlette shells
-Melt the butter in a 2-quart saucepan. Add the brown sugar and stir until reaches 220°F (will bubble up and look slightly browner). Add 2 cups of the milk and whisk to combine.
-In a bowl, whisk the eggs, flour and salt to combine. Then whisk in the remaining cup of milk.
-When the sugar/milk mixture is hot but not boiling, slowly stir in the egg mixture (I tempered my eggs with some hot liquid first). Treat this like a pastry cream, whisking constantly over medium-low heat until it just bubbles. Turn down the heat (very low) and cook one or two minutes longer. Take off the heat and beat in vanilla and rum, if using.
-Strain through a fine sieve into a clean bowl, press plastic wrap directly on surface and cool to room temperature.
-Turn into baked, cooled crust. Smooth surface with on an offset. Press plastic wrap on surface and refrigerate until fully chilled, about three hours.
-Top with lightly sweetened whipped cream (or rum whipped cream!).
SHF#35: Fig and Raspberry Compote over Ice Cream
September 25, 2007 at 11:51 am | Posted in events, ice creams & frozen, other sweet, sweet things | 11 Comments
OMG…there are so many events I want to do this month, and of course I’ve saved them all until the last second! I’ve always been a procrastinator, so this is really just par for the course. But anyway, there will be lots of desserts for R and me (and a barrage of posts for you) this last week of September! So to kick things off, I’m starting with what’s due in just a couple of hours– Sugar High Friday! This month’s hostess is Ivonne, author of the addictively delicious Cream Puffs in Venice, and she’s chosen ‘The Beautiful Fig‘ as her theme.
For a long time I thought figs were really not so beautiful. Fig Newtons (to me anyway) are gross, and so fresh figs suffered from guilt by association. I never even had one until my mid-twenties. I was surprised to find that a fresh fig is sweet and soft, smells great, is pretty and pleasantly seedy–nothing like the icky pasty stuff inside a Newton! I am still not crazy about dried figs, unless they have been heavily booze-soaked. But alas, the fruit (it’s actually a flower, as I read on Cream Puff’s blog) was to suffer another setback when the most annoyingly twitty boy in my culinary school class described a fresh fig as being like a certain part of a woman! Ack–why, WHY did I have to hear that, especially from him?!? Some mental scarring still remains, but I no longer take things out on the innocent fig.

My inspiration for this recipe comes from Regan Daley’s recipe for oven-roasted figs with honey and orange in In the Sweet Kitchen, one of my bookshelf favorites. I tweaked the technique and ingredients a bit because the figs right now in Sydney are maybe not quite as beautiful as their fall counterparts up in the Northern Hemisphere. Chef Daley roasts the figs in the oven in a bath of orange juice, honey and spices. I gave this method a test drive last week, and it truly tasted fabulous, but it kind of drained the color out of my figs. I like to get a pretty picture you know, so I tried again, reducing my liquid to a loose syrup on the stove top before adding the figs to just briefly soften. Once off the heat, I then stirred in a handful of raspberries for some extra visual pop (not to mention they taste great with figs). I let the compote cool just slightly and then put it over vanilla ice cream. I think it would be great with yogurt, too. Scrummy and beautiful!
Fig and Raspberry Compote– makes three or four servings, depending on how much fruit you use
1 orange, zested and juiced
1 cinnamon stick
2 cardamom pods, smashed
1/4 c honey
2 T sugar
pinch of salt
2 T unsalted butter
several figs, quartered (I used 5 figs, but you could throw in a couple more)
handful of raspberries (fresh or frozen)
-Combine the orange juice and zest, cinnamon stick, cardamom pods, honey, sugar and salt in a small sauce pan. Simmer until cooked down and slightly syrupy. Whisk in the butter.
-Add the cut figs, tossing in the syrup. If your figs are ripe and soft, you can remove the pan from the stove top, and the residual heat from the syrup should warm them through. If your figs are on the firm side, continue to gently simmer in the syrup until they soften slightly, about five minutes.
-Once off the heat, discard the cinnamon stick and cardamom pods. Toss in the raspberries, coating with syrup.
-Allow to cool for about 10 minutes before spooning over ice cream.
Back to School: Celebration Cupcakes
September 17, 2007 at 10:07 am | Posted in around sydney, classes, cupcakes, sweet things | 25 Comments
I took another course at Planet Cake in Balmain this weekend. This time, the theme was “celebration cupcakes.” Obviously, these are for celebrating something very girly! They were a lot of fun to make…a little time-consuming, but really not very hard.

Breakfast Couscous
September 8, 2007 at 6:04 pm | Posted in breakfast things, cereals, out of town | 18 Comments
Sounds weird, right? Maybe even a little gross? No, bear with me…it’s good. Honest.
R and I were in Shanghai in August. It’s a crazy city– crowded, and with tons of new construction going up all over the place. In the middle of it all, I ran into someone I used to work with in New York years ago in my past life as an investment banker. But that’s a different story.
As a break from stuffing ourselves with crab xiao long bao , we headed over to a “western” cafe in Pudong called Slice for breakfast one morning. I wanted to go there because I had read that a Shanghai-based baker from New Zealand named Dean Brettschneider makes the breads. I am a big fan of his book Taste (and am searching secondhand bookstores for his previous and now out-of-print book Baker…if anyone has it, are you taking bids?), so I naturally wanted to try his stuff. I happily munched away on the best bagel and rye bread I’ve had since leaving NYC, while Rich ordered this couscous stuff off the menu. It had dried fruit and nuts, yogurt on top and just a touch of sweetness.
I was poking through the pantry the other day, and noticed that I had just enough couscous left for one person. Why not make breakfast couscous with it the next morning? I completely eyeballed everything, so I won’t give a hard and fast recipe, just a basic guideline.

Breakfast Couscous
this would also be good with some sweet spices, like a pinch of cinnamon or cardamom, mixed in
-Make as much couscous as you like (for one serving, I used 1/2 cup of dried couscous), according to package instructions, but add a touch of honey to the hot water so it can be absorbed into the couscous along with the liquid.
-Put as much dried fruit as you want to use (I used a handful of dried apricots, chopped, and some dried cherries) into a small bowl and cover with boiling water to plump while the couscous sits.
-When your couscous has absorbed the water and softened, fluff it up with a fork. Drain the dried fruit and mix into the couscous.
-Portion into serving bowls.
-Sprinkle with nuts (I used chopped almonds, but pistachios would be great, too) and top with a couple of spoonfuls of plain yogurt.
-Drizzle honey on top.
I love cake…
September 2, 2007 at 5:56 pm | Posted in cakes & tortes, layer cakes, sweet things | 7 Comments
…so much that I decorated it with hearts!
Daring Bakers in August: Milk Chocolate and Caramel Tart
August 29, 2007 at 4:56 pm | Posted in daring bakers, groups, pies & tarts, sweet things | 49 Comments
I was just a lil’ bit excited to see that for this month’s Daring Bakers’ challenge, our co-hosts Veronica and Patricia chose a milk chocolate and caramel tart from Eric Kayser’s book Sweet and Savory Tarts. Not only do I love chocolate and caramel (who doesn’t, really?), I love making tarts, especially when they have a few different components like this one. And, although we were warned from the get-go that the directions were sparse and we’d have to read between the lines, at least there would be no fiddling around with agar-agar like last time.
The first part of the recipe to tackle was the pastry dough. The recipe described it as a “chocolate shortbread pastry,” flavored with cocoa powder, ground hazelnuts and cinnamon. Some bakers who tried out the recipe early in the month found the cinnamon to be overwhelming, and it was later deemed optional by the Veronica and Patricia. I followed these bakers’ advice and opted out of the cinnamon in my batch. I chose to make my dough in the KitchenAid (with the paddle attachment), rather than in the food processor. It just seemed less messy, and came together easily in the mixer.
After my dough had an overnight rest in the fridge, I found it to be quite malleable and very easy to work with. The dough really didn’t resemble shortbread though, and neither the finished product, but it did bake up nice and crisp. I decided to go the mini route and used my 3.5″ fluted tartlette pans to form the shells. I docked them well and blind baked them with beans, thanks to the advice of those bakers who had made the recipe early on. Even though they were small, my shells did take several minutes longer to bake than the recipe stated. And I had to be more careful than I would have liked removing the parchment and beans from the baked shells, because the dough wanted badly to stick to the parchment. With a little patience though, everything was fine. I made eight little tartlettes and put the extra unbaked dough in the freezer for another time.
The next step was to make the caramel layer hidden in the middle of the tart. I must admit here that I only made a half-batch of caramel, since I didn’t make the big 10″ tart. R and I can’t finish a whole tart ourselves, but I promise I was true to the ingredients, techniques and proportions. Our co-hosts did give us a choice when it came to the caramel: while the recipe called for using the dry technique, we could switch that to a wet caramel if we were more confident with the wet method. I have actually made an unusual amount of caramel sauce in my time, and am comfortable with both ways, so I went ahead with the dry version before adding butter and cream. I took it to the edge of dark-but-not-burned, so it would be a bit more flavorful and wouldn’t cause a toothache in combination with the milk chocolate. (To make a dry caramel, I add the sugar in stages, starting with just enough to cover the bottom of the pan. When that melts and begins to color, I add a little more.) To the cooled caramel base, eggs and flour were added so it would set up into a soft but firm candy-like layer in the oven, rather than remain an oozy sauce.
Once again, the caramel in my little tarts had to spend about five minutes longer in the oven than the recipe stated to set up. I baked them until the caramel looked well set around the edges and was no longer jiggly in the center. After cooling down on the counter for about 30 minutes, I popped them in the fridge to thoroughly set for a few hours and charged on with the caramel decorations.
I was hoping to do sugar curls or something fun, but I made this recipe during a patch of rainy days here in Sydney. Humidity and sugarwork are archenemies, so my experiments were just a sticky mess. I resorted to the basic caramel fragments suggested in the recipe, but even they stuck together in little clumps after I broke them up. I liked them though…they looked like sparkly jewels.

For the last step before decoration (and eating!), I made the “chocolate mousse” layer. It was just melted milk chocolate folded together with whipped cream. I just had to be sure to let the chocolate cool to about body temperature before combining, so it wouldn’t melt the cream. I used Green & Black’s organic milk chocolate. They claim to use more cocoa solids than other brands, making it a “darker” milk chocolate. I had never tried it, but as a dark chocolate freak, I was interested in finding something a little less sweet. As luck would have it, it was also on sale!

Eight mini tarts equals four days of dessert for R and me, so I made scaled back amounts of the mousse as well…just enough to fill two each day. After piling on the mousse and letting the tarts chill for a bit, it was time to decorate and try. Boy, were they good…almost like a candy bar, but not too sweet. I tried to get fairly equal layers of caramel and chocolate, and was really surprised by how nicely the tarts cut. All in all, I’d say this one’s a keeper, and it wasn’t even too complicated– thanks Veronica and Patricia! I am interested in trying it with dark chocolate though…
You can find the recipe here or here. If you’re nosey like I am, check out the Daring Bakers’ Blogroll to see how everyone else attacked this month’s challenge!
Baked Fresh Weekly

Blog at WordPress.com.
Entries and comments feeds.
