Tuesdays with Dorie: Almost-Fudge Gâteau
February 19, 2008 at 6:33 am | Posted in cakes & tortes, groups, sweet things, tuesdays with dorie | 42 Comments
For this week’s installment of Tuesdays with Dorie, Nikki of Crazy Delicious has chosen Dorie’s Almost-Fudge Gâteau. I love saying the word “gâteau”…sounds so elegant! A dense chocolate cake with bittersweet glaze certainly is elegant, and luckily this one is a snap to make, too. I made a half-recipe to fit my 6-inch springform…that pan is getting a workout lately!

I thought this would make a perfect Valentine’s Day dessert. I actually had to work that night and was unable to make it then, but turns out it was also a perfect Sunday night dessert. (It was even more fudgey on Monday night!) And I still went ahead and decorated it with sugar hearts and pink pearls. It was really great with a little espresso ice cream on the side.

The recipe is, of course, in Baking: From My Home to Yours by Dorie Greenspan, but you can also find it on Crazy Delicious. The TWD group is growing by leaps and bounds…check out all of our gâteaux on the Tuesdays with Dorie site.
Tuesdays with Dorie: Brown Sugar-Apple Cheesecake
February 12, 2008 at 8:32 pm | Posted in cakes & tortes, cheesecakes, groups, sweet things, tuesdays with dorie | 36 Comments
Brown Sugar-Apple Cheesecake–doesn’t that just sound so good? This Tuesdays with Dorie recipe was hand-picked for us by Jaime of Good Eats n’ Sweet Treats. I like all kinds of cheesecake, but I’d never made one quite like this before. Usually I do the standard graham cracker crust and regular base, with maybe some type of berry coulis swirled in (here’s an example). This one has a gingersnap crust supporting a cheesecake sweetened with brown sugar and cider. And there’s a layer of caramelized apples hiding inside!
I was quite pleased to remember that on a trip to IKEA a couple months ago I’d bought a package of Swedish gingersnaps, and they were still unopened in my cupboard. Also, as we roll into fall here in the southern hemisphere, we are now getting “new season” apples at the market…much better than ones that have been sitting around for nine months. So all systems were go for making this cheesecake! I do often have a hard time judging when a cheesecake is ready to come out of the oven (quiche and brownies also torture me this way). Mine didn’t crack on the sides as per the instructions, but it seemed fully set, so I crossed my fingers and took it out. I was worried about overbaking it, too, since I’d halved the recipe and made a six-inch cake.

Seems like it came out just fine. I had some apple jelly in the fridge, so once it was cool, I glazed the top of my cake for a little shine. I love how high up the sides the crust came. The spices (cinnamon and ginger in the base) were just right, and the cheesecake was really creamy.
This recipe is from the book Baking: From My Home to Yours by Dorie Greenspan, and you can find it here on Good Eats n’ Sweet Treats. It’s really good, so thanks Jamie for choosing it! Also check out the blogroll on the Tuesdays with Dorie site to see all of our cream cheese creations this week.
Tuesdays with Dorie: Black-and-White-Chocolate Cake
February 5, 2008 at 6:32 am | Posted in cakes & tortes, layer cakes, sweet things, tuesdays with dorie | 42 Comments
Like probably a lot of you, I have a bookshelf dedicated to my cookbooks. I read them, I admire them, I love and cherish them…but apart from a couple of standards, I don’t really use them that often. Over the holidays, I finally got Dorie Greenspan’s Baking: From My Home to Yours. I felt like the last person on Earth to get it…I wondered if anyone noticed the big “L” stamped on my forehead for the past year! From what I’ve heard, it’s a fabulous book, so I would also be a total loser if I didn’t put it to use. But I need a little peer pressure sometimes, so help cattle prod me, I just joined a really great group called Tuesdays with Dorie! The brainchild of Laurie from quirky cupcake, TWD makes one recipe a week out of Baking from My Home to Yours. It’ll take awhile, but we hope to get through the whole thing! This means that at some point I will also need to get around to baking the first five recipes that I missed out on. I’m hoping none of this is too ambitious on my part…
For my first TWD, the group is making Dorie’s Black-and-White-Chocolate Cake, a recipe chosen by April of Abbey Sweets. It’s a vanilla buttermilk cake, layered with dark chocolate pastry cream and white chocolate whipped cream. Then the whole thing gets frosted with more white chocolate whipped cream. I love me some cake, so I was pretty psyched to get this one going.
OK, if you have the book and look on page 260, you’ll probably notice that my cake doesn’t look a whole lot like Dorie’s from the outside. In fact, it looks like crap. I had some big-time filling and frosting issues…it was highly upsetting, and I almost didn’t want to post a photo. I found the white chocolate whipped cream too soft to spread on the side of the cake (I couldn’t whip it anymore, because it was beginning to look separated, and I actually had to make it twice because the first time it really did curdle and wouldn’t come back together no matter how I tried to save it). It just slid right off and mucked up the cake plate…in hindsight, I should have realized that would happen and just iced the top, leaving the side exposed for an old-fashioned look. Since the dark chocolate pastry cream was oozing out between the layers anyway, I put some that I had leftover into the freezer for half and hour and tried to use it to frost the side instead. Because of it’s consistency, I couldn’t get a nice frost with that either (that’s why no one frosts with pastry cream!), but had to settle for more of a thin smear…grrrrr. I had made some tempered chocolate curls before beginning this whole process, so I hoped they would distract the eye from my frosting failures.

Thank goodness that the inside of my cake looks more or less normal. Oh, by the way, I halved the recipe in the book so I’d just have a six-inch cake. I have have to say, the dark chocolate cream was damn good…a perfect chocolate pastry cream. The cake itself was a little dense, I thought, but this could very well be due to differences in flour (I have had a couple of baked goods come out funky using my US books and Aussie flour).
Because of the problems I had, I’m really interested to see how my fellow TWD members did with this recipe. I’m going over to the Tuesdays with Dorie blog that Laurie set up to see the list of TWD bakers and visit their sites. So should you! And if you want to try your hand at the cake, take a look here on Abbey Sweets for the recipe.
Daring Bakers in December: Yule Log
December 22, 2007 at 9:25 am | Posted in cakes & tortes, daring bakers, groups, sweet things | 54 Comments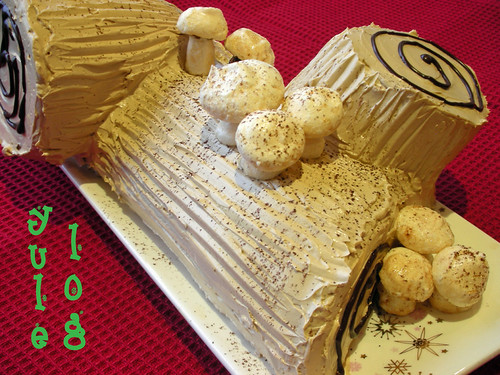
‘Tis the season…to eat cake shaped like tree branches! I love holiday baking (wish I’d gotten to do more of it this year) and I absolutely love yule log, or Bûche de Noël. If you were wondering what the Daring Bakers would be up to for the holidays, this is it! Or hosts, the co-founders of the group, Ivonne and Lisa chose a yule log, a symbol of light and warmth for this month’s challenge.

A Bûche de Noël is usually a genoise sponge cake rolled up with a filling, cut to resemble a log and frosted with buttercream. Then it gets all kinds of slightly wacky decorations. Mushrooms are a traditional yule log decoration. Don’t worry–I’m taking about sweet sugar mushrooms! We were able to chose to make our ‘shrooms from either meringue or marzipan. Not being a huge marzipan fan, I went the meringue route. I dusted them with cocoa and a little gold luster dust. My log came from a magical, sparkley forest!

I have made a couple of yule logs in the past, so I knew the general drill. The genoise sponge we used was slightly different from ones I’ve made in the past. This one had no butter and used cornstarch…more like a ladyfinger recipe I’ve used many times. I decided to keep my sponge plain in flavor, but I was worried it would dry out in the fridge, so I soaked it with a rum simple syrup before rolling it. We had to use coffee buttercream to frost the cake (which was fine by me), and it was made Swiss-meringue style.
I didn’t have any real problems making the yule log. The most difficult part was deciding on a filling, as we could chose whatever we wanted to roll our cakes up with. I decided to do a chocolate mousse filling. It set up nicely and went well with the coffee and rum flavors in the other components. Decorating the cake was a lot of fun, and we certainly had no difficulty eating it up!

I am flying to the States today for the holidays. I’m very excited about the trip, but it means I may not be able to comment on as many of my fellow DBer’s posts as I would like. I apologize for that, but do check out the Daring Bakers’ blogroll and see all the beautiful Bûche that were made! Ivonne has the recipe on her site. Happy holidays!

Raspberry Cheesecake
November 15, 2007 at 5:16 pm | Posted in cakes & tortes, cheesecakes, sweet things | 25 Comments
For my final project with the homemade graham cracker crumbs in my freezer, I decided to bake cheesecake. It had been forever since I had made or even eaten cheesecake, and luckily Philly is sold over here, so it sounded like a good plan. And I thought I would make it pink by adding some raspberries.

I started with a recipe for blueberry swirl cheesecake from Donna Hay’s Modern Classics Book 2, which I’ve made several times and particularly like because the mixture comes together lump-free in the food processor. Then I added a vanilla bean to the cream cheese mixture, changed the fruit swirl to raspberry, changed the base and changed the baking method. Now is it my own recipe? I think so.

Raspberry Cheesecake- makes a 6-inch cake
Note: If you want some extra sauce to top your finished cheesecake, make a double batch of the raspberry swirl sauce. Then use half in assembling your cheesecake and save the remaining half in a jar in the fridge for when you serve the cake.
for the base:
2-3 T unsalted butter, melted
2 T sugar
1/8 t cinnamon (optional)
pinch of salt
3/4 cup graham cracker crumbsfor the raspberry swirl:
110 g fresh or frozen raspberries
2 T sugar
small splash of water
for the filling:
300g cream cheese, softened
1/4 cup plus 2 T sour cream
1 egg
1/2 cup superfine sugar
seeds from 1/2 vanilla bean
-for the crust: Preheat oven to 350°F/180°C. Combine melted butter, sugar, cinnamon, salt and crumbs in a bowl. Press into the botton of a 6-inch springform pan and bake for about 10-15 minutes. Cool crust slightly.
-for the raspberry swirl: In a small pan over medium low heat, gently cook the raspberries with the sugar and water until the berries begin to break down, the sugar has dissolved and the mixture has thickened a bit. Squish up the berries a little and push the mixture through a sieve to remove the seeds. Set aside to cool.
-for the filling: Process the cream cheese in a food processor until smooth (don’t forget to scrape!). Add the sour cream, egg, sugar and vanilla bean seeds and process until smooth and fully combined.
-to assemble: Brush sides of the springform with a little softened butter. Wrap the outside of the pan with a double layer of foil. (The cake bakes in a water bath, and doing this will help keep water from seeping into the cake as it cooks.) Pour the filling over the graham cracker base. Drizzle the raspberry sauce over and swirl gently with a butter or pairing knife. Create a water bath by placing the cake tin in a slightly larger roasting pan or baking dish. Carefully pour hot water halfway up the sides of the springform. Bake at 280°F/140°C for a little over an hour, until the edges look set but the center jiggles slightly. Let cool on a rack, then cover and refrigerate for several hours before serving.
Daring Bakers in October: Bostini Cream Pie
October 29, 2007 at 12:07 am | Posted in cakes & tortes, daring bakers, groups, sweet things | 64 Comments
“Hey– don’t you mean Boston cream pie?” you ask. I know I’m a lousy typist, but I do in fact mean Bostini. It is, of course, a take on the traditional Boston cream pie, created by Donna Scala and Kurtis Baguley of Bistro Don Giovanni and Scala’s Bistro in Northern California– an orange-flavored chiffon cake sitting on a bed of vanilla custard and topped with chocolate glaze. Our Daring Baker hostess this month is Mary from Alpineberry, and since she first tried it about 12 years ago, Bostini cream pie has been one of her restaurant favorites. From what Mary whips up in the kitchen I’d say she has impeccable taste, so I was certainly excited to try this when I saw she had chosen it as the October challenge.
Once I got the ingredients together (a whole farm’s worth of eggs and dairy!), the recipe came together pretty easily. No troubles with the cake (I recommend squeezing the orange juice yourself for best flavor and whipping the egg whites by hand to avoid overbeating), and the custard thickened up quickly thanks to the cornstarch. The glaze couldn’t have been easier– just melted chocolate and butter.

This dessert is assembled in a ramekin or custard cup at the restaurants, but we were allowed to play with presentation, provided we didn’t stray from the ingredient list or basic concepts. I thought about putting it together in a wine glass or bowl, but wanted to put some cute new teacups to use, so I really didn’t play too much. I baked my chiffon cakes in a muffin tin rather than using the same cups I assembled the cake in (as the recipe instructed). I don’t know if my teacups are oven-proof, and didn’t want to chance blowing them up the first time I used them! Also, I liked that the muffin-sized cakes were a bit smaller than the cups, so that all the drippy glaze could run into the custard instead of just down the outside of the cups.

Boston cream pie is R’s number one dessert, and he really liked this version of it. And my brother, who is visiting from Seattle, just loved the custard. I am one of those weirdos who doesn’t like the combination of fruit and chocolate, but the orange flavor was pretty subtle and fresh, so I didn’t mind it here. This dessert is super-rich, so you can get away with a small portion, even though the recipe yields quite a lot. (I actually halved the custard and glaze amounts. I made the full recipe of cake and froze what we didn’t eat right away.) As you can see from the top picture, my oranges were larger than my dessert, and it was plenty!
Thanks to Mary for picking another winning DB challenge! You can check out the recipe over on her site. Don’t forget to look at all the other Bostinis out there by visiting the Daring Bakers’ Blogroll. From some sneak previews I’ve seen, they look pretty good…
I love cake…
September 2, 2007 at 5:56 pm | Posted in cakes & tortes, layer cakes, sweet things | 7 Comments
…so much that I decorated it with hearts!
Red Velvet Cake (a.k.a. Red Silk)
August 14, 2007 at 5:38 pm | Posted in cakes & tortes, layer cakes, sweet things | 15 Comments
*I Photoshopped that candle flame in– how fake does that look??
Every year around the start of August, I ask R to think about what kind of cake he’d like me to make for his birthday. I’ve done Boston Cream a couple of times, Black Forest, and once even a chocolate cream pie. This year he asked for a “red silk cake.” Hmmm…I wasn’t sure what that was, but I thought I should know, so I said no problem. I would figure it out.
I couldn’t figure it out. So the next day I broke down and asked for clarification. What he described was just a red velvet cake. Can’t blame the guy for confusing his fabrics, but now I can’t stop calling it “red silk,” and as it sounds sort of exotic, it must be said in a sultry whisper.
I’ve never actually had red silk…umm, velvet…cake myself. One time, years back, I saw Martha Stewart and a guest make it on her old show. I saw them put two bottles of McCormick red food coloring into the batter! Horrifying– I mean, remember when they thought red M&Ms would kill you?
I remembered seeing that the Daring Bakers had risen to the red velvet challenge back in March. That was before my time in the group, but I looked back over many of the posts to see their individual experiences and to know what to expect. Most thought a cream cheese frosting was traditional and that the chocolate flavor of the cake was very subtle.
There were a lot of different recipes out there, but I wound up going with one in a book I have at home. I’ve had the Chocolate Bar cookbook for sometime, without ever having baked from it. Now was as good a time as any to try it out. The book was written by Matt Lewis and Alison Nelson, and I chose this recipe because Mr. Lewis is now a co-owner of Baked in Red Hook, a favorite sweet spot when I lived in Brooklyn. The cake and frosting recipes below are for an 8-inch three layer cake, but I halved the recipes below to make a six-inch two layer one instead. Also, I only have gel food coloring, so I just used a little squirt (in case you wonder why it’s not super duper red) and added a spoonful of extra boiling water to make up for the missing liquid.

Although in the book, the authors recommend a vanilla buttercream (at Baked they use a cinnamon buttercream and decorate with red hots), I decided to go the cream cheese frosting route instead. I found this to be a tricky cake to ice– even with a crumb coat, there were little flecks of red all over the place. Oh well…one of the charms of homemade, I guess. R thought it looked and tasted great, and since it was his birthday, that’s all that matters to me.
Red Velvet Cake – makes three 8-inch rounds
adapted from Matt Lewis and Alison Nelson’s Chocolate Bar
4 T cocoa powder
1 oz red food coloring
2 1/2 cups cake flour
1 t salt
1 cup buttermilk
6 T (3 oz) unsalted butter, room temperature
1 t vanilla extract
1 T plus 1 1/2 t vegetable shortening, room temperature
1 2/3 cups sugar
2 large eggs
1 egg yolk
2 T boiling water
1 T white vinegar
1 t baking soda
-Preheat oven to 350°F/180°C. Grease and flour three 8-inch round cake pans lined with parchment circles.
-In a small bowl, whisk together the cocoa powder, food coloring and 2 T boiling water. Set mixture aside to cool.
-In the bowl of standing mixer, cream together butter and shortening on high speed until light. Add sugar and continue beating until pale and fluffy, about 5 minutes. Add eggs and egg yolk, one at a time, beating thoroughly after each.
-Mix buttermilk and vanilla into cooled cocoa mixture.
-Sift together flour and salt. With the mixer on low, alternatley add flour and cocoa mixtures, beginning and ending with flour mixture. Mix until just incorporated.
-In a cup, dissolve the baking soda in the vinegar (it will be fizzy). Add immediately to batter and mix until just combined.
-Divide the batter between the prepared cake pans. Bake until a cake tester inserted into the center of the cake comes out clean or with a few moist crumbs, about 30 minutes.
-Cool cakes on a rack in their pans for 10 minutes. Then turn out and let them finish cooling completely on the rack. When cool, frost with cream cheese frosting, below.
Vanilla Bean Cream Cheese Frosting – makes enough for a three-tier 8-inch cake
1 pound cream cheese, room temperature
1/2 pound unsalted butter, room temperature
3/4 t vanilla bean paste (can substitute 1 t extract)
1 pound powdered sugar, sifted
-In the bowl of an electric mixer, slowly paddle the cream cheese, butter and vanilla bean paste. Add the powdered sugar and mix until just smooth, scraping sides of bowl as necessary. If too soft to spread, add more powdered sugar until it reaches desired consistency.
Daring Bakers in July: Strawberry Mirror Cake
July 30, 2007 at 3:43 pm | Posted in cakes & tortes, daring bakers, groups, sweet things | 50 Comments
Sometimes when a challenge is thrown my way, I shake my Magic 8 Ball to predict the outcome. But here, I think I’ll take a cue from the Queen in Snow White: “Mirror, mirror on the wall. Will I skate through my first Daring Bakers challenge, or will I fall?”
Yes, that’s right. I’m now a whisk-wielding member of Daring Bakers. For months I’ve read about the escapades of this group, and I’m very pleased to be able to display the logo myself. Isn’t she cute?
Our hostess of the month, Peabody from Culinary Concoctions by Peabody, had us tackle a strawberry mirror cake. I’ve actually made a similar cake once before (in culinary school…I think we called it “fruit mousse miroir”), so I was reasonably familiar with its components– sponge cake Bavarian cream and gelée. I knew that gelatin is what makes this cake possible, but I don’t eat red meat, so I also do my best to avoid gelatin. One of the hard and fast rules of DB membership is that you must make the recipe the way it is written, and resist the urge to tinker and tweak. An exception is allowed for food allergies or strong aversions, so the green-light was given to use agar-agar as a gelatin substitute.
Armed with my agar powder, a whole bunch of eggs and several baskets of surprisingly nice-looking winter strawberries, I set out to make the cake.

I started by making the sponge cake, which was easy and really delicious. I had a fair amount of scrap left over, so I stuck it in the freezer where it is waiting to be reincarnated, possibly as a trifle….mmm.
From there, however, things took a turn for the difficult. I had never actually used agar-agar before, and really had no idea how. I did some reading on the subject, but perhaps too much, because I wound up confused. You can substitute powdered agar-agar for powdered gelatin in equal amounts, but strawberries are acidic, so they might require more agar…you need to boil it, but it sets at room temperature, blah blah blah. What did I get myself into?
In terms of dissolving the agar-agar in boiling liquid, I did what I thought was best without altering the amount of liquid in the recipe (that was my real concern with using the stuff). Everything looked the way it was supposed to, which was a good sign. So I crossed my fingers and slid the cake tin in the fridge for a nice long rest. When I popped the cake out of the tin, I couldn’t believe how big it looked on the stand–with only two of us in the house, I’m used to just making little six-inchers. It was quite shiny and splendid in all its red and pink glory, and I could actually see a bit of my reflection on the surface!

It’s not all about looks here, though. What’s inside counts, too. I knew I had to bite the bullet and cut the cake, and I was nervous. The Bavarian cream was a bit softly set, but held up fine. Sadly though, it had a bit of a pasty texture that I wasn’t too fond of. I know that had nothing to do with the original recipe. It was the fault of the agar, or more likely, the fault of the person using the agar.

I’m not too keen to blindly experiment with agar-agar again anytime soon, but I have a packet in my pantry in case the urge surfaces. I am a Daring Baker now, after all.
To see how the other DB members tackled this assignment, visit the Daring Bakers’ Blogroll. And if you know of any worthwhile books with recipes designed specifically for agar-agar, or if you’ve had good luck with any of the Kosher gelatins available, please let me know!
Back to School: Madhatter Cake
July 22, 2007 at 5:15 pm | Posted in around sydney, cakes & tortes, classes, sweet things | 33 Comments
I’ve just finished a two-day decorating course on a wacky cake design called a “madhatter cake.” I took the course at Planet Cake in Balmain, where they make all sorts of gorgeous couture cakes.

I’m by no means an expert cake decorator, so there were plenty of things I found tricky about this design. It required a lot of precise trimming to get the angles on the finished cake just right. Also, while I have covered plenty of cakes with rolled fondant, the moment before I drape the fondant over the cake, I always have a mini heart attack! I find it so hard to make it perfect, and it’s even more so when the shape is all “wonky” like this. All in all, I’m quite happy with the way this came out though, and I’m especially fond of the poofy bow on top (even though I did slightly ding up one side of it in the car on the way home–crap!). The cake inside is a very dense mud cake that R and I will be eating for the next five years.

Baked Fresh Weekly

Blog at WordPress.com.
Entries and comments feeds.

