Leftover Lime Curd Tart
October 15, 2007 at 10:39 am | Posted in pies & tarts, sweet things | 10 Comments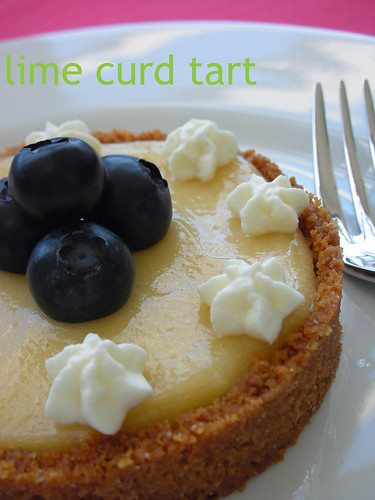
What you do when you’ve started a new job and are working your tail off and don’t have time to cook, bake or post (I will stop there otherwise this will just get all whiny)? You reincarnate what’s already kicking around in the fridge and then post about it two weeks later.
After eating our fill of cherry-lime rickey cupcakes at the end of September, I had a bit of the lime curd filling left. There were also those graham cracker crumbs that had been in the freezer for God knows how long (and even after this, I still have some in there!). I eyeballed a quick crumb crust using sugar and cinnamon to taste and enough melted butter to hold it all together, and then baked off a couple of mini tart shells. I filled the cooled shells with lime curd and added berries and whipped cream on top. Voilà– dessert made in record time.
HHDD#15: Butterscotch Tart
September 27, 2007 at 7:54 pm | Posted in events, pies & tarts, sweet things | 24 Comments
I had been wondering what to do with the chocolate tart dough in my freezer, leftover from last month’s Daring Bakers’ Challenge. Then along came Hay Hay It’s Donna Day hosted by Sarina the TriniGourmet! Sarina picked tarts for this month’s theme, so I it was the perfect time to use that stuff up.
In my excitement over the latest cookbooks with glossy pages and beautiful photos, I sometimes forget about the old classics that are also on my bookshelf. James Beard’s American Cookery may be paperback, and may just have a few black and white illustrations of old-school kitchen gadgets, but it is not to be neglected. It is one of the most useful books I have. Flipping through it while my husband was watching something uninteresting on TV the other night, I came across his recipe for butterscotch pie. Butterscotch is a real favorite of mine…my first choice for a sundae topping, without a doubt. I thought that if I took his custard filling and the dough I already had, I could make some pretty nice little tartlettes. Finished off with a little whipped cream, it made a great old-fashioned dessert.
Although you can use your favorite tart dough (chocolate or plain), or even a crumb crust, you can find the recipe for the dough I used at Veronica’s Test Kitchen. As is, it is quite a big batch (enough for three 9.5-inch tarts), but can easily be scaled back to make a half or a third of the quantity. Blind bake the chilled dough in the tart or tartlette pans, docked and weighted, until fully cooked. Let the crust cool completely before filling. If it will take you a couple of days to finish the tart/tartlettes, I have a tip to keep your crust from getting soggy under the custard filling. You can lightly “paint” the insides of a cooled chocolate crust with some melted chocolate and put it in the refrigerator for the chocolate to set. This acts as a barrier between the filling and crust. For a plain crust, you can get a similar result by lightly painting the insides with egg wash while still hot (just out of the oven, so the egg wash doesn’t remain raw). If you plan to finish the tart the day it is made, or if you are using a crumb crust, you can skip this step.

Butterscotch Pie- makes one 9-inch pie or tart or twelve 3.5-inch tartlettes
adapted from James Beard’s American Cookery
3-4 T butter
1 1/4 cups light brown sugar
3 cups whole milk, light cream, or half milk and half evaporated milk
2 eggs
7 T all-purpose flour
1/4 t salt
1 t vanilla extract
splash of dark rum (optional–my modification)
fully baked crust or tartlette shells
-Melt the butter in a 2-quart saucepan. Add the brown sugar and stir until reaches 220°F (will bubble up and look slightly browner). Add 2 cups of the milk and whisk to combine.
-In a bowl, whisk the eggs, flour and salt to combine. Then whisk in the remaining cup of milk.
-When the sugar/milk mixture is hot but not boiling, slowly stir in the egg mixture (I tempered my eggs with some hot liquid first). Treat this like a pastry cream, whisking constantly over medium-low heat until it just bubbles. Turn down the heat (very low) and cook one or two minutes longer. Take off the heat and beat in vanilla and rum, if using.
-Strain through a fine sieve into a clean bowl, press plastic wrap directly on surface and cool to room temperature.
-Turn into baked, cooled crust. Smooth surface with on an offset. Press plastic wrap on surface and refrigerate until fully chilled, about three hours.
-Top with lightly sweetened whipped cream (or rum whipped cream!).
Daring Bakers in August: Milk Chocolate and Caramel Tart
August 29, 2007 at 4:56 pm | Posted in daring bakers, groups, pies & tarts, sweet things | 49 Comments
I was just a lil’ bit excited to see that for this month’s Daring Bakers’ challenge, our co-hosts Veronica and Patricia chose a milk chocolate and caramel tart from Eric Kayser’s book Sweet and Savory Tarts. Not only do I love chocolate and caramel (who doesn’t, really?), I love making tarts, especially when they have a few different components like this one. And, although we were warned from the get-go that the directions were sparse and we’d have to read between the lines, at least there would be no fiddling around with agar-agar like last time.
The first part of the recipe to tackle was the pastry dough. The recipe described it as a “chocolate shortbread pastry,” flavored with cocoa powder, ground hazelnuts and cinnamon. Some bakers who tried out the recipe early in the month found the cinnamon to be overwhelming, and it was later deemed optional by the Veronica and Patricia. I followed these bakers’ advice and opted out of the cinnamon in my batch. I chose to make my dough in the KitchenAid (with the paddle attachment), rather than in the food processor. It just seemed less messy, and came together easily in the mixer.
After my dough had an overnight rest in the fridge, I found it to be quite malleable and very easy to work with. The dough really didn’t resemble shortbread though, and neither the finished product, but it did bake up nice and crisp. I decided to go the mini route and used my 3.5″ fluted tartlette pans to form the shells. I docked them well and blind baked them with beans, thanks to the advice of those bakers who had made the recipe early on. Even though they were small, my shells did take several minutes longer to bake than the recipe stated. And I had to be more careful than I would have liked removing the parchment and beans from the baked shells, because the dough wanted badly to stick to the parchment. With a little patience though, everything was fine. I made eight little tartlettes and put the extra unbaked dough in the freezer for another time.
The next step was to make the caramel layer hidden in the middle of the tart. I must admit here that I only made a half-batch of caramel, since I didn’t make the big 10″ tart. R and I can’t finish a whole tart ourselves, but I promise I was true to the ingredients, techniques and proportions. Our co-hosts did give us a choice when it came to the caramel: while the recipe called for using the dry technique, we could switch that to a wet caramel if we were more confident with the wet method. I have actually made an unusual amount of caramel sauce in my time, and am comfortable with both ways, so I went ahead with the dry version before adding butter and cream. I took it to the edge of dark-but-not-burned, so it would be a bit more flavorful and wouldn’t cause a toothache in combination with the milk chocolate. (To make a dry caramel, I add the sugar in stages, starting with just enough to cover the bottom of the pan. When that melts and begins to color, I add a little more.) To the cooled caramel base, eggs and flour were added so it would set up into a soft but firm candy-like layer in the oven, rather than remain an oozy sauce.
Once again, the caramel in my little tarts had to spend about five minutes longer in the oven than the recipe stated to set up. I baked them until the caramel looked well set around the edges and was no longer jiggly in the center. After cooling down on the counter for about 30 minutes, I popped them in the fridge to thoroughly set for a few hours and charged on with the caramel decorations.
I was hoping to do sugar curls or something fun, but I made this recipe during a patch of rainy days here in Sydney. Humidity and sugarwork are archenemies, so my experiments were just a sticky mess. I resorted to the basic caramel fragments suggested in the recipe, but even they stuck together in little clumps after I broke them up. I liked them though…they looked like sparkly jewels.

For the last step before decoration (and eating!), I made the “chocolate mousse” layer. It was just melted milk chocolate folded together with whipped cream. I just had to be sure to let the chocolate cool to about body temperature before combining, so it wouldn’t melt the cream. I used Green & Black’s organic milk chocolate. They claim to use more cocoa solids than other brands, making it a “darker” milk chocolate. I had never tried it, but as a dark chocolate freak, I was interested in finding something a little less sweet. As luck would have it, it was also on sale!

Eight mini tarts equals four days of dessert for R and me, so I made scaled back amounts of the mousse as well…just enough to fill two each day. After piling on the mousse and letting the tarts chill for a bit, it was time to decorate and try. Boy, were they good…almost like a candy bar, but not too sweet. I tried to get fairly equal layers of caramel and chocolate, and was really surprised by how nicely the tarts cut. All in all, I’d say this one’s a keeper, and it wasn’t even too complicated– thanks Veronica and Patricia! I am interested in trying it with dark chocolate though…
You can find the recipe here or here. If you’re nosey like I am, check out the Daring Bakers’ Blogroll to see how everyone else attacked this month’s challenge!

Honey Nut Tart
July 24, 2007 at 12:57 pm | Posted in out of town, pies & tarts, sweet things | 9 Comments
I don’t think I mentioned this, but R and I made a weekend trip to Auckland, NZ back in early June. I was my first time in the country, and since it’s probably the closest “foreign land” (anywhere else seems to be at least a nine hour plane ride away), I’m sure we’ll be back. I’m dying to go to the South Island, home of the world’s best Sauvignon blanc…but I digress! We had great time in Auckland. It’s a nice small city with big city food. We had a beautiful dinner and way too much wine at The French Café. During a leisurely lunch at The Grove, we even got to chit-chat with one of the owners, an American who fell in love with the country while traveling years ago.
On Sunday afternoon, we took a short ferry ride from downtown Auckland over to Waiheke Island, where, thanks to the advice of a friend of a friend, we had made a lunch reservation at a vineyard called Te Whau. I very much enjoyed their signature house-smoked salmon, and then had john dory (my favorite fish–lucky for me it was a special that day). I’ve gotta draw the line somewhere, so I don’t normally go for dessert with lunch, but this was vacation. I wouldn’t beat myself up too much if we just shared one. Exercising my wifely right to make decisions for “the team,” I decided that we should try the honey pine nut tart with vanilla ice cream. It was delicious…lots of toasty pine nuts held together in a honey goo. Not that pecan pie can be improved upon in any way, IMO, but this was sort of like its fancy cousin.
After over a month of thinking about it and wanting to make it at home, I finally did a bit of research and found this recipe on Recipezaar. I apparently didn’t do a very thorough read-thru of it before I went grocery shopping, though, and wound up not buying nearly enough pine nuts. I had some walnuts in the fridge, so I used roughly a 50/50 combo instead. Oh well–just as tasty and cheaper, too, I imagine. The honey I have is one that I bought at a farmers’ market; it is quite floral and went nicely with the lemon in the recipe. I know that in the northern hemisphere right now everyone is enjoying peaches and berries, but in the cooler weather down here, when there isn’t a lot of good looking fruit around, a tasty nut tart is just the ticket.

Warning: If you open the recipe link, your eyes may want to wander over to a box on the right side of the webpage containing nutrition (or lack thereof) information. Don’t let your eyes do this, or you may never make the recipe.
WCC#16: Rhubarb Brûlée Tartlettes with Ginger
May 9, 2007 at 3:26 pm | Posted in events, pies & tarts, sweet things | 6 Comments
Towards the end of winter I begin to get very antsy. This is not so much for the arrival of warm weather as it is for the arrival of rhubarb at the Borough Hall Greenmarket in Brooklyn. But wait– I’m not in New York anymore, I’m in Sydney. And it’s not spring here, it’s fall. So imagine my excitement when I saw rhubarb at the Good Living Growers’ Market in Pyrmont this past Saturday! Yes, of course I bought some. I wish my camera could have captured how beautiful the raw, iridescent red stalks were, but I make do with a point and shoot, so it didn’t.
I’ve baked so many rhubarb pies, I *maybe* could make one with my eyes closed…although the lattice work would be tough. If I’m too lazy to make a pie, then the rhubarb always gets folded into a really easy cake batter. I felt like making something different. And I was looking for something to do with my Sunday afternoon while R was glued to the tube watching slasher movies. As I was poking through my cookbook collection, I found a recipe in Regan Daley’s 2001 book In the Sweet Kitchen, which I recently purchased, for rhubarb brûlée tartlettes with ginger. Hmm…that sounded good (as does every other recipe in Chef Daley’s book). Not only would I get to use a new cookbook, it would also give me the chance to use a new gadget, my little kitchen blow torch.

The recipe is broken up into four parts: preparing the tartlette shells, making the brûlée base, cooking the fruit and assembling the final product. In and of themselves, these steps are quite simple, and the first three can be done a day ahead if need be. The finished tarts though should be eaten on the day of final assembly and baking. In detailing the recipe, I’m going to skip the method for the tart shells. I didn’t actually make Chef Daley’s pâte brisée recipe, as I had some pie dough in the freezer from something else and thought this was a good way to use it up. Just use your favorite brisée recipe for the tartlette shells and blind bake them.

For the sake of presentation, I did two things differently than in the original recipe. The liquid from the cooked rhubarb was a beautiful pink, so I didn’t discard it. I added a bit more sugar and reduced it to make a syrup. I also cut the rhubarb a bit longer than instructed. When putting the compote into the tarts, I put the pieces that had fallen apart the most during cooking on the the bottoms, filled the shells with custard, then lined up a few pieces that had retained their shape on top.

The finished dessert was delicious. The tart rhubarb went nicely with the creamy, vanilla-scented custard and it had just a bit of a kick from the ginger. The shell stayed crisp, and of course there was the brûléed top. I may as well also mention that while my little torch is certainly no match for the hardware store type I’ve used in restaurants, it’s not bad.
The theme for the sixteenth Weekend Cookbook Challenge, hosted by Sara (the founder of WCC) at I Like to Cook, is “Something New.” Since I’ve used two new things to make this recipe, I thought I’d submit it as an entry.
Rhubarb Brûlée Tartlettes with Ginger – makes 6 servings
adapted from Regan Daley’s In the Sweet Kitchen
6 (4 1/2 -inch) pâte brisée tartlette shells, pre-baked, cooled and left in their forms
1 1/2 T redcurrant or plum jelly
2 scant T finely chopped crystallized ginger
1/2 cup turbinado sugar for brûléefor the rhubarb:
3/4 pound rhubarb stalks, washed, trimmed and cut into 3-inch lengths
1/4 cup plus 1 T packed light brown sugarfor the custard:
2 cups heavy cream
1/2 vanilla bean, split and scraped
4 egg yolks
1/4 cup plus 1 T granulated sugar
1 T unsalted butter, cut into bits
pinch of salt
– For the rhubarb: Place the cut rhubarb and light brown sugar into a pot over low heat. Cover and cook (gently stirring a few times) for 5 to 10 minutes until the rhubarb is tender, but still holds shape. Drain and cool the rhubarb to room temperature before using, or refrigerate if making ahead. Either discard the juice from the drained rhubarb, or reduce it to syrup consistency if desired for plating.
– For the custard: Set up a water bath by bringing about two inches of water to a simmer in a large pot and setting a heatproof bowl on top. Pour cream into a separate small saucepan and add the pinch of salt and the seeds and pod from the vanilla bean. Pot the pot on medium heat to scald the cream. Put the yolks and sugar in the bowl set over the gently simmering water bath. While cream is heating, constantly whisk the yolk mixture over the water bath. When cream is scalded and the yolk mixture is thick and pale, temper the cream into the yolks. Leave the mixture over the water bath, stirring constantly with a spoon until it thickly coats the back. This will take 5 to 7 minutes. Strain the custard through a fine sieve and stir in the butter until melted and incorporated. Press plastic onto the surface to avoid a skin and refrigerate until cool.
– Assembling the tartlettes: Preheat the oven to 325°F/170°C. Place the tartlette shells on a flat baking sheet. Gently melt the jelly and brush the bottoms of the shells with a thin layer. Spoon a couple of tablespoons of cooked rhubarb into the shells and smooth out. Divide the chopped ginger among the shells and spoon custard on top. If desired, place a few nicely shaped pieces of rhubarb across the top. Bake for 25 to 30 minutes. The filling should be a little jiggly in the center, but slightly set around the edges. Cool the tarts on a rack (the custard will further set). Place in the refrigerator if not eating within two hours (although you should not prepare them more than five hours in advance, according to Daley).
– To serve: Remove the tartlettes from their shells and sprinkle on the turbinado sugar. Using a kitchen torch, melt and caramelize the sugar. If you have placed some rhubarb on top of the tarts like I did, sprinkle sugar and brûlée AROUND the exposed pieces. They will burn if you torch them. Serve immediately with the rhubarb syrup, if using.
Baked Fresh Weekly

Blog at WordPress.com.
Entries and comments feeds.
