CH#4: Minty Chocolate Cupcakes
December 17, 2007 at 10:02 pm | Posted in cupcakes, events, sweet things | 19 Comments
Mint is a really friendly herb. It gets along with so many things…coconut, almond, citrus, berries, melon, blah blah blah. So when Laurie of Quirky Cupcake announced that this month’s Cupcake Hero theme is mint, I really had a hard time deciding what to pair it with. In the end, I maybe went with the most predictable thing–chocolate– but only because I love it so.
The combination of chocolate and mint around the holidays makes me think of Andes mints. My mum rarley bought us candy, but for some reason every Thanksgiving and Christmas, she’d bring out Andes with dessert. My brother and I would go nuts and eat them by the dozen, accumulating a huge mound of the shiny green wrappers next to our plates. I haven’t had them in at least a decade…I wonder if they would taste so good to me today. They probably would.
I made a plain chocolate cupcake, from a recipe (called “Peerless Chocolate Cake”) in The Fannie Farmer Baking Book that I have made a zillion times. I worked the mint flavoring into both a white chocolate whipped ganache frosting and a pudding filling. For the ganache, I infused a bunch of fresh mint into the cream. I swirled a couple drops of red gel coloring gently through the finished frosting before putting it into a piping bag in hopes that it would look a little candy cane-like.

For the pudding, I’m not embarrassed to admit to taking a shortcut (hey–cupcakes should be easy, right?). I have this giant tub of Bird’s custard powder in my pantry from when I made Nanaimo bars. I followed instructions on the package to make what I needed for filling, and then mixed in some melted bittersweet chocolate and a couple drops of mint extract. At that point, it tasted pretty good on its own. You could use any brand of packaged mix, or make homemade if you can’t stand the thought of it.

This cake recipe makes a great cupcake. And mint and chocolate really are perfect together. The frosting had an earthy mint flavor from the fresh herbs, while the pudding had a snappy mintiness to it.
Natalie from Bake and Destroy! is co-hosting with Laurie this month. Thanks Natalie and Laurie…I’m looking forward to the round-up!
Minty Chocolate Cupcakes– makes 12 regular-size cupcakes
-Make and chill some minty chocolate pudding, using your favorite chocolate pudding recipe with mint extract added to taste, or prepare custard powder according to package instructions, flavoring with melted chocolate and mint extract.
-Bake and cool a batch of chocolate cupcakes (recipe below).
-Make the minty white chocolate whipped ganache frosting (recipe below).
-To fill the cupcakes, use a small knife or round cookie cutter to cut a plug out of the center of each (going in from the top). Save the top bit of each plug. Fill each cavity with minty chocolate pudding. Cover with the top bit so the filling is not exposed.
-Top with whipped ganache and decorate as you see fit.
Chocolate Cupcakes– makes 12 regular-sized cupcakes
adapted from Marion Cunningham’s The Fannie Farmer Baking Book
1.5 oz unsweetened chocolate
1/4 c water
1 c plus 2 T all-purpose flour
1/2 t baking soda
1/4 t salt
1/2 c butter, softened
3/4 c sugar
2 eggs, separated
1/2 t vanilla extract
1/2 c buttermilk
-Preheat the oven to 350°F/180°C and line a muffin tin with paper cups.
-Combine the chocolate and water in a small saucepan. Over medium heat, stir until chocolate is melted and mixture is smooth. Set aside to cool.
-Sift together the flour, baking soda and salt. Set aside.
-Cream the butter and sugar in a large mixing bowl until smooth and well-blended. Add the egg yolks, one at a time, beating well. Add the vanilla and chocolate mixture and beat until blended. Add the sifted dry ingredients and buttermilk in three parts, alternating and beating smooth after each addition.
-In a separate mixing bowl, beat the egg whites until they are stiff but not dry. Gently stir one-third of the beaten whites into the batter. Fold in the remaining whites.
-Divide the batter among the paper cups, and cook for about 20 minutes, until a toothpick comes out clean. Cool in the tins for a few minutes and then transfer to a rack to cool completely.
Minty White Chocolate Whipped Ganache– makes enough to generously frost 12 cupcakes
1 cup heavy cream
couple handfuls of fresh mint leaves, picked from stems
7.5 oz white chocolate, finely chopped
7 T butter, very soft
-Put mint leaves in a medium bowl. Bring cream to a simmer in a small saucepot. Pour hot cream over the mint leaves and let stand until room temperature to infuse.
-Strain the cream into a measuring cup, pressing gently on the leaves to extract as much cream as possible. Discard the leaves. Measure the infused cream…if you have less than 1 cup, add cold cream to make up the difference.
-Put chopped white chocolate in a medium bowl. Reheat the cream to a simmer in a small saucepot. Pour hot cream over the chocolate and let stand for 5 minutes to begin to melt. Gently whisk chocolate and cream together to form a perfectly smooth ganache. If the taste of mint is not strong enough for your tastes, you can boost it with a couple drops of mint extract.
-Cover and refrigerate for about 45 minutes, until the ganache is cool and begins to firm up, but is still soft enough to whip.
-By hand with a whisk or with an electric mixer, whip until fluffy frosting consistency. Whip in the soft butter, piece by piece. If it starts to look split (mine did), chill it a couple more minutes and it should come together with a bit more persistent beating.
CH#3: Cranberry Bliss Cupcakes
November 30, 2007 at 2:47 am | Posted in cupcakes, events, sweet things | 26 Comments
A couple of months ago, my cherry lime rickey cupcakes were chosen buy Quirky Cupcake Laurie as the winner of the first-ever Cupcake Hero event! What an honor! Unfortunately, I wasn’t able to come back and defend my title for last month’s clove edition. I did make two different types of cupcakes for it and both were awful! Well, I’ve put that mess behind me and come back with a vengeance for this month’s event with a cranberry theme.
My inspiration for these cupcakes is the Cranberry Bliss bar that Starbucks sells around the holidays. Yes, even in Australia you can find these in the display case at this time of year. If you are a seasoned Cranberry Bliss bar eater, you will probably recognize me for the fraud that I am. I have never had one…don’t even know what’s actually in one. So this is a loose interpretation, containing things that I think are blissful with cranberries!

I seem to be a fan of filled cupcakes lately (there were the rickeys, the Bostinis and the linzers), and I knew I wanted to make a cupcake that would be filled with Thanksgiving-style cranberry sauce. I actually even used my leftover sauce for this! The bar from Starbucks has a cake or cookie base that looks to contain brown sugar, so I went poking around for a brown sugar cupcake recipe. I found one from Nigella, the beautiful Domestic Goddess, for burnt butter brown sugar cupcakes. I liked the sound of that–brown butter gives beautiful flavor to baked goods. I also liked that the batter is quickly blitzed together in the food processor…not a lot of technique involved there.
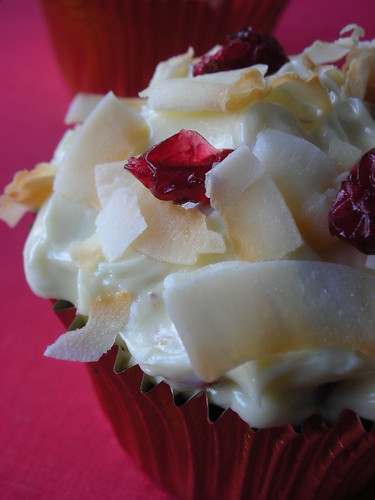
The Bliss bars also appear to have a white chocolate topping, so after baking and filling my cupcakes, I frosted them with a white chocolate whipped ganache, into which I had folded toasted pecans and dried cranberries. I sprinkled some toasted unsweetened coconut flakes and more dried cranberries over the top to finish. Lush! The tart cranberries really balance out the sweet frosting and cake. And the next day, cold out of the fridge, OMG! My brother declared the cold cupcake to be “f-ing amazing” (please excuse his language).
I don’t find the pictures of cupcake insides to be all that appealing, but here’s a picture of the “guts” anyway…

Thanks, Laurie, for another fun event! Can’t wait to see December’s theme!
Cranberry Bliss Cupcakes– makes 12 regular-size cupcakes
-Make and chill the cranberry sauce filling (recipe below).
-Bake and cool a batch of burnt butter brown sugar cupcakes (recipe below).
-Make the white chocolate whipped ganache frosting and flavor it with pecans and dried cranberries (recipe below).
-To fill the cupcakes, use a small knife or round cookie cutter to cut a plug out of the center of each (going in from the top). Save the top bit of each plug. Fill each cavity with cranberry sauce filling. Cover with the top bit so the filling is not exposed.
-Top with whipped ganache and garnish with lightly toasted unsweetened coconut flakes and more dried cranberries.
Cranberry Sauce Filling– makes about 1 cup
just under 1/2 cup sugar
just under 1/2 cup water
2 t orange zest
pinch of salt
6 oz whole cranberries, fresh or frozen
-Bring sugar, water, orange zest and a pinch of salt to a boil in a medium saucepot. Reduce the heat to a simmer and add in the cranberries.
-Simmer about 10 minutes, stirring occasionally until the cranberries pop.
-Transfer to a nonreactive bowl and cool to room temperature. Refrigerate until using.
Burnt Butter Brown Sugar Cupcakes– makes 12 regular-sized cupcakes
modified from Nigella Lawson’s How to be a Domestic Goddess
1/2 cup plus 2 T unsalted butter
3/4 cup self-rising cake flour
3 T sugar
5 T brown sugar (I used dark, but light would be fine, too)
2 large eggs
1 t vanilla bean paste (can substitute vanilla extract)
1 t baking powder
pinch of salt
2-3 T milk
-Preheat the oven to 400°F/205°C and line a muffin tin with paper cups.
-To brown the butter, put it in a small saucepan on medium heat, leaving it until it turns light golden and has nutty-colored brown bits on the bottom (will only take a couple of minutes). Take the pan off the heat and pour the butter into a bowl or cup, scraping the brown bits (if you have accidentally gotten your butter too dark, strain it, leaving the dark sediment behind). Let the butter begin to solidify again, but you need it to remain soft for the cupcakes. You can do this by either leaving it at room temperature, which will take awhile, or putting it in the fridge for about 10 minutes. You want it to be the consistency of regular softened butter.
-When the butter is solid but still soft, put all the cake ingredients except the milk in a food processor and blitz to a smooth batter. As normal, add the milk down the funnel, pulsing sparingly to form a soft, dropping mixture.
-Divide among the paper cups, and cook for 15-20 minutes. FYI, this does not make much batter, and the cups will not be very full. Don’t worry, as the combination of self-rising cake flour and baking powder give it a lot of oomph in the oven. They should rise to normal cupcake size!
White Chocolate Whipped Ganache with Pecans and Cranberries– makes enough to generously frost 12 cupcakes
7.5 oz white chocolate, finely chopped
1 cup heavy cream
7 T butter, very soft
handfull toasted pecans, cooled and roughly chopped
handfull dried cranberries
-Put chopped white chocolate in a medium bowl. Bring cream to a simmer in a small saucepot. Pour hot cream over the chocolate and let stand for 5 minutes to begin to melt. Gently whisk chocolate and cream together to form a perfectly smooth ganache.
-Cover and refrigerate for about 45 minutes, until the ganache is cool and begins to firm up, but is still soft enough to whip.
-By hand with a whisk, whip until fluffy frosting consistency. Whip in the soft butter, piece by piece. If it starts to look split, chill it a couple more minutes and it should come together with a few more strokes. Don’t overbeat the frosting, however, or it may make it too firm.
-Gently fold in pecans and dried cranberries before topping the cupcakes.
Daring Bakers in November: Tender Potato Bread
November 26, 2007 at 12:00 pm | Posted in daring bakers, events, savory things, yeast breads | 60 Comments
Ahhh…finally, today is the day when I can reveal my experience with the latest Daring Bakers challenge– it is something I really look forward to every month. This go-around Tanna from My Kitchen in Half Cups had us roll up our sleeves and bake bread! She chose a recipe for tender potato bread from Home Baking: The Artful Mix of Flour & Tradition Around the World by Jeffrey Alford and Naomi Duguid. This is a book I have on my own shelf, so I was extra-excited to give the bread recipe a try.
Besides being true to the base recipe, we had to knead the bread by hand (I hadn’t done that in forever!) and it had to be savory. But other than that, Tanna really encouraged us to play around with the shape of our bread and the flavorings used. I did cut the recipe in half, which is my usual MO, because R and I can’t (or shouldn’t) eat sooo much bread. I used the maximum amount of mashed potato suggested by Tanna (16 ounces for a full recipe, or 8 ounces for my half recipe), and I can say that kneading the dough was definitely a sticky process. But it wasn’t impossible on a well-floured surface…as the additional flour was worked in, I could feel the dough gaining structure and becoming easier to handle.

I split my dough into one small loaf and one small focaccia. I kneaded some grated aged cheddar and cracked pepper into the loaf portion just before placing in the pan for its second proof. The cheese bread was soft and had great flavor. I still have half the loaf in my freezer, just waiting to be eaten with a bowl of soup. The dough made for a fantastic focaccia as well– I put olive oil, olives, rosemary and Maldon salt on mine. It had a nice, crisp bottom crust from baking it on a ripping-hot pizza stone.
Thanks Tanna for giving us a good break from the sweet stuff. If you are afraid of yeast, don’t be– bread-baking is a truly satisfying experience! You won’t believe how delicious warm homemade bread is! If you want the recipe for the basic potato bread, look here on Tanna’s site.

And before I go, I’d like to wish a very happy birthday to Daring Bakers! This not so-little-anymore group turned one this month. Started by Lis and Ivonne, just two buddies wanting to make their own pretzels, the group is now more than 300 strong! To see how we all interpreted this month’s potato bread challenge, take a look at The Daring Bakers’ Blogroll.

Taste&Create III: Sushi with Sushi Day
November 18, 2007 at 12:30 pm | Posted in events, savory things | 6 Comments
I am always drooling over the fantastic things that you make, photograph and write about on your blogs. There are probably hundreds of recipes that I’ve seen on other sites that I’d like to try myself someday. Unfortunately, sometimes I need a kick in the seat to do things. Well, Nicole from For the Love of Food has come up with a food event called “Taste&Create“, pairing up food bloggers to try out each other’s recipes. How perfect!
Nicole paired me up with Allison from Sushi Day. Sushi! I love sushi! It is something that I get intense cravings for that must be satisfied quickly. But uh-oh. Sushi is also something that I’ve always gone out for, and never tried to make myself.
Allison has a lot of great info on her site to get a grasp of the basics of sushi-making, and a lot of great ideas for combinations, many of them inspired by trips to her favorite Japanese restaurants. While I am crazy about unagi (eel) and anything involving raw tuna, I decided to play it a bit safer for my first foray into sushi-making and make her Crunchy Shrimp Roll. I also knew that both R and my brother would happily devour anything with tempura shrimp and avocado.
After picking up a bamboo rolling mat at a local Japanese grocery, I had to read up on preparing the rolling mat and how to roll maki sushi. And I needed to start with some sumeshi, or sushi rice. Slightly sweet and vinegary, I think the taste and stickiness of the sumeshi are what’s responsible for those sushi cravings I get every couple of weeks. Then I had to fry off a few pieces of tempura shrimp, following Allison’s instructions for how to make tempura, before prepping my scallions and avocado. Assembling and rolling the maki wasn’t hard at all, thanks to Allison’s step-by-step photos and advice.
So there it is, my very first maki roll! Not too bad looking, and certainly tasty!

Since I had prepared a lot of rice and had extra pieces of tempura shrimp and avocado, I also went ahead and made Allison’s Spicy Tempura Roll as well. Its zippy, peppery kick made it another big hit at the dinner table!

Thank you Allison for teaching me how to make sushi myself– armed with my rolling mat, I will be back for more! And thank you Nicole for hosting such a cool event!
Raspberry Cheesecake
November 15, 2007 at 5:16 pm | Posted in cakes & tortes, cheesecakes, sweet things | 25 Comments
For my final project with the homemade graham cracker crumbs in my freezer, I decided to bake cheesecake. It had been forever since I had made or even eaten cheesecake, and luckily Philly is sold over here, so it sounded like a good plan. And I thought I would make it pink by adding some raspberries.

I started with a recipe for blueberry swirl cheesecake from Donna Hay’s Modern Classics Book 2, which I’ve made several times and particularly like because the mixture comes together lump-free in the food processor. Then I added a vanilla bean to the cream cheese mixture, changed the fruit swirl to raspberry, changed the base and changed the baking method. Now is it my own recipe? I think so.

Raspberry Cheesecake- makes a 6-inch cake
Note: If you want some extra sauce to top your finished cheesecake, make a double batch of the raspberry swirl sauce. Then use half in assembling your cheesecake and save the remaining half in a jar in the fridge for when you serve the cake.
for the base:
2-3 T unsalted butter, melted
2 T sugar
1/8 t cinnamon (optional)
pinch of salt
3/4 cup graham cracker crumbsfor the raspberry swirl:
110 g fresh or frozen raspberries
2 T sugar
small splash of water
for the filling:
300g cream cheese, softened
1/4 cup plus 2 T sour cream
1 egg
1/2 cup superfine sugar
seeds from 1/2 vanilla bean
-for the crust: Preheat oven to 350°F/180°C. Combine melted butter, sugar, cinnamon, salt and crumbs in a bowl. Press into the botton of a 6-inch springform pan and bake for about 10-15 minutes. Cool crust slightly.
-for the raspberry swirl: In a small pan over medium low heat, gently cook the raspberries with the sugar and water until the berries begin to break down, the sugar has dissolved and the mixture has thickened a bit. Squish up the berries a little and push the mixture through a sieve to remove the seeds. Set aside to cool.
-for the filling: Process the cream cheese in a food processor until smooth (don’t forget to scrape!). Add the sour cream, egg, sugar and vanilla bean seeds and process until smooth and fully combined.
-to assemble: Brush sides of the springform with a little softened butter. Wrap the outside of the pan with a double layer of foil. (The cake bakes in a water bath, and doing this will help keep water from seeping into the cake as it cooks.) Pour the filling over the graham cracker base. Drizzle the raspberry sauce over and swirl gently with a butter or pairing knife. Create a water bath by placing the cake tin in a slightly larger roasting pan or baking dish. Carefully pour hot water halfway up the sides of the springform. Bake at 280°F/140°C for a little over an hour, until the edges look set but the center jiggles slightly. Let cool on a rack, then cover and refrigerate for several hours before serving.
Stop the Traffik: Toot-toot
November 7, 2007 at 3:21 pm | Posted in events, other stuff | 7 Comments
So I didn’t mention this before because I felt a little weird tooting my own horn, but the white chocolate and almond tartufi I made won last month’s Stop the Traffik chocolate competition, hosted by Rachel from R khooks. I didn’t think I could be more excited when I heard the news a couple weeks ago, until today when I received my prize in the mail!

Rachel sent four bars of fairtrade chocolate and a beautiful card (maybe she even took the photo herself?)! I am holding both a milk and a dark bar from Monoprix Gourmet and mint (yay!) and almond bars from Alter Eco. I have never tried any of these, so I’m looking forward to getting down to business and doing some sampling.
Thanks so much, Rachel, for the chocolate bars and for hosting the event! I’m sure it’s helped to open a lot of eyes to the issue of forced labor in cocoa farming and chocolate production. And if you have a second, please check out Stop the Traffik’s site for more information on “Traffik Free” chocolate and where to find it.
Leftover Bostini Cream Cupcakes
October 31, 2007 at 6:58 am | Posted in cupcakes, sweet things | 12 Comments
Boy, even though I scaled back that Bostini cream pie recipe I made along with the Daring Bakers, I still had a ton of stuff leftover! Enough to make Bositini cream cupcakes! I had baked my chiffon cakes in a muffin tin, so they were in cupcake form already. I just cut a bit out from the center of each, filled them with leftover custard and topped them with glaze that had cooled to frosting consistency.

I may be too old to knock on doors for candy, but I still like Halloween treats!
Daring Bakers in October: Bostini Cream Pie
October 29, 2007 at 12:07 am | Posted in cakes & tortes, daring bakers, groups, sweet things | 64 Comments
“Hey– don’t you mean Boston cream pie?” you ask. I know I’m a lousy typist, but I do in fact mean Bostini. It is, of course, a take on the traditional Boston cream pie, created by Donna Scala and Kurtis Baguley of Bistro Don Giovanni and Scala’s Bistro in Northern California– an orange-flavored chiffon cake sitting on a bed of vanilla custard and topped with chocolate glaze. Our Daring Baker hostess this month is Mary from Alpineberry, and since she first tried it about 12 years ago, Bostini cream pie has been one of her restaurant favorites. From what Mary whips up in the kitchen I’d say she has impeccable taste, so I was certainly excited to try this when I saw she had chosen it as the October challenge.
Once I got the ingredients together (a whole farm’s worth of eggs and dairy!), the recipe came together pretty easily. No troubles with the cake (I recommend squeezing the orange juice yourself for best flavor and whipping the egg whites by hand to avoid overbeating), and the custard thickened up quickly thanks to the cornstarch. The glaze couldn’t have been easier– just melted chocolate and butter.

This dessert is assembled in a ramekin or custard cup at the restaurants, but we were allowed to play with presentation, provided we didn’t stray from the ingredient list or basic concepts. I thought about putting it together in a wine glass or bowl, but wanted to put some cute new teacups to use, so I really didn’t play too much. I baked my chiffon cakes in a muffin tin rather than using the same cups I assembled the cake in (as the recipe instructed). I don’t know if my teacups are oven-proof, and didn’t want to chance blowing them up the first time I used them! Also, I liked that the muffin-sized cakes were a bit smaller than the cups, so that all the drippy glaze could run into the custard instead of just down the outside of the cups.

Boston cream pie is R’s number one dessert, and he really liked this version of it. And my brother, who is visiting from Seattle, just loved the custard. I am one of those weirdos who doesn’t like the combination of fruit and chocolate, but the orange flavor was pretty subtle and fresh, so I didn’t mind it here. This dessert is super-rich, so you can get away with a small portion, even though the recipe yields quite a lot. (I actually halved the custard and glaze amounts. I made the full recipe of cake and froze what we didn’t eat right away.) As you can see from the top picture, my oranges were larger than my dessert, and it was plenty!
Thanks to Mary for picking another winning DB challenge! You can check out the recipe over on her site. Don’t forget to look at all the other Bostinis out there by visiting the Daring Bakers’ Blogroll. From some sneak previews I’ve seen, they look pretty good…
Risotto Relay: Baked Risotto
October 20, 2007 at 10:07 am | Posted in events, savory things | 11 Comments
How do you make risotto without all that standing over a pot and stirring? You cheat and bake it in the oven! Baked risotto is a technique I have read about in a few places, and I thought I would give it a shot for the Risotto Relay being held by Sathya and Liz, authors of the lovely blog The Baker & The Curry Maker.
All the recipes I’ve seen follow a very similar process. Cook the onions on the stovetop first, add in rice and liquid and bring to a simmer. Then chuck in your other ingredients and pop it in the oven at 400°F/200°C for about half an hour. I went ahead and riffed on a recipe for baked risotto with zucchini, tomato and parmesan from superstar Sydney chef Bill Granger, whose food I love. It is in his book bills food.
I obviously made a few additions to recipe I provide below. I sauteed a clove of minced garlic along with the onions. A splash of white wine went into the pot at the same time as the stock and chopped tomatoes. And finally, halfway though the oven-baking process, I stirred in some raw, peeled and de-veined shrimp. I know that seafood and cheese breaks the rules (so does baking your risotto, really), but I used the parmesan in the recipe anyway.

OK, I admit that this is doesn’t really give you that creamy starchiness that a traditional risotto has, but I will definitely make it again. If you are feeling a little lazy, it is a perfectly delicious and acceptable substitute for the real thing, and it is so versatile. Next time, I think I’ll try it with chicken and mushrooms…maybe I’ll add a little extra liquid partway through the cooking process and stir in a pat of butter when it’s done to see if I get a creamier end result.
Baked Risotto with Zucchini, Tomato and Parmesan– makes 4 servings
from bills food by Bill Granger
2 T extra virgin olive oil
1 onion, finely chopped
1 t sea salt
1 cup arborio rice
1 1/2 cups chicken stock or water
14 oz can chopped Roma (plum) tomatoes
3 small zucchini, finely sliced
2 1/4 oz freshly grated Parmesan
freshly ground black pepper
2 T finely chopped fresh flat-leaf (Italian) parsley
shavings of Parmesan, for serving (optional)
-Preheat the oven to 400°F/200°C. Heat a 3-quart/3-litre capacity ovenproof dish (with a lid) over a medium heat.
-Add the olive oil, onion and sea salt and stir for 5 minutes, or until the onion is soft and translucent.
-Add the rice to the dish and stir for another minute. Add the stock or water and the chopped tomatoes and bring to simmering point. Stir in the zucchini and sprinkle with Parmesan and black pepper.
-Cover the dish and bake the risotto for 30 minutes, or until the rice is cooked. Scatter parsley over the top, sprinkle with Parmesan shavings if desired, and serve in the dish.
Cupcake Round-Up 2: Linzer Cupcakes
October 19, 2007 at 4:57 pm | Posted in cupcakes, events, sweet things | 12 Comments
I always like making the traditional versions of my favorite classics, but I’m game for a bit of a switch-up, too. Reinvention using seasonal ingredients is actually the theme for the second Cupcake Round-Up, co-hosted by two cupcake bakers extraordinaire: Garrett of Vanilla Garlic and Cheryl of Cupcake Bakeshop. Inspired by a packet of raspberries in the fridge, I thought the flavors of a linezrtorte would translate well into a cupcake.
I admit I’m a little confused about seasonality here in Australia. Things that I would never think I would find at certain times of the year pop up in the framers’ market unexpectedly. And some things, like rhubarb, seem to be widely available year-round. I have started to see Aussie raspberries, while still outrageously priced (I’ve had to get used to the fact that produce in general is much more expensive here than in the US), being sold for about half the super-outrageous price they were sold for a couple of months ago. Based on cost, I have decided that raspberries must at least be coming into season (it is almost summer here). I haven’t had a fresh raspberry since I moved here nine months ago, so I bought a packet.
I began my little linzer cuppies with a recipe for hazelnut cake from Gina DePalma, pastry chef of the excellent Babbo Restaruant in Manhattan. As written below, I tweaked it a bit to incorporate some of the other flavors found in a linzertorte (and to use up some sour cream I had in the fridge), but if you want Chef DePalma’s original recipe, you can find it here on Babbo’s website. The recipe, originally for a single 8″ round, makes twelve perfect cupcakes…I was so pleased. I made sure they stayed moist with a little douse of simple syrup and filled them with fresh raspberries. Topped off with raspberry buttercream and garnished with more fresh berries and candied hazelnuts, they were every bit as good as the real thing, and without any fussy lattice work or soft dough.

The cupcakes take several steps, although none are hard. But, if it’s one of those days, and you don’t feel like futzing with buttercream and candied nuts, everyone will still love you if you do a simplified version…

Linzer Cupcakes– makes 12 regular-size cupcakes
Note: If you don’t have seedless raspberry jam for this recipe, just press jam with seeds through a strainer to remove. Or if you want the seeds, use seeded jam instead.
-Start with a batch of simple syrup (recipe below).
-Bake the hazelnut cupcakes (recipe below). Lightly brush warm cupcakes with simple syrup, then cool completely.
-Make and cool the candied hazelnut garnish (recipe below).
-Make the raspberry buttercream (recipe below).
-Prep the fresh raspberries. Depending on size, estimate 3 or 4 raspberries for filling each cupcake, plus extras for decoration. Loosen few tablespoons (or as much as needed to coat your berries) of raspberry jam with a squirt of lemon juice. Toss the raspberries into the jam, turning them to coat. Keep them whole– try not to smash them up.
-To fill the cupcakes, use a small knife or round cookie cutter to cut a plug out of the center of each (going in from the top). Save the top bit of each plug. Spoon a small amount (about 1/4 teaspoon) of simple syrup into each cavity. This is just to keep the cakes moist…don’t drown them. Put a few jammy raspberries into each cavity. Cover with the top bit so the filling is not exposed.
-Top with buttercream and garnish with candied hazelnuts and jam-coated raspberries.
Simple Syrup– makes more than you will need, but keeps for a long time and has many uses
1 cup sugar
3/4 cup water
-Combine sugar and water in a small saucepot. Mix gently with your finger so sugar isn’t stuck to bottom or corners of pot. Try not to get a lot of sugar on the sides of the pot above water level (cooking time is short, so it shouldn’t crystallize, but just to be safe…)
-Bring just to a full boil, at which point all the sugar should be dissolved. Shut off heat.
-Transfer to a jar or airtight plastic container for storage. This will keep in the refrigerator for weeks.
Hazelnut Cupcakes– makes 12 cupcakes
adapted from a recipe by Gina DePalma
Note: If you can’t find hazelnut flour in stores, you can make your own by toasting 1 cup of skinned hazelnuts for five minutes in a 350°F oven. Cool them completely and pulse them along with 1/4 cup all-purpose flour in the food processor until finely ground but not pasty. Substitute this mixture for the hazelnut flour in the recipe and only use 1 cup of all purpose flour when proceeding with the third step (as the extra 1/4 cup is already accounted for in your hazelnut flour mixture).
1 cup hazelnut flour
1 ¼ cups unbleached, all-purpose flour
10 T (1 ¼ sticks) unsalted butter, softened
¾ cup sugar
1 t ground cinnamon
1/4 t ground cloves
1 1/2 t lemon zest, finely grated
2 T hazelnut paste or hazelnut butter
3 eggs
1/4 cup sour cream
1 t vanilla extract
½ t kosher salt
1 t baking powder
-Preheat the oven to 325°F. Line your cupcake tin with paper liners.
-In a small bowl or liquid measuring cup, lightly whisk together the eggs and sour cream.
-In the bowl of an electric mixer, cream together the butter and the sugar until very light. Beat in the spices and lemon zest first, followed by the hazelnut paste or hazelnut butter. Then gradually add the egg and sour cream mixture. Scrape down the sides with a rubber spatula and beat in the vanilla extract. In a small bowl, mix together the hazelnut flour, all-purpose flour, salt and baking powder. Beat the dry ingredients into the batter until just combined.
-Divide the batter evenly among the cupcake liners. Bake for 25 to 30 minutes, or until a cake tester inserted in the center comes out clean. Allow the cupcakes to cool in the tin for 10 minutes. Lightly brush tops with simple syrup while still warm. Then gently remove from the tin and cool completely on a rack.
Candied Hazelnuts
handful of skinned hazelnuts
simple syrup to coat (couple tablespoons probably)
-Preheat oven to 350°F.
-Pop hazelnuts in half by sticking the tip of a small sharp pairing knife into the tops of each one.
-Toss them with enough simple syrup to lightly coat (just to make shiny).
-Turn them into a small sheet pan or baking dish, keeping them in a single layer. Bake just until golden and simple syrup hardens, about 10 minutes.
-When cool enough to handle, separate them so they don’t stick together and cool completely.
Raspberry Buttercream– makes about 2 cups
adapted from Cook’s Illustrated’s recipe for vanilla buttercream in Baking Illustrated
2 large eggs
1/2 cup (3.5 oz) sugar
1 t vanilla extract
pinch of salt
8 oz unsalted butter, softened but still cool, cut into pieces
1/3 cup seedless raspberry jam, loosened with a squirt of lemon juice
1/4 t cinnamon
-Bring a few inches of water to a simmer in a medium saucepot. In the bowl of a standing mixer, whisk together the eggs, sugar, vanilla and a pinch of salt. Set the bowl over the simmering water (making a double boiler). Whisk gently but constantly until the mixture reaches 160°F. It should be thin and foamy.
-Transfer the bowl to the mixer and whip until light, airy and room temperature. This should take about five minutes. Reduce the speed and whip in the butter, piece by piece. If it looks curdled halfway through, it should come together as you add the remaining butter.
-Once all the butter is incorporated, beat on high speed for about a minute until light and fluffy. Add the raspberry jam and cinnamon and beat until just incorporated. You can refrigerate, covered, for up to five days.
Baked Fresh Weekly

Blog at WordPress.com.
Entries and comments feeds.
