Pumpkin Cupcakes with Maple Cream Cheese Frosting
October 29, 2013 at 4:23 pm | Posted in cupcakes, sweet things | 14 CommentsTags: baking, cupcakes, dessert

Some days I do not know what the heck I’m doing. I put toothpaste on my Clarisonic. I almost forget the pumpkin in my pumpkin cupcakes. Luckily, I usually realize something’s amiss before it’s too late, so both my face and my cupcakes wound up alright…this time.
Speaking of forgetting the pumpkin, I once had a British guy point out to me that all this “American baked pumpkin stuff” just tastes like spices, so why bother with the pumpkin at all? I’d never really thought about that before, and I guess he was almost right about the taste, but I certainly do think there’s reason to bother. Not only does pumpkin puree make quickbreads and cakes nice and moist, (and orange, of course), but I think that pumpkin has a bit of earthiness to it, keeping them from being just sweet spice cakes. Also squash makes cupcakes healthier?? Maybe I’m kidding myself there. I do happen to love the fall spices, though, and these cupcakes have just the right amount. And what do I need to say about cream cheese frosting, except for “yes please”?
These are a great treat anytime in the cooler weather, but add a few black and orange sprinkles and they turn into Halloween cupcakes. Happy Halloween!
Pumpkin Cupcakes- makes 18-20 cupcakes
from Leite’s Culinaria, but seen all over the interwebs in both cupcake and layer cake form
Steph’s Note: Don’t need that many cupcakes? Make a half-batch to get 9-10, and halve the frosting as well.
1 stick (4 ounces) unsalted butter, at room temperature, plus more for the pans
1 cup firmly packed dark brown sugar
1/3 cup granulated sugar
2 cups cake flour
2 teaspoons baking powder
1 teaspoon baking soda
1 teaspoon ground cinnamon
1 teaspoon ground ginger
1/2 teaspoon ground nutmeg
1/8 teaspoon ground cloves
1/2 teaspoon salt
1/4 teaspoon freshly ground black pepper
2 large eggs
1/2 cup buttermilk mixed with 1 teaspoon vanilla
1 1/4 cups canned solid-pack pumpkin
-Preheat the oven to 350° (180°C) and prepare your cupcake tins with paper liners.
-In a stand mixer, beat the butter and sugars on medium speed until fluffy, about 5 minutes. Meanwhile, sift the flour, baking powder, baking soda, cinnamon, ginger, nutmeg, cloves, salt, and pepper into a medium bowl.
-Add the eggs to the mixer, one at a time, scraping down the sides after each addition. Alternate adding the flour and buttermilk mixtures, beginning and ending with the flour. Beat in the pumpkin until smooth. Divide the batter equally between the lined cups–they should be about 3/4 full.
-Bake the cakes until a toothpick inserted into the center comes out clean, about 18 to 24 minutes. Cool the cupcakes in the tins for 10 minutes. Remove them from the tins and onto a rack to cool completely before frosting.
Maple Cream Cheese Frosting
by me
Steph’s Note: You can see from my photo that this frosting is soft…the kind to spoon on instead of pipe. Using a small amount of natural maple flavor instead the larger amount of maple syrup helps, as does preparing the frosting while the cupcakes are baking and then refrigerating it until the cakes are cool. Cutting back on the powdered sugar (oddly) also helps stiffen up a cream cheese frosting if that’s what you prefer..
1 (8 ounce) package of cream cheese (full-fat or reduced-fat Neufchâtel), at cool room temperature
4 tablespoons (1/2 stick) unsalted butter, at cool room temperature
1 cup confectioner’s sugar
1/4 cup of maple syrup or 1 tsp natural maple flavor
pinch of salt
-In a food processor, zip the confectioner’s sugar first to break up any lumps. Add the other ingredients and process until smooth, scraping as needed. Refrigerate for 30 minutes before using.
Tuesdays with Dorie BWJ: Danish Braid (& Pinwheel)
October 15, 2013 at 9:32 am | Posted in breakfast things, BWJ, groups, sweet things, sweet yeast breads, tuesdays with dorie | 18 CommentsTags: baking, bread, breakfast

I’ve just started working out with a trainer to get my sorry self in shape. Let’s celebrate that with a big slice of Beatrice Ojakangas’s Danish! This may not go so well…
I made a Danish braid here once before. That recipe used what I think is a more traditional method for making Danish dough…there was a separate butter block and lots of chilling between folds (like when we made our croissants). This one uses a “quick” method, employing the food processor to break down the butter into chunks in the flour. The rough dough does need to rest in the fridge overnight, but after that, all of the lamination work is done at once, without any waiting in between the turns and folds. Pretty easy. I was surprised at how good the results were– crisp and flaky. If you are wondering how the dough becomes a braid, this video explains all very clearly.
I don’t like to ask too much of myself on a weekend morning, so I cheated a little on the fillings. Rather than fiddle with homemade pastry cream and fruit spreads, I just whizzed up a quickie sweetened cream cheese filling and combined it with some store-bought apricot jam. I was pretty jazzed to have a use for the pearl sugar I found at an IKEA ages ago.
When we do a recipe that has several variations, I’m never quite sure if we’ll revisit it later to try out those variations, so I took this opportunity to make my favorite Danish shape with some extra dough–the pinwheel! This one had the same cream cheese filling as the braid, but with blueberry jam instead of apricot.

We’re going without hosts now for TWD, so for the recipe, see Baking with Julia by Dorie Greenspan. It’s also here, and there’s even a video of Beatrice and Julia making Danish together. Don’t forget to check out the rest of the TWD Blogroll!
Tuesdays with Dorie BWJ: X Cookies
October 1, 2013 at 12:26 am | Posted in BWJ, cookies & bars, groups, sweet things, tuesdays with dorie | 9 CommentsTags: baking, cookies

Finally–Nick Malgieri’s X Cookies! I’ve had a little hunk of pasta frolla in the freezer waiting for these guys ever since we made pizza rustica. What’s that you say? That means it’s been in the freezer for almost a year and a half? Details, details…
X cookies are a take on a traditional Sicilian cookie called cucidati…a sweet dough filled with a paste of dried figs, raisins, orange, nuts, rum, spices, etc. Think of a more grown-up Fig Newton and you’re on the right track. Truth be told, I’m not the biggest fan of darkly flavored dried fruit and spice stuff like this. I probably would have skipped this recipe, but the process looked fun, and my husband’s half Sicilian, so I thought he might like them. Of course I tried them, too. And while they aren’t my favorite (although, as predicted, my husband likes them quite a lot), I can see their appeal when dunked in hot coffee or eaten with a little scoop of vanilla ice cream.
The instructions for forming the Xs were very clear. It could have been a long process if I’d made a full batch, but I sure don’t need five dozen of them hanging around. I did just a quarter batch for fifteen cookies. I didn’t have any dried orange peel, so I improvised by using Grand Marnier instead of rum.

We’re going without hosts now for TWD, so for the recipe, see Baking with Julia by Dorie Greenspan. It’s also here, and there’s even a video of Nick and Julia making the cookies together. Don’t forget to check out the rest of the TWD Blogroll!
Tuesdays with Dorie BWJ: Espresso Profiteroles
September 17, 2013 at 12:18 pm | Posted in BWJ, general pastry, groups, other sweet, sweet things, tuesdays with dorie | 12 CommentsTags: baking, choux, dessert

Choux paste treats have been well-covered here. Gougères, éclairs, cream puffs and even crullers–wait, something’s missing. How could I forget profiteroles, one of my most favorite desserts? I’ll take care of that one now with Norman Love’s Espresso Profiteroles.
Despite my love of profiteroles, I admit that I didn’t have high hopes for these. Quite frankly, I thought the picture in the book looked terrible (the choux looked bready, not light). I’m happy to report that they turned out better than expected. I’m not sure how much flavor was really contributed by adding coffee to the choux puffs themselves, but they puffed and hollowed nicely. I used espresso ice cream (instead of cinnamon) and boozed up the chocolate sauce with Kahlua (instead of Grand Marnier), so that took care of the missing coffee flavors.
These are best cut and filled right before serving, when the puffs are crisp and the ice cream is just beginning to soften. Pre-scooped and frozen is a profiterole no-no for me. And the sauce should be warm. Mmmmm…sauce…

We’re going without hosts now for TWD, so for the recipe, see Baking with Julia by Dorie Greenspan. Don’t forget to check out the rest of the TWD Blogroll!
Stonefruit and Almond Upside-Down Cake
September 15, 2013 at 3:45 pm | Posted in cakes & tortes, simple cakes, sweet things | 7 CommentsTags: baking, cake, fruit

Fall is in the air and I couldn’t be more excited! I like summer in theory (long days, trips to the beach, bottles of chilled rosé), but in practice, we don’t have A/C, so I just feel uncomfortable and lazy most of the time. Not to mention sweaty. I will miss the summer fruit for sure, but luckily I can still get peaches and plums for another couple of weeks. Even though I have avoided turning on the oven for most of the past two months, now is a great time to get baking.
I’m quite fond of upside-down cakes, and don’t mind experimenting with them. Fruit cooked in caramel goo…ain’t nothing wrong with that. And they’re pretty, too. We know an upside-down cake is really all about the caramelized fruit, but the cakey part shouldn’t be neglected either (trust me). This cake has the right balance of sturdiness and softness. Almond meal and a bit of barley flour help with that texture, and also give it some real flavor (as in we’re not just relying on the fruit). It’s equally delicious made with peaches, nectarines or plums. I’ve had it all three ways…maybe next summer I’ll do a combo? Unless we have company, it takes the two of us four nights to go through an 8-inch cake, and I didn’t feel like this one suffered at all. (I stored the cakes wrapped in the fridge and brought slices to room temperature as we wanted them).
Don’t you just love how plum skins look like jewels when cooked down?

Stonefruit and Almond Upside-Down Cake– makes an 8-inch cake
Steph’s Notes: If you don’t have pre-ground almond meal, grind an equal amount of whole almonds, along with 2 tablespoons of the all-purpose flour, in the food processor until fine. You can replace the barley flour with an equal amount of all-purpose flour, if you wish.
6 tablespoons unsalted butter, at room temperature, plus more to grease pan
1 cup sugar
3-4 medium peaches, plums or nectarines, pitted and cut into 6 wedges each
2/3 cup all-purpose flour
1/3 cup barley flour
1/3 cup almond meal
1 teaspoon baking powder
1/4 teaspoon baking soda
1/3 teaspoon salt
2 large eggs
1/2 teaspoon vanilla extract
1/4 teaspoon almond extract
1/2 cup buttermilk
-Preheat the oven to 350° F and lightly butter an 8-inch round cake pan (preferably not a springform one).
-To make the topping, put 1/2 cup of the sugar and 2 tablespoons water in a medium skillet over medium heat. It should look like wet sand. Wash down any sugar crystals on the sides of the skillet with a wet pastry brush. Cook the sugar until it becomes a deep golden brown caramel. This will happen quickly, so don’t walk away. Add 1 tablespoon butter and whisk it in until smooth. Be careful, as the caramel will bubble a bit when the butter goes in.
-Pour the caramel into the bottom of the prepared cake pan and tilt to coat. Arrange the fruit wedges snugly in the bottom of the pan in a single layer, cutting to fit if needed. It doesn’t matter if the caramel sets up while you are doing this.
-Combine the flours, almond meal, baking powder, baking soda and salt in a bowl and whisk to combine.
-Beat the remaining 5 tablespoons butter and 1/2 cup sugar (a scant 1/2 cup if you like it less sweet, like I do) in a large bowl with a mixer (or in a stand mixer with the paddle) on medium-high speed until light and fluffy, about 4 minutes. Add the eggs, one at a time, beating well after each addition. Beat in the vanilla and almond extracts. Alternate adding the flour mixture and buttermilk in three batches, beginning and ending with the flour. Mix until just incorporated.
-Spread the batter evenly over the fruit and bake until golden and a toothpick inserted into the center comes out clean, about 40 minutes.
-Transfer to a rack and let cool for 15 minutes. Invert onto a plate and let cool completely before serving.
Tuesdays with Dorie BWJ: Blueberry Muffins
September 3, 2013 at 12:01 am | Posted in breakfast things, BWJ, groups, muffins/quick breads, tuesdays with dorie | 14 CommentsTags: baking, breakfast, fruit, muffins
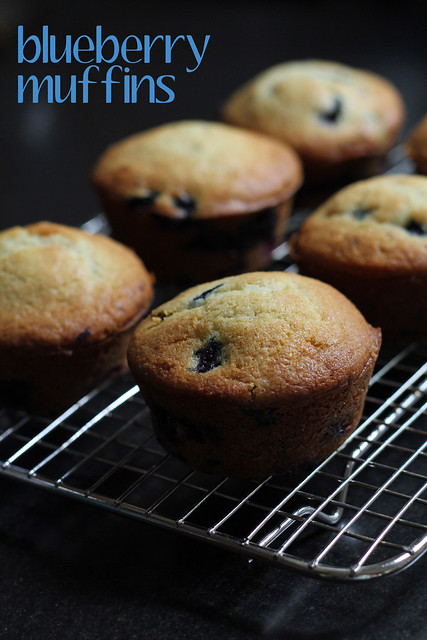
Yesterday was the first Labor Day in many years where I myself did not have to labor. Any holiday is typically an extra busy, extra intense day for those who work in the food biz. It was sort of odd then that I chose to celebrate by getting up a little early to make Rick Katz’s Blueberry Muffins for breakfast. Baked goods for breakfast are a bit of a treat around here, as they should be, I guess. Not only are they an indulgence, but OMG, the wait for prep, baking and cool down is almost too much!
Really, though, blueberry muffins are no big deal (they’re not like sticky buns, or anything), and I’ve made them here before. This particular recipe is unusual in that it uses cake flour and calls for creaming the butter and sugar (instead of the “muffin-method’s” usual melted butter or oil). The results are more like little tea cakes than sturdy coffee shop muffins. They aren’t too sweet and they are loaded with the last-of-season blueberries. They look sort of dainty and unassuming from the outside, but inside they are basically blueberry jam!

We’re going without hosts now for TWD, so for the recipe, see Baking with Julia by Dorie Greenspan. Don’t forget to check out the rest of the TWD Blogroll!
Tuesdays with Dorie BWJ: Johnnycake Cobbler
August 20, 2013 at 12:01 am | Posted in BWJ, cobbler/crisp/shorties, groups, sweet things, tuesdays with dorie | 24 CommentsTags: baking, cobbler, dessert, fruit

I made Johanne Killeen’s Johnnycake Cobbler twice, both times with peaches and red currants. The first time, I thought the biscuit layer was too thick and the fruit was getting lost underneath all that cornmeal topping. So I tried again, reducing the topping ingredients by a third. Now the cobbler to fruit ratio was in much better proportion. Even with less biscuit on top, in order to get it cooked through, I still had to bake the cobbler for several minutes longer than the recipe stated.
I should warn you that the johnnycake topping uses lots of cream. Like lots. I just couldn’t do it– both times, I used a combo of milk and sour cream to replace it (essentially making a higher fat buttermilk-type liquid). I’m sure it was less rich than the original, but at least I could justify having a little scoop of ice cream alongside.
I’ve been seeing plums at the market, so I’ll probably be giving this a third try soon!

We’re going without hosts now for TWD, so for the recipe, see Baking with Julia by Dorie Greenspan. There’s also a video of Nancy and Johanne making the cobbler together. Don’t forget to check out the rest of the TWD Blogroll!
Tuesdays with Dorie BWJ: Eastern Mediterranean Pizzas (& Pitas)
August 6, 2013 at 3:39 pm | Posted in BWJ, groups, savory things, tuesdays with dorie, yeast breads | 9 CommentsTags: baking, bread, savory

Lord knows I’m not above making a pita pizza from time to time, but usually it’s out of sheer convenience (and sometimes out of desperation). Before Jeffrey Alford and Naomi Duguid’s Eastern Mediterranean Pizzas, I certainly wouldn’t have gone through the trouble of making my own pita dough for one. Not that it was a hard dough to make or anything, but like any yeast bread, it does take time.
The topping for these pizzas is lamb (although I used ground turkey) sautéed with onions and garlic, tomatoes and pine nuts. Mine wound up a little on the dry side, probably because I used cherry tomatoes, which didn’t give off much juice. I tried to jazz up my finished pizza with some feta and chopped scallions, but if I make it again, I’ll make sure the topping has just a touch of sauciness to coat the meat.
The bread dough has a fair amount of whole wheat flour in it, which gives it a slightly nutty taste. The recipe calls for baking individual pizzas, but I made a double-sized one instead and baked it on my pizza stone.
Since I had to make pita dough before I could make the base of my pizza, I went ahead and made some actual pita breads with it as well. And then we had warm pita and hummus snack. I was quite pleased that my pitas puffed enough to get a pocket– my husband initially didn’t believe that I made these, as I always get my pitas at the great Damascus Bakery here in Brooklyn. The next morning, I took my last homemade pita, opened its pocket, and made a fried egg sandwich out of it. Tasty!

We’re going without hosts now for TWD, so for the recipe, see Baking with Julia by Dorie Greenspan. There’s also a video of Jeffery and Naomi making the dough and pizzas with Julia. Don’t forget to check out the rest of the TWD Blogroll!
Gooseberry Jam
July 23, 2013 at 4:01 pm | Posted in breakfast things, jams & preserves, sweet things | 7 CommentsTags: jam, preserves

In honour of the Royal Baby, I’ve whipped up something that I think of as very British– gooseberry jam. Gooseberries are high in pectin, so they’re ideal for jamming. Also, when my CSA gave them to me last weekend, I really couldn’t think of anything else to do with them.
I had just two half-pints of gooseberries, so I weighed what I had and scaled down the recipe below accordingly. Even though I had a mix of red and green berries, the jam took on a brilliant rosy color as it bubbled away. My little batch cooked quickly, and gave me a pint of jam plus a smidge extra (that’s what’s left in the pot). A raw gooseberry packs a tart punch, but this jam has a great sweet-tart balance and just a hint of vanilla. Maybe I’ll fold it into whipped cream for a fool or a trifle. That is, if we don’t eat it all on our morning crumpets.
Did you know that “gooseberry” is British slang for what we call “third wheel”? Interesting.
Gooseberry Jam— makes about four 1/2-pint jars
adapted from The Preservation Kitchen by Paul Virant
Steph’s Notes: This is a pretty small batch of jam– small enough that I personally would just store the jars in the fridge and not bother to water bath process them. You can certainly process them to extend shelf life, though, if you choose. New boxes of Ball jars come with instructions on how to do this, or you can find great tutorials online (like this one).
If you have trouble telling if your jam is done, you can pop a small plate into the freezer to chill. Spoon a teaspoon of the fruit mixture onto the cold plate and allow to set for 30 seconds. Tip the plate 45 degrees to one side; jam should be a soft gel that moves slightly. If mixture is liquid and runs quickly down the plate, return the jam to the heat and cook, stirring constantly, 2-5 minutes longer; then repeat the test.
907 g (about 6 cups) whole gooseberries, topped and tailed
282 g (about 1 2/3 cups) sugar
14 g (about 1 1/2 tablespoons) lemon juice
1 vanilla bean (seeds only)
-In a heavy-bottomed pot, combine the gooseberries, sugar and lemon juice. Cover with the lid and bring to a simmer over medium-high heat. Remove the lid once the mixture is simmering and stir in the vanilla bean seeds. Continue to cook over moderate heat, stirring frequently with a wooden spoon, for about 15 minutes. Skim off any scum that rises to the surface of the jam during the cooking process.
-You’ll notice some changes in the fruit mixture as it reaches gelling stage. These changes are subtle, but as the jam starts to set, you’ll feel your spoon “drag” on the bottom of the pot when you stir, and the boiling bubbles will slow (similar to candy making). Also, when you hold your spoon up, the liquid will run off the side of it in thick, heavy drops. If you are uncertain, use the cold plate test described in the above notes.
-Spoon or funnel the jam into four clean 1/2-pint jars (even though I don’t water-bath process small batches of jam, I still like to carefully pour boiling water over the jars, lids, funnel and metal spoon before using them, or have them fresh from the dishwasher), leaving about 1/4 inch of space at the top. Close the jars and let the jam cool to room temperature. Store the jam in the refrigerator for several months.
Tuesdays with Dorie BWJ: Summer Vegetable Tart
July 16, 2013 at 12:01 am | Posted in BWJ, groups, other savory, savory things, tuesdays with dorie, veggies | 14 CommentsTags: baking, savory

Gale Gand’s Summer Vegetable Tart at first sounded so promising. My CSA is throwing all kinds of vegetables my way, and it can be a challenge (a fun challenge) to get them taken care of before the next week’s batch takes over my fridge. I was kind of surprised, then, to see that the “summer vegetables” in the recipe are just garlic, onions, red peppers and mushrooms. Those are more like “whenever vegetables,” so I took some creative license and added zucchini and summer squash to the mix.
The tart is simple enough– the shell is just layers of butter-brushed phyllo baked till golden. The veggies are sautéed separately and then loaded into the baked shell along with some cheese. That’s it, all done and ready to serve. It’s okay. It certainly isn’t bad, just a little dull, even though I tried to pep mine up with some hot pepper flakes and fresh parsley. The phyllo shell gets soggy in a hurry, and because the filling is never baked, it stays loose and messy. I prefer the Cheese and Tomato Galette we did last month, and I think a riff on that will be my next attempt at a summer veggie tart.
We’re going without hosts now for TWD, so for the recipe, see Baking with Julia by Dorie Greenspan. Don’t forget to check out the rest of the TWD Blogroll!
Baked Fresh Weekly

Blog at WordPress.com.
Entries and comments feeds.
