Tuesdays with Dorie: Classic Banana Bundt Cake
August 4, 2009 at 1:21 am | Posted in bundt cakes, cakes & tortes, groups, simple cakes, sweet things, tuesdays with dorie | 49 Comments
At the end of every month, just before the new list of TWD recipes comes out, I do a little dance in the hopes that a Bundt cake will be chosen. My efforts to summon the cake gods have gone unrealized every time, but leave it to Mary The Food Librarian, herself a lover of all things Bundted (seriously, she has made a bazillion of them), to finally chose Dorie’s Classic Banana Bundt. Yay!! (Now I am doing my happy dance!)
I love Bundt cakes, and this banana one is no exception. It’s dense and moist, not unlike a banana bread. It’s full of banana flavor, and the inside is full of those little black squigglies…do you know what I’m talking about? Those fascinate me, and I must study them in every slice.
I made half a recipe of this cake in my treasured six-cup Bundt pan. I switched out a quarter cup of the AP flour for whole wheat, and added in a sprinkle of nutmeg. I also used half sour cream and half yogurt in the batter. The coolest thing about any Bundt is how pretty it is, no thanks to me– it just comes out of the pan that way (provided I spray it well)! I drizzled a quick and easy milk chocolate ganache over this one, because hey– bananas and chocolate are great together!
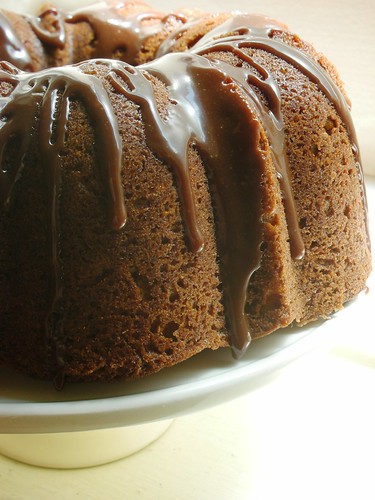
For the recipe, see Baking: From My Home to Yours by Dorie Greenspan, or read The Food Librarian. Don’t forget to check out the TWD Blogroll!
Yogurt Cake with Currant-Raspberry Sauce
August 2, 2009 at 7:27 pm | Posted in cakes & tortes, simple cakes, sweet things | 15 Comments
I’ve racked up a pretty extensive collection of layer cakes here, and while I love the challenge of prepping multiple components and the decorating practice, every now and again I just want a no-brainer. I need to simply plop on the couch and eat a giant slab of sheet cake straight from the pan. Okay, so I probably wouldn’t ever actually do that, but I do enjoy the mental image, and the fact that I could if I wanted to.
When I saw a picture of this yogurt cake in the August issue of Gourmet, I knew I had to make it right away. Soft cake, sweet icing and bright red sauce on mismatched vintage plates– how pretty! Never mind that I don’t have any mismatched vintage plates…I knew this would taste just as good on plain white ones.
I eat yogurt pretty much everyday. Usually it’s mixed into my granola or whizzed into a smoothie, but I love to bake with it, too–just feels like it healthies-up the butter! This cake has a really light, moist crumb that is seriously fluffy. I think adding a little citrus zest would work nicely in it, but I’ll save that for next time. And there will be a next time, too, because it came together in a snap– just the no-brainer I wanted! The sauce is gorgeous, and the red currants make it a wee bit tart. I was pleased to have both berries already in the fridge (leftover from my adventures in blanc-manger), but you could easily use all raspberries (and frozen ones, at that) if you can’t find the currants.
Just a couple notes from my kitchen…I used 2% yogurt instead of whole-milk, and I made half a recipe of the cake in an 8-inch square pan, checking it about ten minutes early just to be safe. I also thought that the original amount of icing was a bit of a sugar bomb, so I only made a sixth (using 1/2 cup of powdered sugar), and I used honey in place of the corn syrup. But you do as wish, even if you wish to eat it straight from the pan!
Yogurt Cake with Currant-Raspberry Sauce– makes a 13×9-inch cake
from a recipe in Gourmet (August 2009)
Notes: If you can’t find red currants, you can substitute 2 more cups raspberries.
Sauce keeps, chilled, two days. Cake can be baked and iced one day ahead and kept in a cake keeper (or covered with an inverted roasting pan; do not touch icing) at cool room temperature.
for the cake:
3 cups sifted cake flour (not self-rising; sift before measuring)
2 teaspoons baking powder
1 teaspoons baking soda
1/2 teaspoon salt
2 sticks unsalted butter, softened
2 cups granulated sugar
2 teaspoons pure vanilla extract
3 large eggs, warmed in shell in warm water 10 minutes
2 cups plain whole-milk plain yogurt (not Greek-style) at room tempfor the sauce:
2 cups fresh red currants (1/2 pound), stemmed
4 cups fresh raspberries (16 ounces), divided
2/3 cup granulated sugarfor the icing:
3 cups powdered sugar
3 tablespoons light corn syrup
1/2 cup heavy cream
scant 1/2 teaspoon pure vanilla extract
Make cake:
-Preheat oven to 350°F with rack in middle. Butter cake pan, then line bottom with a rectangle of parchment paper and butter parchment. Dust with flour, knocking out excess.
-Sift together cake flour, baking powder, baking soda, and salt.
-Beat together butter, sugar, and vanilla with an electric mixer at high speed until pale and fluffy, 3 to 5 minutes. Beat in eggs, 1 at a time, at medium speed. At low speed, mix in flour mixture in 3 batches, alternating with yogurt, beginning and ending with flour mixture, and mixing until just combined. Spread batter evenly in pan and rap pan on counter several times to eliminate air bubbles.
-Bake until cake pulls away from sides of pan and a wooden pick inserted in center comes out clean, 35 to 45 minutes. Cool in pan 10 minutes, then run a knife around edge. Invert onto a rack and discard parchment. Cool completely, about 1 hour.
Make sauce while cake bakes:
-Stir together currants, 2 cups raspberries, sugar, and 1/8 teaspoon salt in a medium saucepan and let stand until juicy, about 15 minutes. Simmer, stirring occasionally, until fruit breaks down, about 8 minutes. Force through a fine-mesh sieve into a bowl, discarding solids. Cool sauce.
Make icing and assemble cake:
-Stir together confectioners sugar, corn syrup, cream, and vanilla until smooth.
-Put cake on a platter and spread icing on top in a thick layer, letting it run down sides. Let icing set at least 15 minutes. Serve with sauce and remaining 2 cups raspberries on the side.
Tuesdays with Dorie: Vanilla Ice Cream
July 28, 2009 at 1:32 am | Posted in groups, ice creams & frozen, sweet things, tuesdays with dorie | 40 Comments
Do I really need to say anything at all about vanilla ice cream? It is good…so good…not to mention good with everything (sweet, that is). It is fantastic if you make it yourself. And it is amazing if you make it yourself and use real beans in your custard. I dare you not to lick every last bit off your machine’s dasher!

For the recipe, see Baking: From My Home to Yours by Dorie Greenspan (Dorie also has it here on her website). Lynne of Cafe LynnyLu chose it for TWD this week, so she’ll have the recipe, too. Don’t forget to scan the TWD Blogroll!
Sour Cherry Pie Filling
July 23, 2009 at 3:58 pm | Posted in pies & tarts, sweet things | 22 Comments
My freezer becomes a bit neglected in the summer. Actually, I cram a whole lot of stuff into it, but apart from ice cream, not a whole lot of stuff manages to find its way back out…intentionally, that is. The other day, after a couple of quarts of frozen chicken stock decided to fling themselves from the freezer when I opened the door (ouch–my foot!), I decided to do a little root-around in there, and I came across my neglected pie dough “collection.” I am often making mini pies and tarts, and stashing what remains from a whole batch of dough in the icebox. If you’re reading this blog, why do I bet that you do, too?!?
I thought that a smart way to use up some of these frozen bits and pieces would be to combine them with something fresh and in season. Sour cherry time is here, although it’ll be over before I can blink, so I knew I had to get myself to the Greenmarket ASAP. I broke out my cherry pitter, and made up a recipe of Nick Malgieri’s “Once-A-Year Cherry Pie” filling. Rather than using his crust, I eeny, meeny, miny, moe’d my dough collection and used some hazelnut linzer scraps that I brought home from work ages ago. You could use a regular sweet dough or a flaky one…heck, probably even a chocolate dough, if you like that combo. Go see what you have hiding in the freezer!
Sour Cherry Pie Filling – makes enough for a 9-inch pie
from a recipe by Nick Malgieri
3 pints fresh sour cherries, stemmed, rinsed and picked over
3/4 cup sugar
3 tablespoons cornstarch
3 tablespoons water
1 teaspoon almond extract
1/4 teaspoon ground cinnamon
2 tablespoons unsalted butter
-To make the filling, pit the cherries over a bowl. Use a cherry pitter, or slash the side of each one with a stainless steel paring knife and squeeze gently to extract the pits. Put the cherries in a bowl as they are pitted.
-When all the cherries have been pitted drain the juices from the bowl into a non-reactive saucepan and add 1 cup of the cherries and the sugar. Bring to a simmer over low heat, stirring occasionally, until the sugar is melted and the mixture is very liquid–about 5 minutes.
-Combine the cornstarch and water in a small bowl and whisk the cherry and sugar mixture into it. Return to the pan and cook, stirring constantly, over low heat, until it comes to a boil thickens and becomes clear. If it does not become clear, continue to cook over low heat an additional few minutes until it does.
-Pour into a large bowl and stir in the remaining filling ingredients, except the cherries then add the remaining cherries.
-Now you are ready to use it as a filling for your favorite pie dough! Bake until the filling bubbles and the dough is golden, at whatever temperature you normally use for your particular dough.
Tuesdays with Dorie: Blanc-Manger
July 21, 2009 at 1:16 am | Posted in groups, pudding/mousse, sweet things, tuesdays with dorie | 34 Comments
Susan of Sticky, Gooey, Creamy, Chewy went midevil on us this week and selected Raspberry Blanc-Manger for TWD. It’s been awhile since I’ve had such a sophisticated dessert here! Time to class up this joint! Blanc-manger is actually something I had never eaten before tonight, because it contains gelatin, which (since I don’t eat most meats) I try my best to avoid. After some initial hesitation and thoughts of skipping this week’s recipe, I got my hands on a Kosher vegetarian gelatin called KoJel, so I gave it a go.
Blanc-manger may have its roots in the Middle Ages, and may have historically been prepared with chicken (what?!?!– did you read the link?), but the modern-day version is basically almond milk and whipped cream set in a mold with the aid of gelatin. I scaled back Dorie’s recipe to just a third, and made two individual portions in ramekins. I folded a combination of fresh raspberries and red currants into the mix before chilling it, and served it with a raspberry coulis. While I wasn’t quite sure what to make of this dessert at first, it is light as a feather (although not low-cal in the least) and absolutely delicious with the berries and currants. Quite beautiful, too, I think.
For the recipe, see Baking: From My Home to Yours by Dorie Greenspan, or read Sticky, Gooey, Creamy, Chewy. Don’t forget to scan the TWD Blogroll!
The Cake Slice: Marbled Lemon-Blueberry Butter Cake
July 20, 2009 at 2:41 am | Posted in cakes & tortes, groups, layer cakes, sweet things, the cake slice | 27 Comments
I really look forward to Cake Slice time every month. The best part, of course, is getting to eat homemade cake!! But the second best part is getting in a little decorating practice. I always keep it simple, mainly because I don’t have the finishing skills to make it fancy, but simple suits me best anyway. One thing I’ve discovered is that a few easy to crank out gumpaste or fondant flowers can make even a mediocre frosting job look pretty good!
I was a little on the fence when I saw we’d be making this particular cake, though. It felt like we’d just done the Triple Lemon Chiffon…although looking at my archives, I now realize that was back in March. My, how time flies– I guess we are due for another lemon cake!
This one’s a different animal from the chiffon altogether. You can tell it’s a butter cake, with its nice tight crumb…it is definitely lemony, which I loved (although I do admit to never measuring zest, and may have been heavy-handed). The frosting is a really rich buttercream…but the kicker is the homemade blueberry jam in the middle (and in the marble). How perfectly summery!

Here’s a printable link to the recipe. Better yet, get your hands on a copy of Sky High: Irresistible Triple Layer Cakes by Alicia Huntsman and Peter Wynne. Cruise through the list of The Cake Slice Bakers to check out all of our sky-high cakes this month.
Tuesdays with Dorie: Brioche Plum Tart
July 14, 2009 at 1:35 am | Posted in groups, pies & tarts, sweet things, sweet yeast breads, tuesdays with dorie | 37 Comments
I’ve been itching to make a tart with the gorgeous summer fruits that are popping up at the Greenmarket. Thanks to TWD and Denise of Chez Us, I got the push I needed this week…albeit in a slightly different direction. Rather than a pastry dough, the tart shell here is made from brioche. It’s pressed into a ring and topped with jam, fruit and nuts. Juice from the jam and fruit seeps into the brioche while it bakes. The end result is a really classy tart that temporarily turned my teensy-weensy Manhattan kitchen into a European bakery! By the way, this particular brioche recipe is the easiest I’ve ever made. The butter is melted, and all the ingredients are basically chucked into a bowl at once and mixed. (I’m thinking cinnamon rolls may need to start making more frequent appearances at my breakfast table!)
Although Dorie intends this tart to be a breakfast or tea-time treat, due to my work schedule this week, we enjoyed ours for dessert. As you can see from the picture, I made a couple of indiviual tarts so I wouldn’t have soggy leftovers. One night I used some little purple plums, hardly bigger than golf balls. They softened up quickly in the oven, which is good because the brioche browned awfully fast! The next night, I pressed out a couple more shells and used sweet cherries instead. With a little vanilla whipped cream, both were good, but I think I liked the cherry tarts better…next time, I should give it a go with apricots and a bit of my homemade jam!
The recipe, of course, is in Baking: From My Home to Yours by Dorie Greenspan, and is also on Chez Us. Don’t forget to check out the TWD Blogroll and Denise’s post over at Chez Us!
Easy Apricot Jam
July 8, 2009 at 8:57 pm | Posted in jams & preserves, sweet things | 34 Comments
First I pickled…now I jam. I think I’m really just looking for excuses to use these cute little French jars. Actually, a recent comment from fellow blogger Joy of Hot Oven, Warm Heart, coupled with finding the cutest little soft apricots at the store the other day, had my one-track mind thinking about pretty much nothing but homemade jam.
The first time I made my own jam was probably about five years ago. I belonged to a CSA, and in the summer months I was taking home bags full of peaches, nectarines and plums each week. Now that’s no hardship, but it was too much for two of us to possibly consume in a week’s time, so I decided to take up canning my own jam. I bought a canning kit, a big pot, a bunch of Ball jars and a couple of books and went to town. My kitchen that summer was like Mr. Wizard’s lab, with bubbling pots, thermometers, sterilized tongs…it was a lot of work, and I was giving away jam to anyone who would take it.
Since that summer, I haven’t been lucky enough to have abundance of stone fruits fall into my lap, so now I’m preserving the easy way, with less sugar and smaller quantities of fruit that yield just enough jam to be eaten up over the course of a couple weeks. The smaller amount of fruit is much easier to work with; it’s also much easier to judge when your jam has gelled. No need for pectin (which I don’t like working with anyway) or water bath processing…just store the finished jam in the refrigerator and use within two weeks. I think that little Ball/Mason jars or French canning jars with rubber seals are downright adorable, but you can recycle store-bought jam jars or just use an airtight container for this type of preserving as well.

If you want, you can also infuse your jam with background flavors during cooking time. A whole cinnamon stick or half a vanilla bean would be great additions to apricot jam. I actually threw a fresh bay leaf into mine while it cooked down. Sounds a little weird, but I remember a pastry chef at an old job poaching whole apricots in a syrup infused with fresh bay. You hardly know it’s there, but it gives a very subtle savory backnote that plays nicely with the sweetness. If you do something like this, just fish out whatever whole spice you’ve added before storing your jam, or the flavor may get too intense while it sits.
Your homemade jam will be the most delicious thing to ever hit your toast, crumpets, crêpes, or (OMG) your PB&J! I haven’t had any consistency problems with this method (because it’s easy to test and correct), but if you ever make jam– whether it’s the easy way or the water bath-processed method– and it sets up loose, don’t throw it out. Runny jam becomes such a perfect fruit sauce for ice cream, yogurt, pound cake, etc, that you can pretend you meant it to be that way!
Easy Apricot Jam— makes 2 1/2 cups
adapted from Cooks Illustrated (July/August 1998)
Note: To prep your apricots, wash, peel (this is optional…personally, I like the skins and leave them on), halve and pit them. Then slice them very thin. You want to wind up with 1 pound of fruit after prepping.
The jam will continue to thicken as it cools, so err on the side of undercooking. Because of its reduced sugar amounts, this jam cannot be canned.
1 pound prepared fruit, about 3 cups
1 cup sugar
2 tablespoons juice from 1 lemon
– Set a bowl over a larger bowl of ice water; set aside.
– In 10- or 12-inch skillet, bring fruit, sugar, and lemon juice to boil over medium-high heat, stirring occasionally. Reduce heat to medium and cook, stirring constantly and skimming foam as necessary, until mixture begins to look syrupy and thickens slightly, about 5 minutes; remove from heat. Spoon 1/2 teaspoon fruit mixture into bowl over ice water; allow to set for 30 seconds. Tip bowl 45 degrees to one side; jam should be a soft gel that moves slightly. If mixture is liquid and runs to side of bowl, return skillet to heat and cook, stirring constantly, 1 to 2 minutes longer; then repeat test. Save the ice bath to cool the finished product.
-Cool jam to room temperature (over the ice bath) before serving or transferring to a clean glass jar or airtight container (you can sterilized first with boiling water, if you are so inclined). It will keep, covered and refrigerated, for up to two weeks.
Tuesdays with Dorie: Tribute-to-Katharine-Hepburn Brownies
July 7, 2009 at 1:09 am | Posted in cookies & bars, groups, sweet things, tuesdays with dorie | 42 Comments
As a child, there were a few movies I was a bit obsessed with…so you don’t think I’m too demented, I won’t mention that as a six-year-old I could recite lines from The Elephant Man or pretty much the entirety of Mommy Dearest. Instead I will tell you that I’ve seen On Golden Pond, starring none other than Katharine Hepburn, more times than I can count. So for years I’ve known what a wonderful actress she was, but until Lisa of Surviving Oz chose Tribute-to-Katharine-Hepburn Brownies for TWD, I did not know that she was also an accomplished brownie-baker. (By the way, our guest hostess Lisa designed our fantastic new TWD logo, which you can see over there in my sidebar.)
These dark, deeply chocolate brownies are made with cocoa powder and lots of bittersweet chunks. They’re on the thin side, and since they have very little flour (one of Miss Hepburn’s tips for good brownies), they are really fudgy. I know that some people fervently oppose nuts in brownies, but I’m a die-hard with-walnuts fan, so I was glad to see them here. I also liked the strong hit of coffee from the espresso powder in the recipe, but I left out the suggested cinnamon so I wouldn’t have too many competing flavors. After reading a comment from Caitlin, I cut back on the butter by a tablespoon, and they were still wonderfully rich. A half-recipe baked up nicely in a loaf pan, although these were so good, we could easily have polished off a full batch!
The recipe, of course, is in Baking: From My Home to Yours by Dorie Greenspan, but she also has it here on NPR’s site, and Lisa of Surviving Oz has it as well. Don’t forget to check out the TWD Blogroll!
Raw Pickled Beets
July 2, 2009 at 4:59 pm | Posted in pickles, savory things, veggies | 13 Comments
Something about pickling has always sounded so complicated to me…brines versus cures, acidity and fermentation, blah, blah, blah. I’ll just leave the mysterious intricacies of anaerobic fermentation up to Rick, and not clog up my own (much needed) personal brainspace, thanks very much. But a quick pickle…God, even I should be able to do something called a “quick pickle,” right?
A good place to start for beet-loving, picking virgins like myself is this recipe from last month’s Martha Stewart Living. Trust me, these are easy…so easy, in fact, that after making one batch, I considered myself expert enough to make a second! The first batch was made with red beets, and the second with the striped variety (although the stripes were basically washed away with the hot pickling liquid). Don’t fear the Thai chile…these are not spicy pickles; a gentle backnote is all you get from its heat.
Remember that these pickles are not canned and sealed in a water bath, so do get them into the fridge straightaway and store them there. Give the beets a day or two to relax in their bath before opening the jar. Then they’ll be ready to eat straight-up, to be made into a snappy salad with feta and mint, or to be put Aussie-style on a burger (and preferably enjoyed with a Coopers Sparkling). Supposedly they’ll keep for a month, but I can guarantee you that mine won’t make it a week.

Raw Pickled Beets– makes one jar
adapted from Martha Stewart Living, May 2009
2 red or golden beets
1 fresh Thai chile
1 cup rice vinegar (not the seasoned kind)
1/4 cup sugar
1 fresh bay leaf
1/2 teaspoon black peppercorns
-Scrub, trim, and peel your two beets. Slice thinly (a mandoline works best), and transfer to a jar.
-Split the fresh Thai chile in half. Bring chile, rice vinegar, sugar, fresh bay leaf, and black peppercorns to a boil in a small saucepan.
-Pour hot mixture over beets. Seal jar and refrigerate. Beets will keep for one month.
Baked Fresh Weekly

Blog at WordPress.com.
Entries and comments feeds.
