Tuesdays with Dorie: Perfect Party Cake
June 30, 2009 at 1:21 am | Posted in cakes & tortes, groups, layer cakes, sweet things, tuesdays with dorie | 52 Comments
Like many of you, I’ve made the Perfect Party Cake before, but it was so good that when I saw that Carol of mix, mix… stir, stir picked it for TWD, party or no party, I was happy to give it a second go! Since I had stayed pretty true to the original last year, this time around I thought I’d switch up the flavors a bit. Instead of using lemon zest and juice, I put almond extract in the cake itself and matcha powder in the buttercream frosting (I just added both flavors to taste). I skipped the jam component and sprinkled toasted sliced almonds over each layer. Good, good stuff!
The original cake is made from two thicker layers that are halved to make a four-layer cake…I simplified things a bit here, and just baked three thinner ones and used them as-is (or as-was, I guess). After making it twice now, the cake doesn’t seem to be an incredibly high-riser…but it was soft, moist and had a great fluffy texture both times, so I’m assuming that’s the norm. Dorie herself weighed in on the TWD site with some tips to achieve party cake perfection– check them out here.
For the recipe, see Baking: From My Home to Yours by Dorie Greenspan, or read mix, mix… stir, stir (Carol always has some cool tricks up her sleeve, so definitely check her post out). Don’t forget to scan the TWD Blogroll!
Daring Bakers in June: Bakewell Tart
June 27, 2009 at 1:32 am | Posted in daring bakers, groups, pies & tarts, sweet things | 40 Comments
June’s Daring Bakers’ challenge is Bakewell Tart, brought to us by Jasmine of Confessions of a Cardamom Addict and Annemarie of Ambrosia and Nectar. This traditional English tart consists of a sweet shortcrust pastry, which is spread with jam or curd and topped with almond frangipane.
The day before this challenge was announced, I had gotten strawberries and rhubarb as part of my weekly Greenmarket haul. I made them into a compote with my morning granola in mind, but after reading the challenge, I knew it would be perfect for the jam component of the tart. This was pretty easily assembled, and tasted great (especially with whipped cream)! Next time, I’ll use a tart ring with higher sides, so I can fit in more frangipane– I love that stuff!

Check out of Confessions of a Cardamom Addict and Annemarie of Ambrosia and Nectar for the Bakewell Tart recipe, and visit the Daring Kitchen site to see what everyone else is up to!
The June Daring Bakers’ challenge was hosted by Jasmine of Confessions of a Cardamom Addict and Annemarie of Ambrosia and Nectar. They chose a Traditional (UK) Bakewell Tart… er… pudding that was inspired by a rich baking history dating back to the 1800’s in England.

Cookie Carnival: Strawberry Shortcake Cookies
June 24, 2009 at 8:46 pm | Posted in cookies & bars, events, sweet things | 25 Comments
It’s been a long time since I’ve participated in The Clean Plate Club’s Cookie Carnival. I saw this month’s recipe for Strawberry Shortcake Cookies in a recent issue of Martha Stewart Living, and they were too cute to resist! I have been gorging myself silly on fresh strawberries since the end of May, so I had plenty on hand to whip these up a couple of weeks ago.
These cookies come together without much fuss, but I do have a couple of pointers. They are pretty much just little biscuits, but the addition of fresh strawberries makes the dough quite wet. To make it easier to handle (and to prevent too much color from bleeding into the dough), after tossing the diced strawberries with sugar and lemon, I left any accumulated juice behind before mixing the berries in. I was a little scared of the large amount of heavy cream in the original recipe, so I replaced half of it with buttermilk, and it worked just fine. Keep a close eye on the cookies near the end of baking time…any strawberry bits on the bottom will start to caramelize if they are taken too far.
They really do taste like little shortcakes! Nice and soft, but a sprinkling of sanding sugar gives them a bit of crunch on top. Do take the advice written in the recipe, though, and eat these soon after they’ve cooled. I did save a few overnight in a container, and by the next day, I would have to say that they had gone from nice and soft to sad and soggy.
Strawberry-Shortcake Cookies– makes about 3 dozen
adapted from Martha Stewart Living, June 2009
Steph’s Note: You can replace half the amount of cream with buttermilk.
12 oz strawberries, hulled and cut into 1/4-inch dice (2 cups)
1 teaspoon fresh lemon juice
1/2 cup plus 1 tablespoon granulated sugar
2 cups all-purpose flour
2 teaspoons baking powder
1/2 teaspoon coarse salt
3 ounces (6 tablespoons) cold unsalted butter, cut into small pieces
2/3 cup heavy cream
sanding sugar, for sprinkling
-Preheat oven to 375 degrees. Combine strawberries, lemon juice, and 2 tablespoons granulated sugar. Whisk together flour, baking powder, salt, and remaining 7 tablespoons granulated sugar in a large bowl. Cut in the butter with a pastry cutter, or rub in with your fingers, until mixture resembles coarse crumbs. Stir in cream until dough starts to come together, then stir in strawberry mixture.
-Using a 1 1/2-inch ice cream scoop or a tablespoon, drop dough onto baking sheets lined with parchment, spacing evenly apart. Sprinkle with sanding sugar, and bake until golden brown, 24 to 25 minutes (start checking at 20 minutes!). Transfer to a wire rack, and let cool.
-Cookies are best served immediately, but can be stored in an airtight container at room temperature for up to 1 day.

Tuesdays with Dorie: Coconut-Roasted Pineapple Dacquoise
June 23, 2009 at 4:45 pm | Posted in cakes & tortes, groups, layer cakes, sweet things, tuesdays with dorie | 35 Comments
Wow. I almost thought this Coconut-Roasted Pineapple Dacquoise wasn’t going to get done, but I really wanted to give props to Andrea in the Kitchen and the Aussie contingent of TWD, so I busted the recipe out this morning.
If you’re wondering what exactly this is, it’s a cake made from layers of crisp almond-coconut meringue. It’s filled with a softly-whipped white chocolate ganache and pineapple slices. Sounds good, right? It’s not hard to make, but there’s a fair amount of wait-time involved, so it did take awhile from start to finish. I made a half recipe of the meringue layers and a just third of the ganache.
I totally of get a kick out of how retro this thing looks. I know that dacquoise meringue is used as a building block for many classic French desserts, but I think this particular cake looks like it belongs at a 70’s dinner party, which instantly makes me love it! I do have to admit that since I just assembled it about an hour ago, my dacquoise is still sitting in the fridge– uncut and untasted. I have taste-tested all the components separately, though, and I do think the final product will be a hit! I’m looking forward to a chilled slice tonight…probably with a few raspberries thrown around the plate.

For the recipe, see Baking: From My Home to Yours by Dorie Greenspan, or read Andrea in the Kitchen. Don’t forget to check out the TWD Blogroll!
The Cake Slice: Piña Colada Cake
June 20, 2009 at 3:16 am | Posted in cakes & tortes, groups, layer cakes, sweet things, the cake slice | 32 Comments
Anyone who knows me well knows that I like relaxing vacations in tropical places (but really, who doesn’t?). If I can’t be in paradise, then a frou-frou frozen drink with a paper umbrella and a plastic mermaid can usually put me in high spirits! But a Piña Colada Cake?? I dunno about that, but if it’s from the book Sky High, I’m willing to give it a shot.
This cake has a couple of standout elements. The first is the actual cake itself– a brown sugar cake that’s really soft and moist, and it stayed that way over the four nights it took us to eat it (and I only made 1/3 of the recipe!). The second is the pineapple filling– crushed pineapple cooked down with vanilla bean and lime juice. It is supremely delicious, and I’m thinking that if I reduced it just to the point of a loose sauce (rather than a jammy cake filling), it would make an awesome topping for vanilla ice cream!
I have to say, however, that on the first night, I wasn’t so impressed by the total package. A healthy sprinkling of rum moistens each cake layer. Normally that would get me pretty excited, but it was just too harshly alcoholoic for me. And the coconut buttercream tasted overwhelmingly of the coconut extract (which always seems a little fake to me) used to flavor it. Happily, after a night of refrigerated rest, the flavors nicely mellowed out…just like me under a palm tree with a drink in my hand!
Here’s a printable link to the recipe. Better yet, get your hands on a copy of Sky High: Irresistible Triple Layer Cakes by Alicia Huntsman and Peter Wynne. Cruise through the list of The Cake Slice Bakers to check out all of our mile-high cakes this month.
Tuesdays with Dorie: Honey-Peach Ice Cream
June 16, 2009 at 2:45 am | Posted in groups, ice creams & frozen, sweet things, tuesdays with dorie | 34 Comments
We are well into June now…never mind the fact that it’s been raining here constantly, and the thermometer can’t decide if it wants to read warm or chilly…it’s time to crank out some ice cream! Tommi of the colorful Brown Interior selected Honey-Peach Ice Cream for TWD, so that’s a good place to start!
Peaches cooked down in honey are puréed and added to a simple custard. I buy Cobble Hill Honey from Two for the Pot in Brooklyn. Every jar I’ve purchased tastes a little different, and my current one is quite mild. After churning, some extra chopped peach bits are supposed to be added to the ice cream. Peaches aren’t quite in season here, and the ones I bought were less than spectacular, so I just cooked and puréed the whole lot, rather than save some for add-ins. I added most of the purée to the custard, but didn’t want to thin it out too much, so I froze the rest in an ice cube tray…I see bellinis in my near future! As is, I liked this ice cream a lot, and would love to try it again with amazing peaches and a stronger batch of honey!
For the recipe, see Baking: From My Home to Yours by Dorie Greenspan, or read Brown Interior. Don’t forget to check out the TWD Blogroll!
P.S.: By the time this post pops up, I’ll be in Michigan, visiting one of my grandmas. I haven’t seen her in a few years, so please forgive me if I can’t make the blogroll rounds this week. Also, because of the timing of this trip, I’m not sure I’ll be able to make next week’s recipe. I know, I know…I’ll do my best, but it may have to be one for the rewind files.
Tuesdays with Dorie: Parisian Apple Tartlet
June 9, 2009 at 2:54 am | Posted in groups, pies & tarts, sweet things, tuesdays with dorie | 49 Comments
I probably would not have considered making an apple dessert when I have two big quarts of greenmarket strawberries in the kitchen, but then Jessica of My Baking Heart selected Dorie’s Parisian Apple Tartlets for TWD. I’m actually glad she did, because I am in love with these little tartlets!
They are so simple (and pretty, too, I think)…a round of buttery puff pastry, topped with half an apple, then dotted with butter and brown sugar…c’est tout. Using good-quality store-bought puff makes this one of the quickest and easiest desserts to put together. In the oven, the apple turns soft, the pastry turns crisp, and the whole thing gets sweetly caramelized. The best part, though, has to be the center of the puff pastry– the part the apple had been sitting upon. It absorbs the brown sugar and the juices from the apple, and is indescribably yummy.
For the recipe, see Baking: From My Home to Yours by Dorie Greenspan, or read My Baking Heart. Don’t forget to check out the TWD Blogroll!
Tuesdays with Dorie: Cinnamon Squares
June 2, 2009 at 2:17 am | Posted in cakes & tortes, groups, simple cakes, sweet things, tuesdays with dorie | 50 Comments
I’ve often wondered when Cinnamon Squares would have their fifteen minutes of TWD fame. Thanks to Tracey of Tracey’s Culinary Adventures, their time has come.
Chocolate, coffee, and, of course, heaps of cinnamon join forces here to form simple squares of cakey goodness. Add frosting, and it becomes simply outrageous. As an aside, why do I always accidentally stick my finger in frostings, and then notice only after I’ve taken pictures??
For the recipe, see Baking: From My Home to Yours by Dorie Greenspan, or read Tracey’s Culinary Adventures. Don’t forget to check out the TWD Blogroll!
Vanilla Buttermilk Cake with Vanilla Swiss Meringue Buttercream
May 28, 2009 at 10:36 am | Posted in cakes & tortes, layer cakes, sweet things | 73 Comments
Did you see the birthday cake I made a few weeks ago for my friend’s little tiger? Well, I promised recipes, so now I am here to deliver. Tiger’s mum, my friend C, wanted a basic vanilla-on-vanilla– something that both the kids and the other mums at the party would like– so I began my quest for the right cake and frosting.
I have baked several fantastic cakes from Sky High: Irresistible Triple Layer Cakes by Alicia Huntsman and Peter Wynne, and I really trust the recipes in the book. I’ve seen the authors’ Vanilla Buttermilk Cake make appearances on countless other blogs, so I thought I’d give it a whirl. This yellow cake is nice and moist, and has a great crumb that doesn’t fall apart when you level the layers or when you slice it up. It’s definitely a multi-purpose vanilla cake– just as good for something simple and homey as it is for something dressed-up and fancy.
C had asked for a buttercream frosting, and since I wanted something snow white, I knew it had to be either Swiss or Italian meringue-based. In the battle between the two, I generally side with the Swiss, only because no futzing with sugar syrups is required. The recipe below is pretty standard…I like its particular proportions because it’s not too sweet, and it’s really easy to work with. A basic Swiss meringue buttercream is the perfect canvas for making flavored frostings, if you are so inclined. Switch up the extracts, add melted chocolate, add coconut flakes…I could go on.
Tiger’s birthday cake was a big triple layer 10-incher, so I scaled up the recipes below. I overshot a bit, and wound up with enough extra batter and buttercream to make a two layer 6-inch cake for myself (oops, how’d that happen?!?). I didn’t have quite enough leftover buttercream to fill the layers of my little cake, so I used lemon curd and some smooshed up raspberries in the middle.

Vanilla Buttermilk Cake– makes an 8-inch layer cake
adapted from Sky High: Irresistible Triple Layer Cakes by Alicia Huntsman and Peter Wynne
4 whole large eggs
2 egg yolks
2 t vanilla extract
1 1/4 c buttermilk
3 c cake flour
2 c sugar
4 1/2 t baking powder
1/2 t salt
8 oz unsalted butter, room temperature
-Preheat the oven to 350°F. Butter or spray the bottom and sides of three 8-inch cake pans. Line with parchment rounds and grease.
-Place the eggs and the yolks in a medium bowl. Add the vanilla and 1/4 cup of buttermilk. Whisk well and set aside.
-Combine the flour, sugar, baking powder and salt in the bowl of a mixer; whisk to blend. Add the remaining 1 cup of buttermilk and the butter to the dry ingredients and with the mixer on low speed, blend together. Raise the mixer to medium speed and beat until light fluffy (about 2 minutes).
-Add the egg mixture in three additions, scrapping down the sides of the bowl after each addition. Don’t overmix.
-Divide the batter among the three pans. Bake the cake layers for 28-32 minutes, or until a toothpick inserted in the center comes out clean. Let the cake layers cool in the pan for 10 minutes. Turn out the cakes onto a wire rack and remove the paper from the bottoms. Cool completely before filling and frosting.
Vanilla Swiss Meringue Buttercream– makes about 6 cups
adapted from Martha Stewart
Note: Unless you like to go really heavy on the stuff, this is most likely more than you will need to fill and frost an 8-inch cake. I always like to be on the safe side with buttercream, however, because finding you are stuck without quite enough is incredibly annoying. Extra buttercream can be stored for a couple weeks and used to frost a half-batch of cupcakes.
1 c egg whites (from about 6 large eggs)
1 1/2 c sugar
pinch of salt
1 lb 4 oz unsalted butter, at room temperature
2 t vanilla extract (or seeds of 1/2 vanilla bean)
squeeze of lemon juice
-Combine the egg whites, sugar and pinch of salt in a large metal bowl (I usually do this right in my stand mixer bowl). Put the bowl over a pot of simmering water (double boiler-style), and whisk until the sugar is completely dissolved. The mixture will feel hot to the touch.
-Transfer the hot mixture to your stand mixer and whip on high speed until it turns white and about doubles in size. This will take about six minutes. Beat in the vanilla and the lemon juice.
-Add the butter, a few tablespoons at a time, on medium speed, mixing after each addition. Raise the speed and beat until smooth; this may take up to ten minutes. The mixture may appear curdled along the way; this is normal. Just keep beating and the mixture will become smooth again.
-Buttercream will keep, covered air-tight and refrigerated, for up to two weeks. Bring to room temperature, then beat on low speed before using.
Daring Bakers in May: Strudel, Two Ways
May 27, 2009 at 2:23 am | Posted in daring bakers, groups, other savory, other sweet, savory things, sweet things, veggies | 43 Comments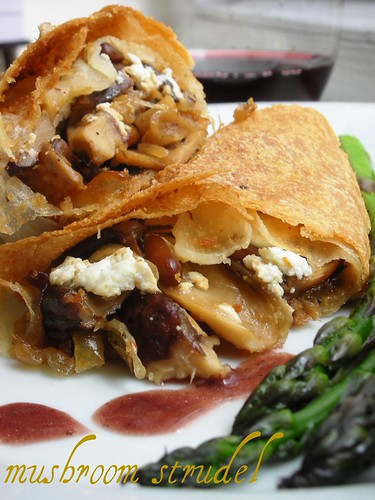
Courtney of Coco Cooks and Linda of make life sweeter! picked a fantastic Daring Bakers’ challenge this month– strudel! Just thinking about strudel makes me long to re-visit Vienna and Budapest, cities that I travelled to long ago. At just nineteen, it was too bad I didn’t know then what I know now about pastries. Actually, maybe it was a good thing– I would never have seen the sights because I would have been sitting in coffee houses all day long!
Prior to this, the only time I’ve made true strudel dough was while studying at the FCI. I vividly remember my partner in strudel-making crime, S, and I struggling with a huge ball of dough, stretching it gently over our hands to eventually cover our entire worktable. I also vividly remember that taking more patience and concentration than I’m normally willing to put in, so whenever I’ve made strudel at home, I’ve gone the lazy route and used store-bought phyllo instead!
My dessert schedule is rather full on at the moment, so I thought something savory would be the smartest way to get this challenge done. Mushrooms immediately came to mind as a tasty strudel filling, and here I used a combination of crimini, shitake and trumpet. I sautéed them first, mainly so I knew they would be cooked through and seasoned properly, but also to release their liquid so the pastry wouldn’t turn soggy. Caramelized onions, garlic, pine nuts and goat cheese all sounded like good things to add to ‘shrooms, and went into the mix. I have to say that I just winged my filling measurement-wise, and was quite please to have a bit left-over…it will make tomorrow morning’s omelette that much better.
There are only two of us here at home, so I just made a half-recipe of the dough. It was a really easy amount to deal with, and I stretched it solo on a clean tea towel with no problems at all– very little patience and concentration required, thank you! My strudel-for-two was a cinch to fill and transfer as well. The mushrooms and goat cheese made a wonderful, hearty filling…perfect for a cool spring day like today. A glass of red wine and some asparagus on the side…much to R’s dismay, I was belting out “I am Sixteen Going on Seventeen” at the dinner table (OK, so that was probably just the wine)!
I had only planned to make the mushroom strudel, but I had the teensiest bit of dough left after rolling it, so I made a couple of two-bite apple strudels as well. Since they were so small, to make the filling, I just grated half an apple, squeezed most of the liquid out, and tossed it with dark brown sugar, cinnamon and chopped pecans. And the only way to eat apple strudel? Mit schlag, of course!

This was a really fun recipe to make, and it’s very adaptable. Sweet and savory possibilities are limitless, although I’m sure you’ll find heaps of inspiration on the Daring Kitchen site. I’m listing the recipe for the dough below, but you can find more information on Coco Cooks and make life sweeter!
Strudel Dough
from Kaffeehaus – Exquisite Desserts from the Classic Cafés of Vienna, Budapest and Prague by Rick Rodgers
1 1/3 cups (200 g) unbleached flour
1/8 teaspoon salt
7 tablespoons (105 ml) water, plus more if needed
2 tablespoons (30 ml) vegetable oil, plus additional for coating the dough
1/2 teaspoon cider vinegaryour prepared filling of choice
5 tablespoons butter, melted
1 1/2 cups (350 ml) fresh bread crumbs
-Combine the flour and salt in a stand-mixer fitted with the paddle attachment. Mix the water, oil and vinegar in a measuring cup. Add the water/oil mixture to the flour with the mixer on low speed. You will get a soft dough. Make sure it is not too dry, add a little more water if necessary. Take the dough out of the mixer. Change to the dough hook. Put the dough ball back in the mixer. Let the dough knead on medium until you get a soft dough ball with a somewhat rough surface.
-Take the dough out of the mixer and continue kneading by hand on an unfloured work surface. Knead for about 2 minutes. Pick up the dough and throw it down hard onto your working surface occasionally. Shape the dough into a ball and transfer it to a plate. Oil the top of the dough ball lightly. Cover the ball tightly with plastic wrap. Allow to stand for 30-90 minutes (longer is better).
-It would be best if you have a work area that you can walk around on all sides like a 36 inch (90 cm) round table or a work surface of 23 x 38 inches (60 x 100 cm). Cover your working area with table cloth, dust it with flour and rub it into the fabric. Put your dough ball in the middle and roll it out as much as you can. Pick the dough up by holding it by an edge. This way the weight of the dough and gravity can help stretching it as it hangs. Using the back of your hands to gently stretch and pull the dough. You can use your forearms to support it.
-The dough will become too large to hold. Put it on your work surface. Leave the thicker edge of the dough to hang over the edge of the table. Place your hands underneath the dough and stretch and pull the dough thinner using the backs of your hands. Stretch and pull the dough until it’s about 2 feet (60 cm) wide and 3 feet (90 cm) long, it will be tissue-thin by this time. Cut away the thick dough around the edges with scissors. The dough is now ready to be filled.
-Put the rack in the upper third of the oven and preheat the oven to 400°F (200°C). Line a large baking sheet with baking paper (parchment paper). Spread about 3 tablespoons of the melted butter over the dough using your hands (a bristle brush could tear the dough, you could use a special feather pastry brush instead of your hands). Sprinkle the buttered dough with the bread crumbs. Spread your filling about 3 inches (8 cm) from the short edge of the dough in a 6-inch-(15cm)-wide strip.
-Fold the short end of the dough onto the filling. Lift the tablecloth at the short end of the dough so that the strudel rolls onto itself. Transfer the strudel to the prepared baking sheet by lifting it. Curve it into a horseshoe to fit, if necessary. Tuck the ends under the strudel. Brush the top with the remaining melted butter.
-Bake the strudel for about 30 minutes or until it is deep golden brown. Cool for at least 30 minutes before slicing. Use a serrated knife and serve either warm or at room temperature. It is best on the day it is baked.
The May Daring Bakers’ challenge was hosted by Linda of make life sweeter! and Courtney of Coco Cooks. They chose Apple Strudel from the recipe book Kaffeehaus: Exquisite Desserts from the Classic Cafés of Vienna, Budapest and Prague by Rick Rodgers.
Baked Fresh Weekly

Blog at WordPress.com.
Entries and comments feeds.
