SHF#43: Meyer Lemon Ice Cream Bombe
May 24, 2008 at 11:28 am | Posted in events, ice creams & frozen, sweet things | 33 Comments
I don’t often make this kind of thing at home. I’ll leave the plated dessert nonsense for work, thanks very much (although this is not even close to restaurant-worthy). But R was in Korea for four days this week, and I had too much time on my hands. Also, I thought he’d like having a special dessert when he came home.
I’ve called this a “bombe,” but if you’d like to think of it as “baked Alaska,” that’s fine, too. I originally thought to do some version of this as a means to use up some extra sponge cake in the freezer and some yolks in the fridge. I could have gone in any number of directions flavor-wise, but I wanted to send Tartelette one more entry for her Sugar High Friday (an event started by Jennifer The Domestic Goddess) citrus extravaganza, so I settled on a meyer lemon ice cream bombe with orange caramel sauce hiding in the center.

If you’re into making ice cream, then this isn’t too complicated if you start the whole process a couple days ahead. Make your ice cream custard and caramel sauce one day, run the ice cream and mold it the next. Then the day of, assemble, make your meringue and plate up! And if you’re not into making ice cream, then I think store-bought would do just fine, and would save a lot of prep. Having cake in the freezer and a silicone semi-spherical mold (like this) in the cupboard helps, too.

The ice cream is snappy, and combined with the meringue, is a bit reminiscent of LMP. The orange juice and zest in the caramel help temper some of its sweetness. This is like a self-contained ice cream sundae, and it’s good!
Meyer Lemon Ice Cream Bombe– makes 6 individual bombes (of this size)
Note: If you don’t have a silicone mold, you can put a large scoop of ice cream onto cut cake circles and just serve the sauce on the side. I don’t give a recipe for the cake here, but I used scraps from the jaconde used in my opéra cake (any relatively thin sponge cake will do).
Day 1: Make the custard base for the meyer lemon ice cream (recipe below; save your egg whites for the meringue) and chill in the refrigerator. Put your ice cream machine canister in the freezer, if necessary. Make the orange caramel sauce (recipe below) and chill. If you don’t already have cake available, make or buy the cake and freeze.
Day 2: Freeze the meyer lemon ice cream base according to your machine’s instructions. Using a spoon, fill the cavities of your dome molds with the ice cream, making sure to nudge it against the side of the molds, and level off each one with an offset spatula or the back of a knife. Lay your silicone molds on a sheet pan and freeze for about 4 hours. Once semi-hardened, using a spoon or a small ice cream scoop, hollow out a cavity in the middle of each mold. This cavity will hold the caramel sauce, so be sure to leave enough ice cream “cushion” around it. Press plastic wrap against the exposed surface of the ice cream and return the molds to the freezer overnight to harden.
Day 3: No more than a couple of hours before serving, cut out cake circles using a round cutter that matches the diameter of the bottom of the mold. Take the tray holding the silicone molds out of the freezer. Using a spoon or a squeeze bottle, fill the cavities in of each bombe with orange caramel sauce. Lightly press a cake circle onto each bombe, and pop out of the silicone mold. Place back on the sheet tray, cake side down (the caramel shouldn’t leak out). Return the tray to the freezer. Prepare the Swiss meringue (recipe below) and use a small offset spatula to cover the bombe. Either brown the meringue with a kitchen blowtorch, or bake in a preheated 500°F oven until meringue is deep brown in spots, turning the sheet pan as needed for even cooking, about 3 minutes. Transfer to plates and serve (or you can return the bombes to the freezer for up to a couple of hours, if necessary).
Meyer Lemon Ice Cream Base
modified from a recipe on Epicurious
Note: The xanthan gum in the recipe is optional, and helps keep ice crystals from forming as the ice cream sits in the freezer. It is a powder and can be found in most health food stores.
1 1/2 c heavy cream
1 c milk
3/4 c sugar
2 T finely grated fresh meyer lemon zest
1/8 t salt
6 large egg yolks
2/3 c fresh meyer lemon juice
pinch of xanthan gum (under 1/8 t)
-Take about half of the sugar and put into the bottom of a 2-quart heavy saucepan. Add the lemon zest and rub into the sugar using your fingers. Add the cream, milk and salt to the pan and bring just to a boil, stirring occasionally. Take off the heat and set aside for about ten minutes to infuse the flavor of the zest.
-Beat yolks and the remaining sugar well in a large bowl, then add hot sweetened cream in a slow stream, whisking. Pour custard into saucepan and cook over moderately low heat, stirring constantly with a wooden spoon, until a candy or instant-read thermometer registers 170°F and custard coats back of spoon, about 10 minutes.
-Pour through a sieve into a clean bowl, then stir in meyer lemon juice. Cool custard, stirring occasionally, then chill until cold, preferably overnight, before freeing in an ice cream machine.
Orange Caramel Sauce
1 c sugar
1 T light corn syrup or golden syrup
pinch of salt
1/4 c water
1/2 c heavy cream, heated
2 T unsalted butter
zest and juice of half an orange
–In a medium saucepan, stir together the sugar, syrup, salt and water until the sugar is completely moistened. Wash down any sugar that is stuck to the side of the pot with a wet pastry brush or wet fingers. (Sugar granules on the side could cause your caramel to crystallize.) Allow it to boil undisturbed until it turns deep amber in color (380°F.). Immediately remove it from the heat and slowly and carefully pour the hot cream into the caramel. It will bubble up, so stand back.
-Use a whisk or wooden spoon to stir the mixture until smooth, scraping up the thicker part that settles on the bottom. If any lumps develop, return the pan to the heat and stir until they dissolve. Stir in the butter and the orange zest and juice. Cool. Store in a jar in the refrigerator.
Swiss Meringue
Note: If you are afraid you will not be able to work quickly enough rather than pull out the full tray, you can remove the unmolded bombes from the freezer and meringue them one by one, returning each one to the freezer before removing the next.
4 egg whites (about 1/2 cup)
1 cup sugar
-Combine sugar and egg whites in large metal bowl or the bowl of a stand mixer. Set bowl over saucepan of gently simmering water and whisk until mixture is hot to the touch and all the sugar has dissolved, about 2-3 minutes. Remove bowl from over water. Using the stand mixer fitted with the whip or a handheld electric mixer, beat meringue at high speed until very thick and billowy and room temperature, about 2-3 minutes.
-Place sheet tray with unmolded, assembled bombes on work surface. Mound 2 heaping tablespoons meringue atop ice cream on 1 cake round. Spread meringue evenly over to cover, sealing meringue to plain cake border and swirling decoratively. Repeat with remaining desserts.
Taste&Create IX: Hummus and Pita Chips
May 23, 2008 at 6:42 pm | Posted in events, savory things | 10 Comments
With pita or raw veggies, in a fried egg sandwich on Turkish pide, or on a bagel…hummus if so good. I know it’s ridiculously easy to make, but it’s something I never do myself. You know, I make my own baba ghanoush, and opening up a can of chick peas is certainly less involved than roasting an eggplant, so what’s the excuse? In Brooklyn, it was perhaps understandable because I was spoiled by having Sahadi’s and their amazing hummus practically around the corner (then I would skip up the block to Damascus Bakery for fresh pita!). Now there’s no Sahadi’s, so there’s also no excuse.
Min from The Bad Girl’s Kitchen is my partner in crime for this month’s edition of Taste&Create. I’m making Middle Eastern food for dinner tonight, and I found a great, lemony hummus recipe on her site. Made in the food processor, it’s done in under five. Needing something to go with my/her hummus, I also made Min’s pita chips. They were salty and crunchy and a perfect companion to my bowl of hummus.

Thanks, Min, for weaning me off the store-bought stuff with your great recipes! Also, thanks as always to Nicole from For the Love of Food for hosting T&C!
Tuesdays with Dorie: Traditional Madeleines
May 20, 2008 at 3:37 am | Posted in cakes & tortes, cookies & bars, groups, simple cakes, sweet things, tuesdays with dorie | 55 Comments
I’d been crossing my fingers that Tara of Smells Like Home would choose a cookie for this week’s Tuesdays with Dorie recipe. Then Tara picked Dorie’s Traditional Madeleines–score! I know that a madeleine is really cake in cookie’s clothing, but after all the hard-core desserting I’ve been doing (and still have left to do this month), I was happy to have something that’s just a sweet bite.
I have fond voluntary (as opposed to Proustian-ha!) memories of these little scalloped-shaped cuties. Actually my memories are quite recent, as we made madeleines as part of the petits fours plate at the restaurant I last worked for. That recipe uses browned butter and almond flour, and we made a variety of flavors, from lavender to lemon-thyme, depending on what we felt like or what we had available.

Dorie’s recipe is flavored with lemon zest, and even though she doesn’t instruct you to brown the melted butter, I went ahead and did it anyway. Browned butter just has such a beautiful flavor, I used my non-stick mini madeleine pan (which is the only one I have, and trust me, you still need to grease it well) to bake them off, and made half of Dorie’s recipe. Rather than sprinkling them with powdered sugar before serving, I tossed the still-warm madeleines in some finely ground vanilla sugar.
I will say that these make very good little lemony tea cakes. They are soft and light and tasty (do bake them right when you are ready to eat them though, as they stale quickly). But I have one gripe. If we are talking about “tradition” here, then madeleines are supposed to have a bump on their backsides. We learned in culinary school that the bump is desirable, and our instructor said that madeleines are often presented with their bums in the air (rather than scalloped side up) to show them off. Dorie calls for chilling the batter for at least three hours to help form this bump. The same day I made the batter, I baked up half of it after letting it chill for several hours. No bump. The next day, I baked up the remaining batter (it had now been chilling overnight). Two madeleines had the bump…the rest didn’t. Ah well…after conferring with other TWDers, this seemed to happen to most everyone. And as Ulrike pointed out, even the Traditional Madeleines pictured in Dorie’s book don’t have bumps!

If you’d like to try your hand at baking madeleines (and see if you get the coveted golden bump!), you can find the recipe here on Smells Like Home or in Baking: From My Home to Yours by Dorie Greenspan. Don’t forget to check out the TWD Blogroll!
SHF#43: Lemon Yogurt Cake with Marmalade Glaze
May 18, 2008 at 7:57 pm | Posted in cakes & tortes, events, simple cakes, sweet things | 28 Comments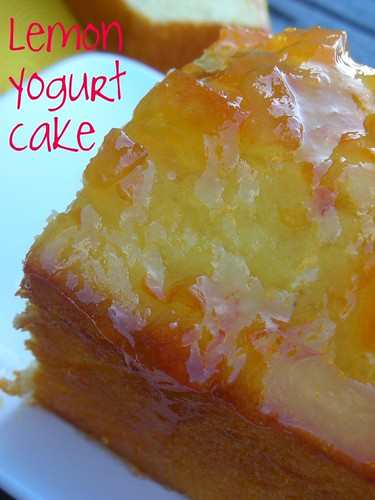
Do you ever find yourself with one or more of the following things in your refrigerator?:
- An extra lemon that you bought a week ago, and is now just rolling back and forth every time you move something around it
- A huge tub of plain yogurt (because the plain only comes in huge tubs, but that’s what you like to eat on your granola) that you don’t know if you’ll be able to finish before it turns icky
- A jar of grapefruit marmalade that looked so beautiful, you had to buy it at the farmers’ market, but now it’s been open forever because it’s actually too thick-cut to be enjoyable on your toast or PB&J
Well, today I realized I had all three and I needed to do something about it. That something was to bake a lemon yogurt cake with marmalade glaze. Yogurt cake is a cousin to pound cake…the cousin you call on when you don’t quite need all those pounds, if ya know what I mean. The yogurt keeps it tender and a little oil keeps it moist. It has a light texture that’s a bit spongier than pound cake.
This is particular recpie is one that my friend P photocopied for me from Bon Appétit magazine a few years ago. I only have the recipe itself, and not the article associated with it, but I noticed that it bears a striking similarity to a recipe I’ve seen in Baking: From My Home to Yours by Dorie Greenspan. After a little Internet research, I found that it is in fact a Dorie recipe– a slightly altered version of what’s in her book. While I’ve made another lemon yogurt cake here before, I’ve actually baked this one a few times, too, with assorted maramalades on top, making my own small tweaks along the way. I prefer to cut down a bit on the oil in the original version and ramp up the lemon. I’ve made those changes in the recipe below, but I link to the original as well.
This cake is happy and sunny; sweet but with a little pucker from the marmalade. And loaf cakes are easy to make, giving you the sugar high you’re after with minimal effort. Speaking of which, I’m sending this over to Tartelette who’s hosting a sweet-tart, citrusy version of Sugar High Friday (started by Jennifer The Domestic Goddess) this month!

Yogurt Cake with Marmalade Glaze– makes one loaf pan
modified from a recipe in Bon Appétit by Dorie Greenspan, February 2005
For the cake:
1 1/2 c all-purpose flour
2 t baking powder
1/4 t salt
1 c plain yogurt (whole-milk or low fat)
1 c sugar
3 large eggs
finely grated peel from 1 lemon
juice of half a lemon
1/3 c vegetable oilFor the glaze:
1/4 c lemon, orange, or grapefruit marmalade
1 t water
-Position rack in center of oven and preheat to 350°F. Generously butter 8 1/2×4 1/2×2 1/2-inch metal loaf pan.
-Sift flour, baking powder, and salt into medium bowl.
-Combine yogurt, sugar, eggs, lemon peel and lemon juice in large bowl; whisk until well blended. Gradually whisk in dry ingredients. Using rubber spatula, fold in oil.
-Transfer batter to prepared loaf pan. Place cake on baking sheet in oven and bake until cake begins to pull away from sides of pan and tester inserted into center comes out clean, about 50 minutes.
-Cool cake in pan on rack 5 minutes. Cut around pan sides to loosen cake. Turn cake out onto rack. Turn cake upright on rack and cool completely. (Can be made 1 day ahead. Wrap and store at room temperature.)
-Stir marmalade and 1 teaspoon water in small saucepan over medium heat until marmalade melts. Brush hot mixture over top of cake. Let glaze cool and set before cutting.
Good News and Classic Sandwich Bread
May 15, 2008 at 5:44 pm | Posted in savory things, yeast breads | 23 Comments
I woke up this morning to some good news: my Rhubarb-Filled Yogurt Cupcakes won Cupcake Hero’s Earth Day event! I’m so excited, and not to brag (hahaha), but it’s actually my second CH win! Thanks so much to Laurie, Tempered Woman, Joy and Leigh, who collect, bake and round-up the CH entries each month. That takes not only heaps of ingredients, but lots of time, effort and witty paraphrasing skills as well. Definitely check out the round-up to see all the Earth loving cupcakes they received last month.
Now, onto the bread. I have some bread baking experience, but it’s pretty limited. I’ve made zillions of batches of brioche, bagels and English muffins through my various jobs, and I make my own pizza dough all the time at home, but I never bake my own baguettes or dinner rolls, and I rarely even make a simple loaf bread.
What brought this on then? Laziness may sound like a weird reason to bake your own bread, but that’s what it was, pure and simple. I was too lazy to walk the 25 minutes down to the grocery store (I don’t drive). R has been in Malaysia on business the last couple days. If I were in New York and R was away, I’d likely use that freedom to go and get bombed with my single friends if it weren’t a work night (you can keep that on the down-low), or at least order some yummy delivery if it were. Since I don’t know too many people in Sydney to go boozing with, and there aren’t really any delivery options where I live, it was a tuna sandwich and the company of Tim Gunn’s Guide to Style for me last night. I can’t manage a whole can of tuna myself, so I still had half my salad to eat for lunch today. But…you guessed it…no bread.
Being lazy today, I’m lucky that making this type of bread is so freakin’ easy. I had originally wanted to use a recipe from Rose Levy Beranbaum, but it required making a sponge starter and then it needed three rises for the dough. While it would have had great flavor, it also wouldn’t have been ready by lunch-time, and that was the whole reason for getting the yeast out! Then I remembered a recipe that I’d torn off a bag of King Arthur flour a couple years ago. It only takes about two hours of total rising time, and if you use a stand mixer, measuring out the ingredients is really the only work there is. It’s baked in a loaf pan, so there isn’t even any tricky shaping to do. And I don’t know if it was because the bread was so fresh and soft, or if it was because I was so antsy after waiting for it to cool down, but that was one tasty tuna sandwich!
In true lazy fashion, I’ll just show you the way to King Arthur’s recipe, rather than type it myself. I made mine in my stand mixer, using the dough hook. I know that King Arthur’s AP flour has a higher protein content than most. Since I can’t kind KA flour in this neck of the woods and I have no clue as to the protein content of the flour I buy here, I substituted 1/4 cup of the AP flour in the recipe with bread flour. I substituted another 1/4 cup with whole wheat flour, just for fun. Be sure take your baked bread out of the loaf pan and cool it on a rack for about an hour before slicing into it. This rest period helps set the bread’s texture and crust.
Tuesdays with Dorie: Florida Pie
May 13, 2008 at 4:08 am | Posted in groups, pies & tarts, sweet things, tuesdays with dorie | 57 Comments
“What the heck is Florida Pie?” you ask. It’s basically a key lime pie with a couple of coconutty embellishments, and it happens to the TWD pick o’ the week from Dianne of Dianne’s Dishes. Dorie’s Florida Pie has the standard crumb crust and lime juice/condensed milk filling, but it also has a layer of coconut cream in between said crust and filling, and coconut folded into the meringue topping. I decided to go for mini pies, and half a recipe of filling gave me three babies. Mini pies do have a higher crust to filling proportion than full size pies, so I probably used about 2/3 recipe of crust.
I didn’t stray too far from Dorie’s instructions this time, but I did make a couple tweaks. I used regular (not key) limes and condensed low fat milk in the filling, which worked nicely. And for the coconut cream layer, I used way less cream than she called for, probably just a few tablespoons, and wound up with something more like a tasty goo. I also toasted my coconuts (both the shredded stuff I used in the goo, and the fine desiccated stuff I folded into the meringue), because I think it really brings out the flavor of packaged coconut, which can be pretty lackluster as-is.

“How did it taste?” you ask. Pretty darn good. Next time, I’ll add a little lime zest to the filling. I really like the combination of coconut and lime, but if you aren’t a coconut fan, just leave out the cream layer and keep your meringue unflavored. You’ll still wind up with a fantastic key lime pie. If you’d like to be transported via baking to Key West, Del Boca Vista, or the Floridian destination of your choice, put on your Lilly Pulitzer and check out the recipe here on Dianne’s Dishes, or in Baking: From My Home to Yours by Dorie Greenspan. Don’t forget to go look at the TWD Blogroll!
Tuesdays with Dorie: Peanut Butter Torte
May 6, 2008 at 4:27 am | Posted in cakes & tortes, groups, sweet things, tuesdays with dorie | 65 Comments
There are a few recipes in Baking: From My Home to Yours whose pictures and titles are so alluring, I’ve been surprised no one’s chosen them for TWD yet. Well, the time has finally come for one of these, as Elizabeth of Ugg Smell Food has picked Dorie’s Peanut Butter Torte as our recipe of the week! Kind of like the Snickery Squares, I think Dorie has played candy bar dress-up here, except this time the candy in question is a Reece’s cup. I don’t mean to sound like a buzzkill, but the ingredient list is a little frightening, I have to tell you…Oreos, peanut butter, cream cheese, heavy cream, chocolate and peanuts. April was my busiest posting month to date, so that means it was also a very busy eating month. If I didn’t want to feel my heart racing (in a bad way) with each bite, I knew I had to tweak this torte a bit.
It was a given that was not going to make a full-sized torte. I rarely make a full-sized anything for the two of us. My six-inch springform would be prefect for a half recipe, and I’d still get six pieces out of it, but even a half batch seemed like so much cream and peanut butter. After some intense volume calculations (not really), I decided that I could still use my six-inch pan and get away with just a quarter recipe of the filling. Sure, it wouldn’t be as high as the one in Dorie’s picture, but I didn’t mind if my torte looked more like a tart.
I am a peanut butter fanatic, and I love the sugary, salty, junky stuff. I am sorry to say though that I don’t think the Aussie peanut butter is very good…it’s pale and doesn’t have peanuty specks in it. That may explain why, according to an informal poll taken by yours truly, it doesn’t seem to be a popular food item here (I was even told by someone that my favorite lunch, PB&J, is gross!). No matter–I’ve been “importing” my own peanut butter since my first trip back to the States. My current PB of choice is reduced fat Jif (smooth, never crunchy) so that’s what I decided to go with in this torte.

Back in the US, I wouldn’t think twice about swapping full fat cream cheese for the light Philly they label “Neufchâtel.” Here, though, the light Philly doesn’t have the same consistency at all…it tastes good, but even straight out of the fridge, it’s incredibly soft. Further inspection of the package says that it’s a blend of cream cheese and cottage cheese, so I guess that’s why. I didn’t think my filling would set up properly if I used it, so I went with the light version of a New Zealand brand called Mainland.
I also decided that rather than using Oreos to make my crust, I’d save a few more fat grams and use some almond cookie crumbs that I had in the freezer already. Adding cocoa powder turned them into chocolate crumbs.

I’m happy to report that my filling set up nicely after several hours in the fridge, and although I can imagine how wonderful the full blown PB torte would be, the skimpy version was still great! I loved the chocolate-peanut crunchy bits throughout the filling. Now you know my tricks, but you can find the original version of this recipe in Baking: From My Home to Yours by Dorie Greenspan, and on Elizabeth’s site. Don’t forget to go check out the TWD Blogroll!
Cupcake Hero: Rhubarb-Filled Yogurt Cupcakes for Mother Earth
April 30, 2008 at 5:55 pm | Posted in cupcakes, events, sweet things | 28 Comments
Kermit the Frog summed it up best when he sang, “It’s not easy being green.” I tell ya, you want to buy organic products, but they’re nowhere near local. You take your own tote bags to the grocery store, but you still have to practically wrestle the plastic ones out the the cashier’s hands. You try to recycle as much as possible, but then your neighbor throws her baby’s dirty diapers into the plastics recycling bin (nice!). And it’s expensive, even more so in Sydney than in New York. You should see the amount of cazash I plonk down at the growers’ markets here ($27 for an organic chicken last week!), and the enviro-friendly cleaning products cost a small fortune.
What’s a little frog to do? The best she can, I guess. I’m happy to see that a lot of bloggers have gone green during April to celebrate Earth Day. These may not be the most kid-friendly cupcakes, but I wanted to make something earthy, delicious and maybe even slightly healthy for Cupcake Hero‘s own celebration of the planet. We all know that cupcakes make the world go ’round!
These should be called “rhubarb-filled yogurt cupcakes with lemon butter icing and pistachios,” but that’s a little long, don’t cha think? To make these, I used as many organic and/or local products I could. The exceptions are the baking powder and baking soda (which I think exist in organic form, but I couldn’t find them at the health food store) and the icing sugar (which although not organic, and certainly not local, is unrefined). The pistachios, lemon and rhubarb came from a local farmers’ market, and everything else from either the regular grocery store (which stocks a good range of organics) or the health food store. None of these items even required a car ride…all were picked up within reasonable walking distance from my place. And, while I am the first to admit that my giant collection of cupcake papers borders on the crazy, in efforts to make as little waste as possible, I baked these au naturel .

The cupcakes are delicious, moist and not too sweet. Their brown color comes from Alter Eco’s organic ground cane sugar. This is more like a soft brown sugar than a white granulated one. The cupcakes domed a bit in the oven, which at first had me a little peeved, but then I used it to my advantage, as they appear to have a huge mound of frosting on top, but really the amount is quite modest. My favorite part is hidden inside–the rhubarb compote, which you can modify according to your own sweetness preference. I made a big bunch, because whatever doesn’t get used in the cupcakes is amazing on top of oatmeal or with granola and yogurt. The icing is so simple, and it is great with the rhubarb. The refined icing sugar (I used Billington’s) is less harshly sweet, if you know what I mean, than regular powdered sugar and it is and a beautiful ivory color…I should always use this stuff.

Rhubarb-Filled Yogurt Cupcakes– makes 6 regular-size cupcakes
-Start by making and chilling the rhubarb compote (process below).
-Bake and cool the yogurt cupcakes (recipe below).
-If your pistachios have papery skins on them, blanche them for a minute in boiling water. Drain them, and once cool enough to handle, slip off the skins. Chop them roughly.
-Make the lemon butter icing.
-To fill the cooled cupcakes, use a small knife or round cookie cutter to cut a plug out of the center of each (going in from the top). Save the top bit of each plug. Fill each cavity with rhubarb compote. Cover with the top bit so the filling is not exposed.
-Top with the icing and sprinkle on the chopped pistachios.
Rhubarb Compote
Note: This is more of a process than a recipe, and can be adjusted depending upon the amount of rhubarb you have and how sweet you would like it to be. I’d use at least 6 stalks, and any leftover compote is great on oatmeal or with yogurt.
-Trim off the tops and bottoms of each stalk of rhubarb. Use a pairing knife to peel away any strings. Cut into 1-inch pieces.
-Weigh the cut rhubarb. Measure out sugar equal to 1/4 to 1/3 of the weight of the rhubarb, depending on how sweet you’d like it. If you don’t have a scale, you can eyeball or use cup measurements.
-Put rhubarb pieces and sugar into a heavy-bottomed pot. Add a small splash of water (just to keep the rhubarb from burning) and place over medium heat. Stir frequently to keep from sticking to the bottom.
-Simmer for several minutes until the rhubarb releases its juice and the sugar is dissolved. The rhubarb will soften and break down and the liquid should be reduced (although if you have an excessive amount, you can tip it out). All this will probably take about 10 minutes, unless you are working with a very large quantity.
-Transfer to a container and chill. This will keep for a week or two.
Yogurt Cupcakes– makes 6 regular-sized cupcakes
heavily modified from The 1997 Joy of Cooking
Note: I used salted butter in this recipe, as it is the only organic kind sold here (therefore, there is no added salt in the ingredients list). If you are using unsalted butter, add a 1/4 t salt in with the dry ingredients.
1 c sifted all-purpose flour
1/2 t baking powder
1/4 t baking soda
2 1/2 T salted butter, room temperature
1/2 c sugar
1/2 egg (break egg into a cup, whisk it and pour out half)
1 egg white
1/2 t vanilla
1/2 c plain yogurt (full or nonfat), cool room temperature
-Preheat the oven to 350°F/180°C and spray and flour six cavities of a muffin tin (or line with six paper cups).
-Sift together the flour, baking powder and baking soda. Set aside.
-Beat the butter in a large mixing bowl until creamy. Gradually add the sugar and beat until light in color and texture. (The amount was too small for my stand mixer, so I did it by hand. Handheld electric beaters would also work well.)
-Whisk together the 1/2 egg, egg white and vanilla. Gradually beat into the butter/sugar mixture until thoroughly combined.
-Add the dry ingredients and yogurt in three parts, alternating and beating smooth after each addition.
-Divide the batter in the tin, and cook for about 20-25 minutes, until a toothpick comes out clean. Cool in the tins for a few minutes and then transfer to a rack to cool completely.
Lemon Butter Icing– makes enough to generously frost 6 cupcakes
adapted from Everyday by Bill Granger
4 T butter (salted or unsalted), room temperature
3 3/4 oz powdered sugar, sifted
2 t lemon zest (finely grated)
2t lemon juice
-Beat the butter until very soft and white. Beat in the powdered sugar, lemon zest and juice. (You can adjust consistency with either extra powdered sugar or lemon juice.)
Tuesdays with Dorie: Fluted Polenta and Ricotta Cake
April 29, 2008 at 4:18 am | Posted in cakes & tortes, groups, sweet things, tuesdays with dorie | 45 Comments
This cake reminds me of the kind of thing my Italian nonna would make, if I had an Italian nonna. No wonder my husband, who is half Italian, scarfed this up! Caitlin of Engineer Baker chose this, Dorie’s Fluted Polenta and Ricotta Cake, as our TWD recipe of the week.
Polenta in this case is just another name for yellow cornmeal, so the cake had sort of a sweet cornbread feel to it, but combined with ricotta and honey, it was quite moist. And you can’t tell from the outside, but hidden in the cake are…dried figs! Normally, I am not a fan of dried figs (a lasting side effect of my childhood aversion to Newtons), but they work really well here. Their little seeds give a pleasant crunch to the cake. I did use a couple less than the recipe called for, though, and I chopped them into quarters so I could more evenly scatter them throughout the batter.

I wanted to follow Dorie’s suggestion to put a few thyme leaves into the batter, but then of course I forgot! So I made thyme whipped cream instead, by rubbing thyme leaves into the sugar that sweetened it. Please, no judgements about the massive amount of cream in that photo–I know I went a little overboard!
This was a lovely cake…simple and homey and good for breakfast (maybe without the mountain of whipped cream). I made a half batch, which fit perfectly into my 7 1/2-inch tart pan. Early reports from some other TWDers were that the cake was a bit too sweet. I went a little skimpy on the measurements for both the sugar and honey, and it came out just right. The only thing that left me scratching my head was the extra little hunk of butter that gets dotted on top of the cake before it goes into the oven. It didn’t seen to do much but make some pale colored spots on top…I think I’ll leave it out if I make the cake again.
You can find this recipe in Baking: From My Home to Yours by Dorie Greenspan, and on Caitlin’s site. Now go check out the TWD Blogroll!
Daring Bakers in April: Cheesecake Pops
April 27, 2008 at 2:10 pm | Posted in cakes & tortes, cheesecakes, daring bakers, groups, sweet things | 51 Comments
I must admit that I almost skipped making these cheesecake pops, this month’s Daring Bakers challenge. Even though I went out and searched around for lollipop sticks at the beginning of the month, I hadn’t really been in a cheesecake mood. Then I realized that the photo opportunities here were too good to be missed! The recipe, from the book Sticky, Chewy, Messy, Gooey by Jill O’Connor, was chosen by co-hostesses Deborah from Taste and Tell and Elle from Feeding My Enthusiasms.
I found a recipe calling for five bars of cream cheese to be a bit much to swallow (literally). I scaled the recipe way back to just one bar and baked it in a small loaf pan. I put the batter together my favorite way– in the food processor. As long as all the ingredients are room temperature, you will never get a lump. It baked up nicely, but even the tiny amount that I made took about 20 minutes longer than the suggested time.

After a night in the fridge, I used an ice cream scoop to form the set cheesecake into rough balls, and put them into the freezer for half an hour before reshaping them a bit. They still came out looking a bit…ummm….individual. Not that that’s a bad thing! The sticks are really wooden craft sticks (I had no luck finding the paper ones here), and I loved their fun colors. The packet said non-toxic, so let’s just hope that’s right!

I’m not embarrassed to say that hundreds and thousands are my favorite cake decoration! Just looking at them makes me smile!

I decided to roll a couple in some almond cookie crumbs mixed with a little cinnamon to get kind a cheesecake crust thing going on. In the center of these ones, I managed to hide a blob of strawberry jam. Sneaky!

The cuteness factor is unbelievable, and they taste pretty good too! Just what I needed put myself into a cheesecake mood! Thanks Deborah and Elle! You can find the recipe for the pops on Deborah’s site. I’ve looked at a bunch of posts, and the DBers did a beautiful job this month, so please check out the DB blogroll!

Baked Fresh Weekly

Blog at WordPress.com.
Entries and comments feeds.
