Tuesdays with Dorie: Pumpkin Muffins
October 21, 2008 at 5:14 am | Posted in breakfast things, groups, muffins/quick breads, tuesdays with dorie | 52 Comments
It’s spring-time warm here, and pumpkin would be the last thing on my mind if it weren’t for the fact that Kelly of Sounding My Barbaric Gulp chose these muffins for TWD. I’d actually better get used to the idea of cool weather foods, and quick, because come Friday, I’ll be back in the States! That’s right–this is my last TWD from Oz…I’ve already done next week’s recipe, but I won’t be able to post “early” anymore. Boo.
I’ve never noticed canned (or tinned) pumpkin in Australian grocery stores. Maybe I’ve been looking in the wrong aisle, I don’t know, but I assume it’s just not popular here. I would have had to roast and mash my own if I hadn’t had a can of Libby’s that I brought back from home. As an aside, which my American friends may or may not find interesting, all the hard-skinned gourds are referred to as “pumpkin” here (not just the orange ones that I think of in the US). For instance, I’ve gotten used to calling butternut a pumpkin, not a squash.
So, armed with my Libby’s, I was ready to tackle Dorie’s muffin recipe. I started by dividing it half (to make just six) and replacing the raisins with dried cranberries. Then I decided to skimp on the butter a bit, leaving out one tablespoon and replacing it with an additional tablespoon of buttermilk. The baked muffins were moist and soft, so I never even noticed that bit of butter was missing. What was missing, though, were the nuts! I had the exact amount of walnuts needed for this…they were right there on the counter…and that’s where they stayed. Oops! Early morning baking is apparently not my forte. Oh well–they found a new home in a spinach salad instead.

I can’t say that I ever crave pumpkin muffins, but I liked these a lot. I’ll make them again if I have an open can that needs to be used up. Next time, I’ll be sure to remember the nuts!
For the recipe, look in Baking: From My Home to Yours by Dorie Greenspan or read Kelly’s post. Don’t forget to check out the TWD Blogroll to see what close to 300 other people had to say!
The Cake Slice: Cappuccino Chiffon Cake
October 20, 2008 at 6:39 am | Posted in cakes & tortes, groups, layer cakes, sweet things, the cake slice | 33 Comments
I’ve joined a new baking group, and I couldn’t be more excited! Gigi and Katie thought it would be fun to actually use the cookbooks they have on the shelves, and so The Cake Slice was born. The premise is easy: we bake from one book per year, making a different recipe each month. This year’s book is a great one, covering a subject dear to my heart–Sky High: Irresistible Triple Layer Cakes by Alicia Huntsman and Peter Wynne.
The first of what promises to be twelve amazing layer cakes is a Cappuccino Chiffon Cake. Chiffon cake is light as cloud, and relies on air (in the form of a meringue) to give it a sky-high rise, with a little baking powder mixed in for “insurance” purposes. Because it’s made with oil instead of butter, it’s not incredibly flavorful in and of itself, but its texture makes it a perfect vehicle for soaking up a flavored syrup.

This cake looks and tastes sophisticated, but it’s really quite basic–three layers of espresso-flavored chiffon soaked in a coffee simple syrup, finished off with heaps of whipped cream. Wanting to pack as much cappuccino flavor as I could into the cake, I skipped over to the coffee shop on the corner and bought a few shots of strong espresso to use in the cake batter and the syrup. The only change I made to the recipe was that I switched out the rum in the soaking syrup for Kahlua.
I love the lightness of whipped cream frosting, but I have to admit that I’m always a little nervous when actually icing a cake with it. It’s so fragile that messing around with it just a bit too much can overwork it in a hurry. As someone who will muck about with buttercream icing for half an hour trying to get it just so, I had to try hard to just get the whipped cream on there, throw the spatula in the sink and walk away.

I wondered how the whipped cream would hold up, but this cake lasted nicely for a couple days in the fridge. It became even tastier as syrup soaked its way through the cake layers. There’s a little cinnamon in the cake batter…I really love it in combination with the espresso. I don’t allow myself to have an afternoon coffee any more (too many sleepless nights), but I’ll make an exception anyday for a slice of cappuccino chiffon cake!
Visit Gigi and Katie for the recipe, and cruise through the list of The Cake Slice Bakers to check out all of our chiffon cakes!
Tuesdays with Dorie: Lenox Almond Biscotti
October 14, 2008 at 4:28 am | Posted in cookies & bars, groups, sweet things, tuesdays with dorie | 60 Comments
Is this picture ridiculous? Of course I did not store the Lenox Almond Biscotti I made for TWD in this jar. I couldn’t close the lid without destroying them. That would be dumb, possibly even self-defeating. I just need better props.
Anyway, we have Gretchen of Canela & Comino to thank for this week’s recipe choice. I knew before baking these biscotti that they would go over well. R, being the good half-Sicilian that he is, loves crunchy, almondy Italian bakery cookies.
You probably know that biscotti are sturdy, crunchy and “twice baked”…they first go into the oven as large log to set the dough, and then again when that dough is sliced into individual cookies. During the first bake, my biscotti log certainly spread, as I knew it should, but it didn’t poof. The finished product was much flatter than I expected or hoped. I decided to cut them a little wider to compensate for their sad, deflated look. I must have done something screwy, because I’ve seen others make this recipe with picture-perfect results. I was kind of pissed at myself, but they tasted *fantastic*, so I got over it soon enough.

I definitely had to increase the times for both the the first and second bakes…I can’t really tell you how much extra time I added, but for the first bake, I left the log in the oven until it no longer had visible raw spots. For the second bake, I made sure the slices were crisped through before taking them out of the oven.
I followed Dorie’s cue to add a couple extras to the dough…a big pinch of cinnamon (that was for Gretchen, although I chickened out on the cumin!) and a handful of white chocolate chunks (there is still a tiny bit left in the bag). The full amount of almond extract sounded quite overpowering, and too much can be a little artificial-tasting, I think, so I did choose to go skimpy on that. Also, I used slivered almonds instead of sliced, because that’s what’s I had.
The finished cookies were crunchy and craggy– perfect with coffee, or with ice cream! Quite sweet, too, but then again I did add white chocolate. The cornmeal in the recipe gives a golden boost to the color of the cookie dough, and a rustic, gritty crunch (which I like, but I know some aren’t crazy about).

For the recipe, look in Baking: From My Home to Yours by Dorie Greenspan (she also has it here on NPR’s website) or read Gretchen’s post. Don’t forget to check out the TWD Blogroll to see what over 250 other people had to say!
Tuesdays with Dorie: Caramel-Peanut-Topped Brownie Cake
October 7, 2008 at 5:11 am | Posted in cakes & tortes, groups, sweet things, tuesdays with dorie | 63 Comments
My blog buddy Tammy of Wee Treats by Tammy picked a winning recipe for this week’s TWD–Dorie’s Caramel-Peanut-Topped Brownie Cake. These are three good things that go well together, let me tell you!
Although it’s called a “brownie cake,” it’s not as dense and fudgy as a brownie. It definitely has a cake-like crumb, but is quite moist. (Mine dipped a little in the center as it cooled, but Dorie suggests that that’s normal.) I’m running a little low on vanilla extract, and trying to save my last few drops for something where it’s really needed. Here I replaced it with a sprinkle of instant espresso and a splash of Kahlua added to the warm melted chocolate and butter. I often put espresso powder in my brownies, so hey, why not here?
You can probably tell from the top picture that I made a half-recipe (a 6-incher). I made even less caramel…I figured 1/3 of the full amount was all I’d really need. Rather than pour the caramel-peanut sauce over the whole cake, I spooned it over the cut slices. That way I could easily (and cleanly) wrap and save the remaining cake overnight.

Sweet and salty, this has all the flavors of a yummy candy bar! For the recipe, look in Baking: From My Home to Yours by Dorie Greenspan or read Tammy’s post. Don’t forget to check out the TWD Blogroll to see what over 250 other people had to say!
White Chocolate Ice Cream
October 4, 2008 at 3:31 pm | Posted in ice creams & frozen, sweet things | 20 Comments
I want to start by saying thank you for all the good wishes regarding my last post! We are getting our act together over here and slowly sorting out the move details. Luckily, the move itself probably won’t be too painful, as we really don’t have much big stuff to send back. I’ll keep posting till we go, and I hope you’ll follow me back to New York!
OK, time to get back on topic–did I ever tell you about that one kilo bag of white chocolate I bought a few months back? I probably did, as it was dumb purchase that I am continually kicking myself for. I am determined to not waste it, but I can’t seem to use it up either. It taunts me from the cupboard…in fact, I have a sneaking suspicion that it may be multiplying in the bag.
The days have suddenly gotten quite warm (and a little muggy, too) here in Sydney, so I thought maybe a white chocolate ice cream would kill two birds with one stone: use up some some of that stash, and beat the heat at the same time. I found a recipe to almost exhaust the bag– the white chocolate ice cream from David Lebovitz’s The Perfect Scoop. It uses a whopping 8 ounces of chocolate…that’s about double any other recipe I’ve seen. With all that white chocolate, you can probably guess that it’s a pretty rich ice cream. It’s quite dense, but silky smooth. Although I’ve photographed it plain and simple here, it’s great with sliced strawberries, or if you are feeling naughty, a big splash of Kahlua poured over the top works, too.

If you have The Perfect Scoop by David Lebovitz, you can find the recipe there. If you don’t, you can find a version with fresh ginger here on his site (omit the ginger and you’ll get the same recipe I’ve used).
One last thing…I cringe at the thought of using my blog as a pawn shop, but if anyone in Sydney is interested in purchasing a very gently used (gorgeous!) pistachio KitchenAid Artisan stand mixer or a Braun Multiquick stick blender with lots of attachments, shoot me an e-mail for the details. I apologize. I know it’s tacky, but these electronics won’t work back home (without a transformer, which I don’t trust and would rather not bother with). Also, to buy them new, they are much more expensive here than in States, so if anyone wants a deal, I thought I’d throw it out there.
Emptying Out the Cupboards
October 1, 2008 at 4:02 pm | Posted in other stuff | 31 Comments
Dear readers, there is something I have known about for a couple months now, and have neglected to share with most of you. And that’s not right. You need to know.
Seems R and I will be leaving Sydney and moving back to New York at the end of this month. I have mixed feelings about it, and I guess that’s to be expected. Of course I’ve missed my good friends, my neighborhood of eleven years, and the city itself. But being here, especially over the past few months, has been like living in some sort of suspended reality. We have had a fine time traveling recently, and are now doing our best to enjoy the last of our days here in Sydney. It’s not to say that we haven’t been affected by what’s going on, economically-speaking, in the States–in fact that’s the reason we’re leaving. Reality will certainly hit us in the face when we get back home. Where will we live? That will be a scramble. Will be both find jobs? I’m not so sure.
There’s little we can do about either of these things from half a world away, so I’ve been trying to concentrate on what’s right in front of me, and not stress too much about November. One important task at hand is to use up the food in the house (including my huge dried herb and spice collection). So forgive me if I come up with some wacky combos over the next few weeks, or if I do some weird ingredient substitutions for TWD. I’m just trying to empty out the cupboards.
Did I mention the saddest thing about leaving? It’s Sydney itself. I like it here, and although I knew we wouldn’t stay forever, I’m not ready to leave just yet.
Tuesdays with Dorie: Wattleseed Crème Brûlée
September 30, 2008 at 9:15 am | Posted in groups, pudding/mousse, sweet things, tuesdays with dorie | 54 Comments
Who doesn’t like crème brûlée? At every restaurant I’ve worked in, if brûlée is on the dessert menu, it outsells all the rest. Although I’m not so keen to order it myself (other things always seem much more interesting), I do like it, too. With that crunchy caramelized top, and silky smooth custard, how could I not? It’s Mevrouw Cupcake Mari’s choice for TWD this week.
Dorie’s recipe is unusual, in that, instead of baking the custards in a water bath at about 300°F, they’re baked at a much lower 200°F, without water. I was a little skeptical, but they set up nicely in about 50 minutes. I don’t have proper crème brûlée dishes so I used little teacups instead.
I flavored my brûlées with ground wattleseed, which I steeped in the warm milk and cream (one teaspoon for the two servings I made). The wattleseed gave it a lovely color and taste, much like café au lait. And then of course, there is the sugary top…

For the recipe, look in Baking: From My Home to Yours by Dorie Greenspan or read Mevrouw Cupcake. Don’t forget to check out the TWD Blogroll to see what over 250 other people had to say!
Cupcake Hero: Cocoa-Malt Cupcakes with Malted Marshmallow Frosting
September 29, 2008 at 8:21 pm | Posted in cupcakes, events, sweet things | 13 Comments
Happy anniversary, Cupcake Hero! I haven’t participated in CH for the past few months, but how could I not jump back in the game to help Laurie celebrate its first year? The theme for this month is actually to choose two themes from the past year and combine them into one double-good cupcake. In honor of the festivities, I went with cocoa and marshmallow, (two of the past year’s best) to come up with these Cocoa-Malt Cupcakes with Malted Marshmallow Frosting.
Ever since I cracked open my jar of malt syrup earlier in the month, I’ve been dreaming of malt! A bit of a one-track mind, I know. I decided to incorporate the flavor into a simple Devil’s Food batter made with cocoa powder. The frosting is a “loose interpretation” of marshmallow, in that no gelatin is involved. Rather than mess with a sugar syrup, I made a fluffy Swiss meringue, also flavored, of course, with malt.
I was a little nervous wondering whether or not the addition of malt syrup to the batter would affect the baking. They took a full 25 minutes in my oven, and after removing them from the cupcake tin, they still felt a little soft. I put them on a sheet tray (out of the tin) and stuck them back in the oven for another 5 minutes. When we had them later that night, the cakes were soft and moist and perfectly baked. And the marshmallow frosting was sweet and sticky, just like it should be.
Check out the new Cupcake Hero page for a run-down of all this month’s entries!

Cocoa-Malt Cupcakes with Malted Marshmallow Frosting– makes 6 regular-size cupcakes
For the cupcakes:
Note: For a more traditional Devil’s Food cupcake, replace the malt syrup with a dash of vanilla extract or a sprinkle of instant espresso powder.
1/6 c cocoa powder
1/4 c boiling water
1/4 c sour cream
1 large egg, at room temperature
1/8 c vegetable oil
2 t barley malt syrup
1/2 c AP flour
1/4 c granulated sugar
1/4 c light brown sugar, packed
1/4 t baking powder
1/4 t baking soda
1/4 t kosher salt
-Preheat the oven to 350°F. Line a cupcake tin with 6 paper liners.
-Put the cocoa in a medium bowl, pour the boiling water over it and whisk to combine. Let sit for a few minutes to cool slightly. Add the sour cream, egg, oil and malt syrup and whisk to thouroughly combine.
-In a separate bowl, sift or whisk the dry ingredients (including sugars) to combine.
-Pour the wet ingredients into the dry and whisk just until blended.
-Divide the batter among the cupcake cups. The batter will be loose, so transferring it to a measuring cup and pouring it into the cups is probably easiest.
-Bake for about 25 minutes, until puffed and springy to the touch.
-Cool for 5 minutes and remove from the pans. If the cupcakes feel soft on the bottom, set them on a baking sheet (not in cupcake tin) and pop them back in the oven for 5 minutes to firm up. Allow to cool completely on a rack before frosting.
For the frosting:
Note: Because this is meringue, it’s best to make the frosting just before topping your cupcakes (in other words, don’t make the frosting until you are ready to use it). You can store the frosted cupcakes in the fridge overnight, if you have leftovers. The meringue will be a little softer the next day, but still good!
1/4 c egg whites (about 2 whites)
1/2 c sugar
1 T barley malt syrup
-Combine sugar and egg whites in large metal bowl or the bowl of a stand mixer. Set bowl over saucepan of gently simmering water and whisk until mixture is hot to the touch and all the sugar has dissolved, about 2-3 minutes. Remove bowl from over water. Using the stand mixer fitted with the whip or a handheld electric mixer, beat meringue at high speed until very thick and billowy and room temperature, about 3-5 minutes.
-Add the malt syrup and whip on low speed for 1 minute.
-Spread or pipe the frosting on the cooled cupcakes.
Daring Bakers in September: Lavash Crackers & Toppings
September 27, 2008 at 6:42 am | Posted in daring bakers, groups, savory things, snacks, yeast breads | 51 CommentsTags: baking, savory, snacks

This month we had our first “Alternative” Daring Bakers’ Challenge! Natalie from Gluten A Go Go and Shel of Musings From the Fishbowl teamed up to bring us a two-part challenge. The first part involved making homemade lavash. Lavash are thin Armenian-style crackers. They are very popular here in Australia, and packets go for big bucks in the gourmet stores. Funny how easy it is to make them yourself! Lavash are great with cheese, but the second part of this challenge was to concoct a vegan and gluten-free spread or dip to go with them.
Lavash dough is a simple yeasted dough, rolled out thin and often sprinkled with a seedy topping. We were allowed to flavor the dough itself if we so desired, so I subbed a couple of tablespoons of the bread flour for wheat germ. This gave the baked crackers a subtle, almost Wheat Thins-like flavor. I made a full batch of the dough and divided it into two pieces–one to use straight away, and one to park overnight in the fridge. I used different toppings and made a different spread for each.
When it came time to roll the dough, I busted out my pasta machine (for the first time since moving to Sydney, so I was glad to actually have used it and justified its move). I’ve made some form of cracker in every restaurant I’ve worked in, and have always used a pasta machine to roll them out. It makes such quick work of it and is the easiest, least frustrating way to get your crakcers paper thin. Use the lasagna sheet section, work with one bit of dough at a time, and take it down to the thinnest setting.
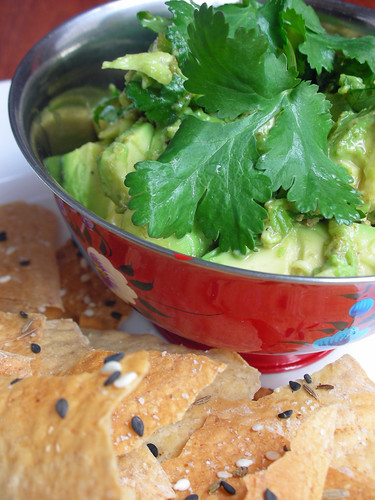
For my first batch of cracker, I rolled out long, wide pieces that I sprinkled with black and white sesame seeds, cumin seeds, cayenne pepper and Kosher salt before baking (brushing on a little water first acts as glue for the topping). I simply broke these big pieces into more manageable shards after baking. I served them with a chunky avocado relish with heaps of cilantro, lemon juice and spices.
For my second batch of cracker, I got a bit more fussy. Instead of just baking off big pieces in whatever form they took when rolled, I used a pastry wheel to cut them into rectangular crackers. I sprinkled them with poppy seeds and Maldon salt. I had a huge bag of fava beans (a.k.a broad beans) from the farmers’ market, so I took about half of them and whizzed them into a dip for this batch of lavash.

I was really pleased with challenge! The lavash and dips made perfect pre-dinner snacks (with a glass of wine, not too shabby!). And how impressed would your friends be if you served them homemade crackers at a dinner party?
Check out the DB blogroll! And visit Gluten A Go Go or Musings From the Fishbowl for the lavash recipe (which was adapted from The Bread Baker’s Apprentice: Mastering The Art of Extraordinary Bread by Peter Reinhart). I made my two spreads pretty much freehand, but the basic procedures are below.
Chunky Avocado Relish
1 avocado
leafy green herb (such as basil or cilantro)
juice of half a lemon
olive or avocado oil
ground spices to taste (I used garam masala, cayenne, and cumin)
salt and black pepper to taste
-Scoop out the avocado and dice into chunks. Chop your herb. In a small bowl, make a dressing from the lemon juice, a slight splash of oil, the spices and salt and pepper. Add the avocado and herb to the bowl and toss gently to mix.
Fava Bean Dip
1 1/2 cups fava beans, shelled from the outer pod
1 clove of garlic
leafy green herb (such as basil, parsley or cilantro)
squirt of lemon juice
olive oil
salt and black pepper to taste
-Bring a medium pot of water to the boil. Blanch the fava beans for about thirty seconds, remove with a slotted spoon and shock in ice water. Pop the garlic clove, peeled or unpeeled, into the boiling water and blanch for about 1 minute (this just helps take the edge off the raw garlic).
-Pop the papery outer skins off the blanched fava beans and discard. Peel the garlic clove if you haven’t already, and rough chop.
-Put the fava beans, garlic, lemon juice, herbs, splash of olive oil, salt and pepper into a mini food processor. Pulse until it’s the consistency you like (you can use a couple tablespoons of water to thin out, if needed). Taste for seasoning.

SHF#47: Vanilla Date Cupcakes with Buttermilk Fudge Frosting
September 26, 2008 at 4:50 pm | Posted in cupcakes, events, sweet things | 7 Comments
Not sure why, but I haven’t participated in Sugar High Friday in awhile. This month, though, I found myself seduced by a cupcake-loving pink flamingo into sending super-sweet Fanny a super-sweet cupcake for her round-up.
I’ve been on a tear lately trying to use up things in my pantry. One of those things was a bag of dates that had been lingering around for longer than I would like to admit. It was time for them to move out, and I found them a new home thanks to one of my favorite baking books, Regan Daley’s In the Sweet Kitchen. She has a recipe for moist date cupcakes, flecked with vanilla bean and frosted with buttermilk fudge. It sounded so interesting, I had to give it a go!

With the combination of dates, brown sugar and buttermilk, the cakes are golden-hued, really moist and delicious, and keep nicely for a few days. There isn’t a picture in the book, but the author’s instructions led me to believe that the frosting would be quite stiff. Mine actually had a consistency in between a glaze and a normal icing. I could definitely spread it on, but I couldn’t heap it on. It is definitely sweet, though, and a little goes a long way, so maybe that was a good thing. I thought about chilling the icing, then whipping it further, but I liked the smooth tops and gentle drips that formed as it set.

Vanilla Date Cupcakes with Buttermilk Fudge Frosting– makes 8 regular-size cupcakes
adapted from Regan Daley’s In the Sweet Kitchen
Note: If some of these measurements seem a little screwy, that’s because I downsized it from the original, which was much larger and meant to produce jumbo cupcakes.
For the cupcakes:
2 1/2 oz plump, pitted dates, coarsely chopped
5 T unsalted butter, at room temperature
1/4 c granulated sugar
1/4 c light brown sugar, packed
seeds of 1/3 vanilla bean
1 large egg, at room temperature
1/4 t pure vanilla extract (or dark rum)
1 c cake flour (not self-rising), sifted
1/3 t baking powder
1/3 t baking soda
1/8 t kosher salt
pinch of grated nutmeg
1/3 c + 1 T buttermilk
-Preheat the oven to 350°F. Line cupcake pan with 8 paper liners.
-Put the chopped dates in a small bowl and pour 3 T boiling water over them. Let sit for a few minutes, and mash with a fork to a rough paste. Set aside while you prepare the batter.
-By hand, or using a hand-held mixer, cream the butter, two sugars and vanilla seeds until light and fluffy, approximately 5 minutes. Add the egg, then add the vanilla extract (or rum) and mix well.
-In another bowl, sift together the flour, baking powder, baking soda, salt and nutmeg.
-Add the buttermilk and the flour mixture alternately in thirds to the butter/sugar/egg mixture, beginning with the buttermilk and ending with the flour mixture. Mix only until blended. Fold the date paste into the batter with a rubber spatula.
-Divide the batter among the cupcake cups, filling each one 2/3 to 3/4 full. Bake in the middle of the oven for 20 to 25 minutes, until a toothpick comes out clean.
-Cool for 10 minutes, remove from the pans, and allow to cool completely on a rack before frosting.
For the frosting:
1/2 c granulated sugar
1 1/2 t light corn syrup
1 1/3 T unsalted butter, in small pieces
1/3 c buttermilk, plus an additional 1 T, for thinning the cooked frosting
1/3 t baking soda, sifted
1/4 t pure vanilla extract or paste
-Combine the sugar, corn syrup, butter, buttermilk and baking soda in a heavy-bottomed pot (use a larger pot than you think you will need…this mixture bubbles up to about four times its original volume as it comes to the boil!). Stir over medium heat until the sugar dissolves. Increase the heat slightly and bring the mixture to a boil. Stir one last time as it comes to the boil, then don’t stir again.
-Boil the syrup until it reaches 236°F on a candy thermometer (soft ball stage). You will see that the frosting caramelizes as it cooks. Immediately pour it into a mixing bowl (or bowl of a stand mixer fitted with the whip). Let it cool for about five minutes.
-Stir in the vanilla extract or paste, then beat on medium speed until thick enough to spread, about five minutes. If the frosting is too thick, add the additional buttermilk, one teaspoon at a time.
-Slather the tops of the cupcakes with the frosting and cool before serving. You can place the cupcakes in the refrigerator to set the icing if it seems loose, or add additional teaspoons of buttermilk if it seems too thick. (If it is too loose to work with, you can try chilling it for 10 minutes or so, then re-whipping.)
-Iced cupcakes can be stores for 2-3 days in an airtight container at room temperature or in the refrigerator (bring to room temperature before serving). If you have more frosting than you need, transfer extras to a small, flat container…it will set up as fudge in the refrigerator.
Baked Fresh Weekly

Blog at WordPress.com.
Entries and comments feeds.
