Tuesdays with Dorie: Almost-Fudge Gâteau
February 19, 2008 at 6:33 am | Posted in cakes & tortes, groups, sweet things, tuesdays with dorie | 42 Comments
For this week’s installment of Tuesdays with Dorie, Nikki of Crazy Delicious has chosen Dorie’s Almost-Fudge Gâteau. I love saying the word “gâteau”…sounds so elegant! A dense chocolate cake with bittersweet glaze certainly is elegant, and luckily this one is a snap to make, too. I made a half-recipe to fit my 6-inch springform…that pan is getting a workout lately!

I thought this would make a perfect Valentine’s Day dessert. I actually had to work that night and was unable to make it then, but turns out it was also a perfect Sunday night dessert. (It was even more fudgey on Monday night!) And I still went ahead and decorated it with sugar hearts and pink pearls. It was really great with a little espresso ice cream on the side.

The recipe is, of course, in Baking: From My Home to Yours by Dorie Greenspan, but you can also find it on Crazy Delicious. The TWD group is growing by leaps and bounds…check out all of our gâteaux on the Tuesdays with Dorie site.
Food Fight #3: Lentil Soup
February 17, 2008 at 4:07 pm | Posted in events, savory things, soups | 9 Comments
It’s been awhile, but Allen from Eating Out Loud is back with another Food Fight, and this time it’s a pantry raid. That phrase makes me giggle in a juvenile sort of way…one of the lingering side effects of having seen Revenge of the Nerds a few too many times.
My pantry isn’t super-well stocked. I don’t have a huge family..it’s just my husband and me (and I guess now my brother since he’s been “visiting” for four months!), and several nights a week I am working at the restaurant and not home to make dinner. I tend to do my shopping on an as needed basis so I don’t have too much junk lying around. Poking through what I do have in the pantry the other day, I was wondering how I could combine Craisins, wild rice, peanut butter and golden syrup into something delicious. Perhaps I could encase them in that puff pastry that’s been in the freezer for several months. Yeah, maybe not. Then I discovered something I’d forgotten about…a bag of lentils.
Rather than concoct something potentially disgusting, I decided to go with a classic lentil soup that I could easily put together with things I had already. I’d say this particular pot of soup fit the definition of a pantry raid. It was made only from items I already had in the pantry and fridge (and wine rack). I didn’t go to the store to get any additional ingredients for it, and nothing was bought in advance with the intention of making lentil soup with it.

I used a recipe that I’d made once before from my most favorite cooking magazine, Cook’s Illustrated. I modified it slightly to use up what I had at home…dried thyme instead of fresh, a chicken chorizo sausage instead of bacon. (The other time I made this recipe, I turned it into a vegetarian soup by sauteing my veggies in olive oil rather than rendered fat.) I had a few small new potatoes hanging around from the previous week…there weren’t enough of them to do anything else with, so they went into the pot, too. The chicken chorizo gave it a wonderful smoky flavor that we all loved. Even my brother, who was quite suspicious of lentil soup, asked for seconds!
Allen asked us to also include a photo of our pantries. How personal! I bet you aren’t going to get any organizational tips from mine–what’s in there is a total mess! This photo is of a large pantry closet in the kitchen. I have a few shelves dedicated to food items and the others are for cake pans, the salad spinner, etc. Stuff is kind of all over the place, but I could close my eyes and still be able to pull out exactly what I need when I need it–sort of an organized chaos, I guess. I also have a smaller cupboard with my expansive vinegar collection, honey, jams and stuff like that.

Lentil Soup- makes about 2 quarts
modified from Cook’s Illustrated
Note: Instead of chorizo, you can use 3 slices bacon (about 3 ounces), cut into 1/4-inch pieces, or for a vegetarian version, use olive oil.
1 chicken (or other) chorizo sausage, cut into slices
1 large onion , chopped fine (about 1 1/2 cups)
2 medium carrots , peeled and chopped medium (about 1 cup)
3 medium cloves garlic , minced or pressed through garlic press (about 1 T)
1 can (14 1/2 oz) diced tomatoes, drained
1 bay leaf
1/2t dried thyme leaves
1 cup lentils (7 oz), rinsed and picked over
1 t salt
ground black pepper
1/2 cup dry white wine
4 1/2 cups low-sodium chicken broth
1 1/2 cups water
4 small new potatoes, peeled and cut into 1/2-inch pieces
1 1/2 t balsamic vinegar
3 T minced fresh parsley leaves
-Fry chorizo in large stockpot or Dutch oven over medium-high heat, stirring occasionally, until fat is rendered and chorizo crisps on the outside, 3 to 4 minutes. Transfer chorizo to a paper towel-lined plate to drain. Leave the rendered fat in the pan (although you can pour some off if it is excessive). Add onion and carrots; cook, stirring occasionally, until vegetables begin to soften, about 2 minutes. Add garlic and cook until fragrant, about 30 seconds. Stir in tomatoes, bay leaf, and thyme; cook until fragrant, about 30 seconds. Stir in lentils, salt, and pepper to taste; cover, reduce heat to medium-low, and cook until vegetables are softened and lentils have darkened, 8 to 10 minutes. Uncover, increase heat to high, add wine, and bring to simmer. Add chicken broth and water; bring to boil, cover partially, and reduce heat to low. Simmer for about 20 minutes, then add in the diced potatoes. Continue to simmer until lentils are tender but still hold their shape and potatoes are cooked, about 10 to 15 minutes more.
-Discard bay leaf and puree 3 cups soup in blender until smooth, then return to pot; stir in vinegar, add the chorizo back to the pot and heat soup over medium-low until hot, about 5 minutes. Stir in 2 tablespoons parsley and serve, garnishing each bowl with some of remaining parsley and sour cream or yogurt, if desired.
Tuesdays with Dorie: Brown Sugar-Apple Cheesecake
February 12, 2008 at 8:32 pm | Posted in cakes & tortes, cheesecakes, groups, sweet things, tuesdays with dorie | 36 Comments
Brown Sugar-Apple Cheesecake–doesn’t that just sound so good? This Tuesdays with Dorie recipe was hand-picked for us by Jaime of Good Eats n’ Sweet Treats. I like all kinds of cheesecake, but I’d never made one quite like this before. Usually I do the standard graham cracker crust and regular base, with maybe some type of berry coulis swirled in (here’s an example). This one has a gingersnap crust supporting a cheesecake sweetened with brown sugar and cider. And there’s a layer of caramelized apples hiding inside!
I was quite pleased to remember that on a trip to IKEA a couple months ago I’d bought a package of Swedish gingersnaps, and they were still unopened in my cupboard. Also, as we roll into fall here in the southern hemisphere, we are now getting “new season” apples at the market…much better than ones that have been sitting around for nine months. So all systems were go for making this cheesecake! I do often have a hard time judging when a cheesecake is ready to come out of the oven (quiche and brownies also torture me this way). Mine didn’t crack on the sides as per the instructions, but it seemed fully set, so I crossed my fingers and took it out. I was worried about overbaking it, too, since I’d halved the recipe and made a six-inch cake.

Seems like it came out just fine. I had some apple jelly in the fridge, so once it was cool, I glazed the top of my cake for a little shine. I love how high up the sides the crust came. The spices (cinnamon and ginger in the base) were just right, and the cheesecake was really creamy.
This recipe is from the book Baking: From My Home to Yours by Dorie Greenspan, and you can find it here on Good Eats n’ Sweet Treats. It’s really good, so thanks Jamie for choosing it! Also check out the blogroll on the Tuesdays with Dorie site to see all of our cream cheese creations this week.
Time To Make The Doughnuts: Crullers with Rum Glaze (Spritzkrapfen)
February 10, 2008 at 2:53 pm | Posted in breakfast things, events, other sweet, sweet things | 37 Comments
What time is it? It’s time to put on my disposable paper cap and make like Fred! Two of my favorite food bloggers, Peabody and Tartelette, have teamed up to host Time To Make The Doughnuts, and I couldn’t not participate. I must say, I love doughnuts but I rarely allow myself to have them because I can quickly spiral out of control. This is embarrassing, but if you have a box of Entenmann’s chocolate glazed things in the fridge (those MUST be eaten cold!) and invite me over, do not turn your back on me because I will sense their presence and they will magically disappear! And back when Krispy Kreme was just a southern thang, it was so fun to go to the big shop near Grandma W’s and watch as they plopped off the line and into the vat of fat! Oh, and have you ever had one from the Doughnut Plant? They are the schiznit!
I definitely go for cake-style doughnuts over yeast-raised; usually cinnamon-sprinkled or chocolate-frosted. But there is another type of doughnut that really makes my heart race (yes, this is probably actually because of sugar content)…glazed crullers. I love them, but I had never made them myself and had no idea how they were made either. So I decided to find out, and fry them up for Peabody and Helene.
Turns out they are just pâte à choux, the same dough you’d use for eclairs or creampuffs, fried and glazed. I found a recipe in the book Kaffeehaus by Rick Rodgers. They are a Viennese treat, properly called spritzkrapfen. As an aside, I drool over everything in this book. I went to Vienna, Budapest and Prague as part of a backpacking trip in college. It’s too bad that I didn’t know anything about anything back then, because I would have loved to experience the kaffeehaus atmposphere (and pastries!). I will have to go back sometime and do it right.
Back to the doughnuts…My crullers came out very homemade-looking (if not for the label, would you have mistaken them for onion rings in the photo??), but they were totally melt-in-your-mouth, and the rum glaze was sensational. They were easily the best crullers I’ve had…probably because they were so fresh, and of course dripping with rum. My brother had two suggestions for improvement–make them bigger (I couldn’t agree more) and make more of them (I only made three so as not to be piggy)!
Be sure to visit Peabody and Tartelette on February 15 to see a great round-up of fried and baked doughnut delights!
Crullers with Rum Glaze (Spritzkrapfen)– makes 14
adapted from Kaffeehaus by Rick Rodgers
Crullers
1 cup water
8 T (4 oz) unsalted butter, cubed
1 t sugar
pinch of salt
1 cup unbleached flour
4 large eggs (3 whole and 1 beaten), room temperature
Vegetable oil, for fryingRum Glaze
2 cups powdered sugar
2 T golden rum
1 T water, approximately
For the crullers:Combine the water, butter, sugar, and salt in a large saucepan and bring to a full boil over medium-high heat, stirring occasionally so the butter melts. Remove from the heat, add all the flour at once, and stir hard with a wooden spoon until all the flour is incorporated and it forms a ball. Return the pan medium-low heat and cook. Stir continuously to evaporate some of the moisture, until the dough films the bottom of the pan, about 90 seconds.
Scrape the mixture into a medium bowl. Using a handheld electric mixer (you could do this by hand or in a stand mixer), beat in the three whole eggs one at a time, making sure they are completely incorporated and stopping after each addition to scrape down the sides of the bowl. Add as much of the fourth beaten egg as needed so the dough is thick and hold its shape, but falls slowly and steadily from the beaters when you lift it out of the bowl. It should be smooth and shiny.
Cut out fourteen 4-inch parchment squares and place a wire rack over a sheet pan for draining. Using a pastry bag fitted with an open star tip (Rodgers recommends a 9/16-inch-wide tip, like Ateco #825, but I’d go even a bit wider), pipe the dough into 3-inch circles onto the parchment squares.
Pour the vegetable oil into a large pot or Dutch oven to a depth of 3 inches and heat to 360°F. Working in batches, without crowding, place the dough circles (still on their papers) upside-down in the oil. After about 15 seconds, use tongs to pull off and discard the papers. Fry, turning once, until golden on both sides. Using a skimmer, transfer the cooked crullers to the rack to drain, and repeat for the next batch. Try to keep the oil at 360°F throughout.
For the rum glaze: Sift the powdered sugar into a medium bowl. Whisk in the rum and enough water to make a glaze the consistency of heavy cream. Dip each cruller upside-down in the glaze and place right side up on the rack to cool and set.
TWD Rewind: Orange Berry Muffins
February 9, 2008 at 11:05 am | Posted in breakfast things, muffins/quick breads, sweet things, tuesdays with dorie | 12 Comments
When I put up my first Tuesdays with Dorie post earlier in the week, I mentioned that I’d like to make the recipes the group tried out before I joined. This morning I decided to start with the simplest one, the first in the book: Orange Berry Muffins.

I may be a little groggy at 8:00 on a Saturday morning, but I had no trouble putting these together. A few ingredients, mixed by hand…twenty-five minutes later, breakfast is ready. The best part is they’re loaded with berries!

This recipe was Michelle’s choice and she has it posted on her blog, Sugar and Spice. It is from the book Baking: From My Home to Yours by Dorie Greenspan.
Tuesdays with Dorie: Black-and-White-Chocolate Cake
February 5, 2008 at 6:32 am | Posted in cakes & tortes, layer cakes, sweet things, tuesdays with dorie | 42 Comments
Like probably a lot of you, I have a bookshelf dedicated to my cookbooks. I read them, I admire them, I love and cherish them…but apart from a couple of standards, I don’t really use them that often. Over the holidays, I finally got Dorie Greenspan’s Baking: From My Home to Yours. I felt like the last person on Earth to get it…I wondered if anyone noticed the big “L” stamped on my forehead for the past year! From what I’ve heard, it’s a fabulous book, so I would also be a total loser if I didn’t put it to use. But I need a little peer pressure sometimes, so help cattle prod me, I just joined a really great group called Tuesdays with Dorie! The brainchild of Laurie from quirky cupcake, TWD makes one recipe a week out of Baking from My Home to Yours. It’ll take awhile, but we hope to get through the whole thing! This means that at some point I will also need to get around to baking the first five recipes that I missed out on. I’m hoping none of this is too ambitious on my part…
For my first TWD, the group is making Dorie’s Black-and-White-Chocolate Cake, a recipe chosen by April of Abbey Sweets. It’s a vanilla buttermilk cake, layered with dark chocolate pastry cream and white chocolate whipped cream. Then the whole thing gets frosted with more white chocolate whipped cream. I love me some cake, so I was pretty psyched to get this one going.
OK, if you have the book and look on page 260, you’ll probably notice that my cake doesn’t look a whole lot like Dorie’s from the outside. In fact, it looks like crap. I had some big-time filling and frosting issues…it was highly upsetting, and I almost didn’t want to post a photo. I found the white chocolate whipped cream too soft to spread on the side of the cake (I couldn’t whip it anymore, because it was beginning to look separated, and I actually had to make it twice because the first time it really did curdle and wouldn’t come back together no matter how I tried to save it). It just slid right off and mucked up the cake plate…in hindsight, I should have realized that would happen and just iced the top, leaving the side exposed for an old-fashioned look. Since the dark chocolate pastry cream was oozing out between the layers anyway, I put some that I had leftover into the freezer for half and hour and tried to use it to frost the side instead. Because of it’s consistency, I couldn’t get a nice frost with that either (that’s why no one frosts with pastry cream!), but had to settle for more of a thin smear…grrrrr. I had made some tempered chocolate curls before beginning this whole process, so I hoped they would distract the eye from my frosting failures.

Thank goodness that the inside of my cake looks more or less normal. Oh, by the way, I halved the recipe in the book so I’d just have a six-inch cake. I have have to say, the dark chocolate cream was damn good…a perfect chocolate pastry cream. The cake itself was a little dense, I thought, but this could very well be due to differences in flour (I have had a couple of baked goods come out funky using my US books and Aussie flour).
Because of the problems I had, I’m really interested to see how my fellow TWD members did with this recipe. I’m going over to the Tuesdays with Dorie blog that Laurie set up to see the list of TWD bakers and visit their sites. So should you! And if you want to try your hand at the cake, take a look here on Abbey Sweets for the recipe.
Daring Bakers in January: Lemon Meringue Pie
January 28, 2008 at 2:52 pm | Posted in daring bakers, groups, pies & tarts, sweet things | 79 Comments
This sounds bizarre, even to me, but I don’t think I’ve ever had lemon meringue pie (a.k.a. LMP) before. I can’t imagine how this is possible, but I also can’t recall ever having a piece. This month’s Daring Bakers challenge, chosen and hosted by Jen The Canadian Baker, was my chance to fill this gross void in my culinary experience.
Apparently LMP doesn’t keep well. The meringue can breakdown and weep (how sad!), and the crust can sog out if it’s not eaten within a few hours of being made. I decided that for just three of us, dividing the recipe in half might make more sense. I have some rarely-used mini pie tins that I put to work to get three baby pies.

The pastry dough came together easily in the food processor, but was a little more wet than the sweet dough I usually make. It rolled out fine though…I chilled it for several hours in the tins before baking, and it held its shape nicely in the oven. I was even able to pop them out of the tins successfully! The filling was super easy to make…much less work than a regular lemon curd, thanks to cornstarch. And I was really happy with the cloud-like fluffy whiteness of the meringue. In the oven, the peaks took on a gorgeous pale brown.

I must say, I thought my little guys came out really cute, what with their mounds of fluff heaped on top! But what did I think of my first taste of LMP? I liked it, but I could really take it or leave it. The lemon filling has a bit too much of that cornstarchy giggle. I think I prefer a traditional French lemon curd tart.
Want a few hundred more opinions of LMP? Then head on over to the Daring Bakers Blogroll. And if you want the recipe, it’s here on Jen’s site.

CH#5: Cappuccino Cupcakes
January 21, 2008 at 11:11 am | Posted in cupcakes, events, sweet things | 25 Comments
In my dream life, I spend my mornings sipping cappuccinos in a café while reading The New Yorker and watching the world go by. In my real life though, The New Yorkers pile up on the kitchen table, and a cappuccino is a rare treat usually consumed on the go. Laurie of Quirky Cupcake had her husband, Jaos, pick Cupcake Hero’s theme this month. He chose coffee, so I thought I’d celebrate my favorite morning drink in cupcake form.
Now, I heard that Jaos likes his cupcakes kept simple, and since it is his birthday (happy 29th!), I kept that in mind. This is a simple little cupcake (no filling this time), but it has great flavor, thanks to a double shot of espresso in the batter. A little bit Kahlúa soaking syrup boosts the flavor and keeps them really moist. The “foam” on top is just whipped cream, sweetened and flavored with an extra splash of Kahlúa. And finally, because I like cinnamon and coffee, I sprinkled a bit on top. I made a small batch of just six cupcakes, but the recipe could easily be doubled for a whole tin.

Cappuccino Cupcakes– makes 6 regular-size cupcakes
-Start with a batch of Kahlúa syrup (recipe below).
-Bake the espresso cupcakes (recipe below). Lightly brush warm cupcakes with Kahlúa syrup, then cool completely.
-Whip some cream, sweetening to taste and adding a splash of Kahlúa (or other coffee liqueur) to flavor. Note that, because whipped cream doesn’t keep well, it’s best to just top the cupcakes you will be eating that day. If you have extras, make new whipped cream to top them as needed.
-Top with whipped cream and garnish with a sprinkle of cinnamon.
Kahlúa Syrup– makes more than you will need, but keeps for a long time and has many uses (like sweetening iced coffee)
1 cup sugar
3/4 cup water
splash of Kahlúa, or other coffee liqueur
-Combine sugar and water in a small saucepot. Mix gently with your finger so sugar isn’t stuck to bottom or corners of pot. Try not to get a lot of sugar on the sides of the pot above water level (cooking time is short, so it shouldn’t crystallize, but just to be safe…)
-Bring just to a full boil, at which point all the sugar should be dissolved. Shut off heat and add in a splash of coffee liqueur to taste.
-Transfer to a jar or airtight plastic container for storage. This will keep in the refrigerator for weeks.
Espresso Cupcakes– makes 6 regular-sized cupcakes
1/2 c plus 3 T all-purpose flour
1/4 t plus 1/8 t baking powder
pinch of salt
3 T brewed espresso, cooled to room temperature
1 T milk
1/2 t instant espresso powder
2 oz butter, room temperature
1/2 c sugar
1 egg
-Preheat the oven to 350°F/180°C and line a muffin tin with six paper cups.
-Whisk together the flour, baking powder and salt. Set aside.
-Combine the espresso and milk. Dissolve the instant espresso powder in the mixture and set aside.
-Cream the butter and sugar in a large mixing bowl until smooth, fluffy and pale. Add the egg, beating well.
-Add the dry ingredients and espresso mixture in three parts, alternating and beating smooth after each addition. Add the liquid additions a little at a time to avoid splitting the batter.
-Divide the batter among the paper cups, and cook for about 20-25 minutes, until a toothpick comes out clean. Cool in the tins for a few minutes and then transfer to a rack to cool completely.
Taste&Create V: Turkey Chili with We [heart] Food
January 13, 2008 at 5:52 pm | Posted in events, savory things | 8 Comments
I’m starting off the new year with another round of Taste&Create hosted by Nicole from For the Love of Food. This month, Nicole paired me up with Chris and Lisa from We [heart] Food. One look at Chris and Lisa’s blog and I knew I would have a hard time deciding which of their dishes to make myself. They like some spicy food, and that’s right up my alley!

I finally decided to go with a recipe for turkey chili that they made in September. I hadn’t had chili in forever, and I always equate it with football season. I thought my husband would be pleased if I made him a little dinner-time tribute to the playoffs, especially seeing as how his team (the Chargers) is in the mix this year. Never you mind that when you live in Australia, the American football games are on at five in the morning.
Ground turkey, beans, and peppers simmered in tomatoes and lots of spices– this was perfect with a hunk of cornbread and a cold beer. And it was easy to make, too. I do admit that I forgot to buy the scallions for garnish…not that it is really a substitution, but I grated a little cheese on top instead. Thanks Nicole, Chris and Lisa!
Daring Bakers in December: Yule Log
December 22, 2007 at 9:25 am | Posted in cakes & tortes, daring bakers, groups, sweet things | 54 Comments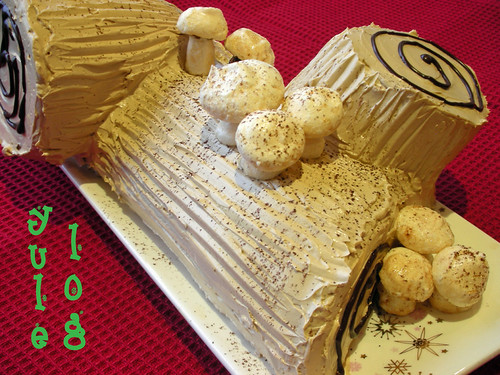
‘Tis the season…to eat cake shaped like tree branches! I love holiday baking (wish I’d gotten to do more of it this year) and I absolutely love yule log, or Bûche de Noël. If you were wondering what the Daring Bakers would be up to for the holidays, this is it! Or hosts, the co-founders of the group, Ivonne and Lisa chose a yule log, a symbol of light and warmth for this month’s challenge.

A Bûche de Noël is usually a genoise sponge cake rolled up with a filling, cut to resemble a log and frosted with buttercream. Then it gets all kinds of slightly wacky decorations. Mushrooms are a traditional yule log decoration. Don’t worry–I’m taking about sweet sugar mushrooms! We were able to chose to make our ‘shrooms from either meringue or marzipan. Not being a huge marzipan fan, I went the meringue route. I dusted them with cocoa and a little gold luster dust. My log came from a magical, sparkley forest!

I have made a couple of yule logs in the past, so I knew the general drill. The genoise sponge we used was slightly different from ones I’ve made in the past. This one had no butter and used cornstarch…more like a ladyfinger recipe I’ve used many times. I decided to keep my sponge plain in flavor, but I was worried it would dry out in the fridge, so I soaked it with a rum simple syrup before rolling it. We had to use coffee buttercream to frost the cake (which was fine by me), and it was made Swiss-meringue style.
I didn’t have any real problems making the yule log. The most difficult part was deciding on a filling, as we could chose whatever we wanted to roll our cakes up with. I decided to do a chocolate mousse filling. It set up nicely and went well with the coffee and rum flavors in the other components. Decorating the cake was a lot of fun, and we certainly had no difficulty eating it up!

I am flying to the States today for the holidays. I’m very excited about the trip, but it means I may not be able to comment on as many of my fellow DBer’s posts as I would like. I apologize for that, but do check out the Daring Bakers’ blogroll and see all the beautiful Bûche that were made! Ivonne has the recipe on her site. Happy holidays!
Baked Fresh Weekly

Blog at WordPress.com.
Entries and comments feeds.
