Daring Bakers in September: Lavash Crackers & Toppings
September 27, 2008 at 6:42 am | Posted in daring bakers, groups, savory things, snacks, yeast breads | 51 CommentsTags: baking, savory, snacks

This month we had our first “Alternative” Daring Bakers’ Challenge! Natalie from Gluten A Go Go and Shel of Musings From the Fishbowl teamed up to bring us a two-part challenge. The first part involved making homemade lavash. Lavash are thin Armenian-style crackers. They are very popular here in Australia, and packets go for big bucks in the gourmet stores. Funny how easy it is to make them yourself! Lavash are great with cheese, but the second part of this challenge was to concoct a vegan and gluten-free spread or dip to go with them.
Lavash dough is a simple yeasted dough, rolled out thin and often sprinkled with a seedy topping. We were allowed to flavor the dough itself if we so desired, so I subbed a couple of tablespoons of the bread flour for wheat germ. This gave the baked crackers a subtle, almost Wheat Thins-like flavor. I made a full batch of the dough and divided it into two pieces–one to use straight away, and one to park overnight in the fridge. I used different toppings and made a different spread for each.
When it came time to roll the dough, I busted out my pasta machine (for the first time since moving to Sydney, so I was glad to actually have used it and justified its move). I’ve made some form of cracker in every restaurant I’ve worked in, and have always used a pasta machine to roll them out. It makes such quick work of it and is the easiest, least frustrating way to get your crakcers paper thin. Use the lasagna sheet section, work with one bit of dough at a time, and take it down to the thinnest setting.
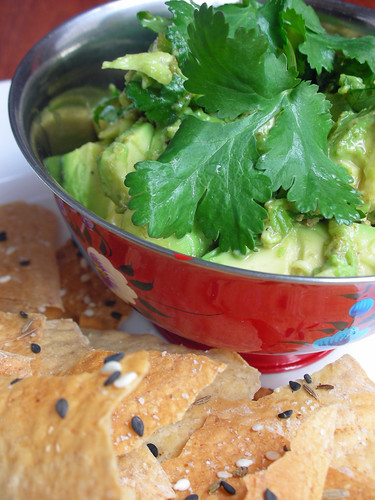
For my first batch of cracker, I rolled out long, wide pieces that I sprinkled with black and white sesame seeds, cumin seeds, cayenne pepper and Kosher salt before baking (brushing on a little water first acts as glue for the topping). I simply broke these big pieces into more manageable shards after baking. I served them with a chunky avocado relish with heaps of cilantro, lemon juice and spices.
For my second batch of cracker, I got a bit more fussy. Instead of just baking off big pieces in whatever form they took when rolled, I used a pastry wheel to cut them into rectangular crackers. I sprinkled them with poppy seeds and Maldon salt. I had a huge bag of fava beans (a.k.a broad beans) from the farmers’ market, so I took about half of them and whizzed them into a dip for this batch of lavash.

I was really pleased with challenge! The lavash and dips made perfect pre-dinner snacks (with a glass of wine, not too shabby!). And how impressed would your friends be if you served them homemade crackers at a dinner party?
Check out the DB blogroll! And visit Gluten A Go Go or Musings From the Fishbowl for the lavash recipe (which was adapted from The Bread Baker’s Apprentice: Mastering The Art of Extraordinary Bread by Peter Reinhart). I made my two spreads pretty much freehand, but the basic procedures are below.
Chunky Avocado Relish
1 avocado
leafy green herb (such as basil or cilantro)
juice of half a lemon
olive or avocado oil
ground spices to taste (I used garam masala, cayenne, and cumin)
salt and black pepper to taste
-Scoop out the avocado and dice into chunks. Chop your herb. In a small bowl, make a dressing from the lemon juice, a slight splash of oil, the spices and salt and pepper. Add the avocado and herb to the bowl and toss gently to mix.
Fava Bean Dip
1 1/2 cups fava beans, shelled from the outer pod
1 clove of garlic
leafy green herb (such as basil, parsley or cilantro)
squirt of lemon juice
olive oil
salt and black pepper to taste
-Bring a medium pot of water to the boil. Blanch the fava beans for about thirty seconds, remove with a slotted spoon and shock in ice water. Pop the garlic clove, peeled or unpeeled, into the boiling water and blanch for about 1 minute (this just helps take the edge off the raw garlic).
-Pop the papery outer skins off the blanched fava beans and discard. Peel the garlic clove if you haven’t already, and rough chop.
-Put the fava beans, garlic, lemon juice, herbs, splash of olive oil, salt and pepper into a mini food processor. Pulse until it’s the consistency you like (you can use a couple tablespoons of water to thin out, if needed). Taste for seasoning.

Tuesdays with Dorie: Dimply Peach Cake
September 23, 2008 at 5:49 am | Posted in breakfast things, cakes & tortes, groups, simple cakes, sweet things, tuesdays with dorie | 49 Comments
Michelle of Bake-En selected Dorie’s Dimply Plum Cake for this week’s TWD. I’ve read about this little breakfast cake all over the place, so I was really looking forward to trying it. Unfortunately, stone fruits are not in season just yet here in Australia. I had to take what I could get on this one, and what I could get were a couple of rock-hard peaches. I stuck ’em in a paper bag and crossed my fingers that they’d ripen after a few days.
Well, they didn’t really ripen at all, and frankly I was surprised that I could even get the pits out, but I charged ahead with my out of season fruit anyway. I went with one of Dorie’s “playing around” suggestions and added a few shredded basil leaves instead of citrus zest to the cake batter. I kept in the cardamom, which is a spice I love, and added a pinch of cinnamon, too. To try and help the crunchy peaches along a bit, I sprinkled each exposed half with sugar just before putting the cake in the oven, and then a couple more times during the baking process as well.

Such a cute cake– I loved the fruity dimples, and the peach halves looked almost like hearts! What I’ve hidden from you in these photos, though, is a little patch of raw batter left under each peach half. Drat– I couldn’t get that part to cook through for the life of me! In a flash of genius while taking these photos, I thought that if I flipped the individual slices upside-down on a baking sheet and stuck them under the broiler for a minute, I cook get the raw bits to firm up. And it worked! (That technique might get a little messy with a whole large cake.) There was no time to take extra pics, however, as the coffee was good to go, and R was grumbling that breakfast was already taking too long.
I made half a recipe and baked it in a standard-sized loaf pan. Leftovers weren’t a problem, as R and I polished off the whole thing in one sitting! The peaches did sweeten and soften nicely in the oven (I do think the sugar sprinklings helped), and I loved the warm, spicy cardamom flavor. Although R was initially suspicious, the basil was a really nice touch, too…I should bake with herbs more often.

For the recipe, look in Baking: From My Home to Yours by Dorie Greenspan (she also has it on Serious Eats) or read Bake-En. Don’t forget to check out the TWD Blogroll to see what over 250 other people had to say!
Tuesdays with Dorie: Chocolate Chunkers
September 16, 2008 at 4:15 am | Posted in cookies & bars, groups, sweet things, tuesdays with dorie | 54 Comments
Just reading the recipe for this cookie is enough to make you grab a tube of Clearasil and apply a proactive smear all over your face. You may initially feel relief upon only seeing 3 tablespoons of butter, but look a little closer, and you’ll see 1+(6×3)=19…19 ounces of chocolate! This cookie is basically bits of chocolate held together with a smidge of brownie batter. Before you think I’m poo-pooing the Chocolate Chunkers (did someone say poo-poo? hmmm…I won’t go any further, but I think you know what I mean), let me make it clear that they are insanely good! Thanks to Claudia of Fool for Food for picking it for TWD this week! And a special shout-out to Mari…I did totally copycat you with the cooling rack thing (although yours is cuter!). What can I say? I am out of ideas for cookie photography at this point.
This recipe is easily divides in half, but I toughed out the math to cut it down to just a third. I didn’t want to blow my whole chocolate stash in one swoop. Dorie notes that good chocolate is a must here, and she ain’t kidding. For the label-curious, I used cocoa powder by Valrhona, bittersweet by Scharffen Berger, unsweetened (well, really 85%) by Lindt, milk by Green & Black’s and white by Belcolade. Semisweet was also in the recipe, but I don’t have any, so I used a bittersweet/milk combo instead. It’s not all chocolate in here, though…there are nuts and dried fruit going on, too. I decided to toss in coconut flakes rather than raisins, which I don’t like, and toasted almonds. The whole thing was deliciuosly Almond Joy-esq.

A couple of observations…if you chill this dough, it becomes rock-hard! For easier shaping, and the well-being of your cookie scoop, you may want to let it come to room temp before digging into it. Also, my cookies didn’t want to flatten at all in the oven, so at the half-way point I helped them out by giving them a gentle smoosh with a silicone spatula.
Look in Baking: From My Home to Yours by Dorie Greenspan or read Claudia’s post to find the recipe. Don’t forget to check out the TWD Blogroll to see what over 250 other people had to say!
P.S.: This week I’m Port Douglas, Queensland. I know, I know…I’ve been travelling a lot lately. Back over the weekend!
Tuesdays with Dorie: Chocolate Malted Whopper Drops
September 9, 2008 at 5:20 am | Posted in cookies & bars, events, sweet things, tuesdays with dorie | 63 Comments
We had a great week in New Zealand…the South Island is so beautiful, with so many different landscapes, it almost doesn’t look real in some places. And the baby sheep (otherwise known as lambs, I guess)–heart-meltingly cute! Lots of good food and vino, too (so much that, even though we brought back several bottles of wine, I am on the wagon for the next couple weeks). Should you ever go to Christchurch, do yourself a favor and check out Restaurant Schwass. Same goes for Gibb’s Vineyard Restaurant in Blenheim in the Marlborough wine region.
Enough rambling–on to the cookies! Chocolate Malted Whopper Drops are the TWD choice of Rachel from Confessions of a Tangerine Tart. These cookies are really Maltesers drops, the brand of malt ball sold here. A lot of people say they are better than Whoppers, but I haven’t had a Whopper in a very long time, so I can neither confirm nor deny this. (If you live in Brooklyn, though, the dark chocolate espresso malt balls sold at Two For the Pot on Clinton Street are most definitely the best ever!) I was pleased to notice a dark version of Maltesers, and that’s what I used here.

I, of course, only made half a batch of cookies, and they were a bit of a test-kitchen experiment for me. I don’t have any malted milk powder, and I wasn’t about to buy a big canister of Milo or Ovaltine just to make cookies. I do, though, have barley malt syrup and powdered milk, so for my half-batch I used 1/2 cup of powdered milk and 2 teaspoons of malt syrup in place of the malt powder. Luckily, they were not a total mess! Malt syrup is strong stuff, and the flavor here is definitely noticeable. I did do something that some may consider a sin–I cut back the amount of chopped malt balls and chocolate chunks (for which I used white instead of dark) by about 25%. It was still plenty, trust me, but I guess that’s why I don’t see as many chunky bits on the surface of mine as in Dorie’s book picture.
The first night, we ate them straight up, and they were so soft and chewy that R commented that they would be the perfect ice cream sandwich cookie. Well, I can’t ignore a comment like that, so the next day I made a batch of vanilla malted ice cream. He was right–they were great, albeit a little drippy.

Look in Baking: From My Home to Yours by Dorie Greenspan or read Confessions of a Tangerine Tart to find the recipe. Don’t forget to check out the TWD Blogroll to see what over 250 other people had to say!
Tuesdays with Dorie: Chunky Peanut Butter and Oatmeal Chocolate Chipsters
September 2, 2008 at 4:09 am | Posted in cookies & bars, events, sweet things, tuesdays with dorie | 43 Comments
This week for TWD, Stefany of Proceed with Caution chose these Chunky Peanut Butter and Oatmeal Chocolate Chipsters. They combine the best bits of all my favorite cookies, and even have a little spice in there, too!

Since more cookies are on the baking horizon, I made just a quarter recipe. I have a lot of half-used bits of chocolate floating around, so I put milk chocolate chunks instead of bittersweet in these, purely for the satisfaction of finishing off a bar.
They came out great, thankfully. Anytime I have to bake with my precious stash of Jif (which I bring back on trips the States), I sweat a little that the recipe will be a bomb. The PB is subtle in flavor, but the cookies really smell peanuty, and the little bit of cinnamon and nutmeg gives them a warm flavor. I baked mine on the low end of the recommended time, so they’d stay a little soft, which is how I prefer a chocolate chip cookie to be. Dorie notes that these are great cookies to make ice cream sandwiches with. I totally bet she’s right, but I didn’t have the stomach (or maybe too much of the stomach is really my problem) to try that out!

I’m actually in New Zealand for most of the week and may not be able to go through the TWD Blogroll myself, but you should definitely check it out! And look in Baking: From My Home to Yours by Dorie Greenspan or read Proceed with Caution to find the recipe for these cookies.
Daring Bakers in August: Pierre Hermé’s Chocolate Éclairs
August 31, 2008 at 4:25 am | Posted in daring bakers, groups, other sweet, sweet things | 63 Comments
Éclairs may be my husband’s favorite pastry. He blames a box of éclairs that I made and brought home while in cooking school for sending him on a downward sweets spiral that resulted in him being on a diet for like two years after my graduation! I blame his lack of self-control. Let’s see if he can keep it together for this month’s Daring Bakers event– Meeta from What’s For Lunch, Honey? and Tony of Olive Juice have challenged us to make éclairs. Not just any éclairs, but Pierre Hermé’s éclairs.

Éclairs are made from choux pastry, usually filled with pastry cream and dipped in chocolate. They’re just like a cream puff, but elongated instead of round. Meeta and Tony wanted us to keep either the glaze or the pastry cream chocolate, but gave us free reign to make one of them non-chocolate. I kept the chocolate on top and filled mine with a coffee-wattleseed pastry cream.
It wasn’t until I took that top picture, that I noticed that from the side, my éclair looked a little weird. “What’s with this thing?” I thought. I usually prefer not to cut éclairs in half in order to fill them. Looks-wise, I like them better when they are kept intact and filled through a small hole in the back or on the bottom. But I was fast running out of daylight for my photos, so I figured I’d cut them in half to cool quicker and just assemble and photograph one right away. Upon closer inspection, I realized that rather than filling the bottom half of the éclair I photoed with pastry cream, I’d filled the top half of another one, and then sandwiched the two together. D’oh! I thought about a redo but then I decided to leave it, so you can have a glimpse of what it’s like to be me, the master (or mistress, I guess) of imperfection.
I made Dorie’s pâte à choux not too long ago, and I think I preferred it. The ingredients aren’t too different, although this one from Hermé has an additional egg. Perhaps that’s why it seemd a little crustier than I’m used to. I also had to bake it a bit longer than the recommended 20 minutes to dry it out and get it the shade of brown I like. I do love the chocolate sauce, though. It is delicious, and luckily I have a bunch left over..it will be great on ice cream.

Check out the DB blogroll! And visit Meeta or Tony for the recipe (which was adapted from Chocolate Desserts By Pierre Hermé).
Tuesdays with Dorie: Chocolate-Banded Ice Cream Torte
August 26, 2008 at 4:36 am | Posted in groups, ice creams & frozen, sweet things, tuesdays with dorie | 54 Comments
I’m just going to admit that I almost pooped out on TWD this week. I’ve been feeling a little weighed down lately, ya know, and I wasn’t so sure that something called a “Chocolate-Banded Ice Cream Torte” was really going to help. But then I felt guilty…I haven’t missed a week for no good reason yet, and thought it best not to go down that road. Besides, I didn’t want to let down Amy of Food, Family and Fun, who chose this week’s recipe. The deal I struck with myself was to make just two individual servings– one for R and one for me.

I knew that my solo portions wouldn’t need to be as tall as Dorie’s large torte, so I could get away with less of everything. I made just 1/8 of the ganache recipe (or enough for one Dorie-sized serving), and divvied it up between my two little molds, which were actually sturdy, straight sided muffin wrappers. (FYI: The truffle cream does use raw eggs, so if you are sensitive to that, then you may want to skip this recipe or seek out pasteurized eggs, or do whatever you would normally do in this case.) Dorie uses raspberry-flavored ice cream in her torte, but I can’t say that I’ve ever been a fan of fruit and chocolate combos. Instead, I bought two scoops of condensed milk ice cream from a Sydney shop called Passion Flower, which has lots of cool Asian-inspired flavors (I wasn’t sure how black sesame or taro would pair with chocolate, so I played it safe). Back at home, I ground up some hazelnut praline, leftover from this cake, and stirred that in to the ice cream.
The key to serving a frozen dessert like this is to it pull it out of the freezer and let it temper on the counter a few minutes beforehand. Obviously you don’t want it to start melting, but if the ice cream begins to soften just a tad, it’s much more pleasant to eat and will actually taste better, too.

I’m so glad I pulled my head out from you-know-where and got this one done! It was fantastic, and a bit more classy than the normal mid-week dessert around these parts. The chocolate ganache doesn’t freeze solid, but becomes almost chewy when cold. And I really loved it in combination with the hazelnut praline, which retained its sweet crunch in the ice cream.
Look in Baking: From My Home to Yours by Dorie Greenspan or read Food, Family and Fun to find the recipe. Don’t forget to check out the TWD Blogroll to see what over 250 other people had to say!
Tuesdays with Dorie: Granola Grabbers
August 19, 2008 at 5:46 am | Posted in cookies & bars, groups, sweet things, tuesdays with dorie | 46 Comments
Granola Grabbers– I feel so wholesome. Perhaps Michelle of Bad Girl Baking was going for that good, clean feeling when she chose these for TWD this week.

Whether you are trying to satisfy the after-school crowd, or are just trying to put aside those impure thoughts you’ve been having about Gael García Bernal ever since watching The Motorcycle Diaries a few days ago, these will do the trick. These chubby little cookies are loaded with granola (of course), wheat germ, nuts, coconut and raisins (or dried cranberries, in my case). I also added a pinch of cinnamon to mine. They are chewy, but the granola also makes them crunchy…a very pleasant combination of textures. I only made a third of a recipe, and I briefly thought about patting the dough into a loaf pan and making bars instead, but I have definitely not been getting my recommended daily dose of cookies lately.

Look in Baking: From My Home to Yours by Dorie Greenspan or on Bad Girl Baking to find the recipe for Granola Grabbers. Don’t forget to check out the TWD Blogroll to see what over 200 other people had to say!
Tuesdays with Dorie: Blueberry-Sour Cream Ice Cream
August 12, 2008 at 5:22 am | Posted in groups, ice creams & frozen, sweet things, tuesdays with dorie | 64 Comments
I’m back from Hawaii…a couple days in Oahu, a couple Kauai, but most of our time was spent on the Big Island, where my dad’s side of the family descended upon Kona for my uncle’s wedding. I’m sure the area is still recovering from the W family whirlwind. It was a lot of fun, and I have a face full of freckles and a mind full of good memories to show for it. One night, I even had a mai tai for each of you! Trust me when I say that I paid a stiff price for it the next day!
I’ve returned just in time to make blueberry sour-cream ice cream, this week’s TWD recipe, which comes to us courtesy of Dolores from Chronicles in Culinary Curiosity. I was pretty jazzed about this recipe, not only because I jump at any excuse to use my KA ice cream attachment, but also because one of my favorite homemade fruit ice cream recipes is a strawberry-sour cream ice cream I found in Sunset magazine many moons ago. I just love the tang that a whomp of sour cream gives!

This ice cream recipe was pretty simple…no eggs, no making custard, no straining. I used frozen blueberries to make the base. I thought the end product had pretty good flavor, but decided to amp it up a bit before serving with a simple sauce made from, you guessed it, frozen mixed berries.
Dorie notes that this this ice cream is firm in texture. On the day I made it, we ate some within a few hours, when it had that gorgeously soft, smooth feel to it. But on the second day, it was more rock hard than just firm, even after sitting out for awhile. I find that to be a bit unpleasant, and usually put a teeny pinch of xanthan gum, which I get at the health food store, into my homemade ice creams to keep it scoopable for a few days (just a pinch, so it’s never gummy like some store-bought stuff). I was a little PO’d with myself for forgetting it here. If I make this again, I’ll wait till fresh berries are in season and I’ll add a pinch of xanthan gum at the point where the berries are just cooked and still hot.

Look in Baking: From My Home to Yours by Dorie Greenspan or read Chronicles in Culinary Curiosity to find the recipe. Don’t forget to check out the TWD Blogroll to see what over 200 other people had to say!
Tuesdays with Dorie: Black-and-White Banana Loaf
August 5, 2008 at 5:32 am | Posted in cakes & tortes, groups, simple cakes, sweet things, tuesdays with dorie | 54 Comments
I love a making loaf cakes (and Bundts, too…wink, wink, nudge, nudge), so I was glad to see that Ashlee of A Year In The Kitchen chose Dorie’s Black-and-White Banana Loaf for TWD this week. Loaf cakes are basically throw together no-brainers, although this one has the extra steps of melting chocolate, mashing a banana and marbling. Still no-brainers, but with a few more bowls to wash at the end.
I also love stuff baked with bananas. I do find this odd, since I don’t like raw bananas at all–ick! But they smell so good baking in the oven, and make for super-moist cakes, breads and muffins. You’ll hear no complaints from me on this cake (it tastes just like you’d expect), although perhaps I could work on my marbling skills…what I did just looks like blobs. Dorie said to make this more white than black, but I paid that no mind and went more black than white.

Did I tell you I found a half-size loaf pan a couple months ago? Really, I don’t even know why I have larger baking pans anymore…they rarely see the light of day. The little guy’s almost as deep as a normal loaf, though, so it doesn’t really shave anything off the baking time.

Look in Baking: From My Home to Yours by Dorie Greenspan or read Ashlee’s post to find the recipe. Don’t forget to check out the TWD Blogroll to see what over 200 other people had to say!
P.S.: I’m still out of town…back in a couple days!
Baked Fresh Weekly

Blog at WordPress.com.
Entries and comments feeds.
