TWD Rewind: Orange Berry Muffins
February 9, 2008 at 11:05 am | Posted in breakfast things, muffins/quick breads, sweet things, tuesdays with dorie | 12 Comments
When I put up my first Tuesdays with Dorie post earlier in the week, I mentioned that I’d like to make the recipes the group tried out before I joined. This morning I decided to start with the simplest one, the first in the book: Orange Berry Muffins.

I may be a little groggy at 8:00 on a Saturday morning, but I had no trouble putting these together. A few ingredients, mixed by hand…twenty-five minutes later, breakfast is ready. The best part is they’re loaded with berries!

This recipe was Michelle’s choice and she has it posted on her blog, Sugar and Spice. It is from the book Baking: From My Home to Yours by Dorie Greenspan.
Tuesdays with Dorie: Black-and-White-Chocolate Cake
February 5, 2008 at 6:32 am | Posted in cakes & tortes, layer cakes, sweet things, tuesdays with dorie | 42 Comments
Like probably a lot of you, I have a bookshelf dedicated to my cookbooks. I read them, I admire them, I love and cherish them…but apart from a couple of standards, I don’t really use them that often. Over the holidays, I finally got Dorie Greenspan’s Baking: From My Home to Yours. I felt like the last person on Earth to get it…I wondered if anyone noticed the big “L” stamped on my forehead for the past year! From what I’ve heard, it’s a fabulous book, so I would also be a total loser if I didn’t put it to use. But I need a little peer pressure sometimes, so help cattle prod me, I just joined a really great group called Tuesdays with Dorie! The brainchild of Laurie from quirky cupcake, TWD makes one recipe a week out of Baking from My Home to Yours. It’ll take awhile, but we hope to get through the whole thing! This means that at some point I will also need to get around to baking the first five recipes that I missed out on. I’m hoping none of this is too ambitious on my part…
For my first TWD, the group is making Dorie’s Black-and-White-Chocolate Cake, a recipe chosen by April of Abbey Sweets. It’s a vanilla buttermilk cake, layered with dark chocolate pastry cream and white chocolate whipped cream. Then the whole thing gets frosted with more white chocolate whipped cream. I love me some cake, so I was pretty psyched to get this one going.
OK, if you have the book and look on page 260, you’ll probably notice that my cake doesn’t look a whole lot like Dorie’s from the outside. In fact, it looks like crap. I had some big-time filling and frosting issues…it was highly upsetting, and I almost didn’t want to post a photo. I found the white chocolate whipped cream too soft to spread on the side of the cake (I couldn’t whip it anymore, because it was beginning to look separated, and I actually had to make it twice because the first time it really did curdle and wouldn’t come back together no matter how I tried to save it). It just slid right off and mucked up the cake plate…in hindsight, I should have realized that would happen and just iced the top, leaving the side exposed for an old-fashioned look. Since the dark chocolate pastry cream was oozing out between the layers anyway, I put some that I had leftover into the freezer for half and hour and tried to use it to frost the side instead. Because of it’s consistency, I couldn’t get a nice frost with that either (that’s why no one frosts with pastry cream!), but had to settle for more of a thin smear…grrrrr. I had made some tempered chocolate curls before beginning this whole process, so I hoped they would distract the eye from my frosting failures.

Thank goodness that the inside of my cake looks more or less normal. Oh, by the way, I halved the recipe in the book so I’d just have a six-inch cake. I have have to say, the dark chocolate cream was damn good…a perfect chocolate pastry cream. The cake itself was a little dense, I thought, but this could very well be due to differences in flour (I have had a couple of baked goods come out funky using my US books and Aussie flour).
Because of the problems I had, I’m really interested to see how my fellow TWD members did with this recipe. I’m going over to the Tuesdays with Dorie blog that Laurie set up to see the list of TWD bakers and visit their sites. So should you! And if you want to try your hand at the cake, take a look here on Abbey Sweets for the recipe.
Daring Bakers in January: Lemon Meringue Pie
January 28, 2008 at 2:52 pm | Posted in daring bakers, groups, pies & tarts, sweet things | 79 Comments
This sounds bizarre, even to me, but I don’t think I’ve ever had lemon meringue pie (a.k.a. LMP) before. I can’t imagine how this is possible, but I also can’t recall ever having a piece. This month’s Daring Bakers challenge, chosen and hosted by Jen The Canadian Baker, was my chance to fill this gross void in my culinary experience.
Apparently LMP doesn’t keep well. The meringue can breakdown and weep (how sad!), and the crust can sog out if it’s not eaten within a few hours of being made. I decided that for just three of us, dividing the recipe in half might make more sense. I have some rarely-used mini pie tins that I put to work to get three baby pies.

The pastry dough came together easily in the food processor, but was a little more wet than the sweet dough I usually make. It rolled out fine though…I chilled it for several hours in the tins before baking, and it held its shape nicely in the oven. I was even able to pop them out of the tins successfully! The filling was super easy to make…much less work than a regular lemon curd, thanks to cornstarch. And I was really happy with the cloud-like fluffy whiteness of the meringue. In the oven, the peaks took on a gorgeous pale brown.

I must say, I thought my little guys came out really cute, what with their mounds of fluff heaped on top! But what did I think of my first taste of LMP? I liked it, but I could really take it or leave it. The lemon filling has a bit too much of that cornstarchy giggle. I think I prefer a traditional French lemon curd tart.
Want a few hundred more opinions of LMP? Then head on over to the Daring Bakers Blogroll. And if you want the recipe, it’s here on Jen’s site.

Daring Bakers in December: Yule Log
December 22, 2007 at 9:25 am | Posted in cakes & tortes, daring bakers, groups, sweet things | 54 Comments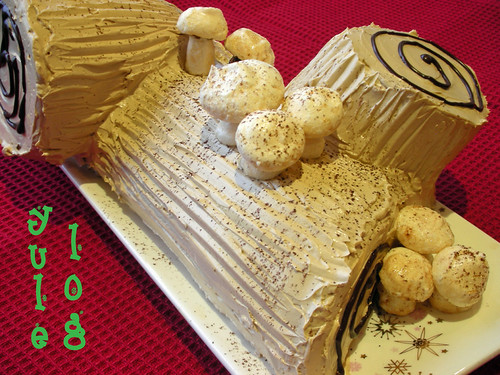
‘Tis the season…to eat cake shaped like tree branches! I love holiday baking (wish I’d gotten to do more of it this year) and I absolutely love yule log, or Bûche de Noël. If you were wondering what the Daring Bakers would be up to for the holidays, this is it! Or hosts, the co-founders of the group, Ivonne and Lisa chose a yule log, a symbol of light and warmth for this month’s challenge.

A Bûche de Noël is usually a genoise sponge cake rolled up with a filling, cut to resemble a log and frosted with buttercream. Then it gets all kinds of slightly wacky decorations. Mushrooms are a traditional yule log decoration. Don’t worry–I’m taking about sweet sugar mushrooms! We were able to chose to make our ‘shrooms from either meringue or marzipan. Not being a huge marzipan fan, I went the meringue route. I dusted them with cocoa and a little gold luster dust. My log came from a magical, sparkley forest!

I have made a couple of yule logs in the past, so I knew the general drill. The genoise sponge we used was slightly different from ones I’ve made in the past. This one had no butter and used cornstarch…more like a ladyfinger recipe I’ve used many times. I decided to keep my sponge plain in flavor, but I was worried it would dry out in the fridge, so I soaked it with a rum simple syrup before rolling it. We had to use coffee buttercream to frost the cake (which was fine by me), and it was made Swiss-meringue style.
I didn’t have any real problems making the yule log. The most difficult part was deciding on a filling, as we could chose whatever we wanted to roll our cakes up with. I decided to do a chocolate mousse filling. It set up nicely and went well with the coffee and rum flavors in the other components. Decorating the cake was a lot of fun, and we certainly had no difficulty eating it up!

I am flying to the States today for the holidays. I’m very excited about the trip, but it means I may not be able to comment on as many of my fellow DBer’s posts as I would like. I apologize for that, but do check out the Daring Bakers’ blogroll and see all the beautiful Bûche that were made! Ivonne has the recipe on her site. Happy holidays!
Daring Bakers in November: Tender Potato Bread
November 26, 2007 at 12:00 pm | Posted in daring bakers, events, savory things, yeast breads | 60 Comments
Ahhh…finally, today is the day when I can reveal my experience with the latest Daring Bakers challenge– it is something I really look forward to every month. This go-around Tanna from My Kitchen in Half Cups had us roll up our sleeves and bake bread! She chose a recipe for tender potato bread from Home Baking: The Artful Mix of Flour & Tradition Around the World by Jeffrey Alford and Naomi Duguid. This is a book I have on my own shelf, so I was extra-excited to give the bread recipe a try.
Besides being true to the base recipe, we had to knead the bread by hand (I hadn’t done that in forever!) and it had to be savory. But other than that, Tanna really encouraged us to play around with the shape of our bread and the flavorings used. I did cut the recipe in half, which is my usual MO, because R and I can’t (or shouldn’t) eat sooo much bread. I used the maximum amount of mashed potato suggested by Tanna (16 ounces for a full recipe, or 8 ounces for my half recipe), and I can say that kneading the dough was definitely a sticky process. But it wasn’t impossible on a well-floured surface…as the additional flour was worked in, I could feel the dough gaining structure and becoming easier to handle.

I split my dough into one small loaf and one small focaccia. I kneaded some grated aged cheddar and cracked pepper into the loaf portion just before placing in the pan for its second proof. The cheese bread was soft and had great flavor. I still have half the loaf in my freezer, just waiting to be eaten with a bowl of soup. The dough made for a fantastic focaccia as well– I put olive oil, olives, rosemary and Maldon salt on mine. It had a nice, crisp bottom crust from baking it on a ripping-hot pizza stone.
Thanks Tanna for giving us a good break from the sweet stuff. If you are afraid of yeast, don’t be– bread-baking is a truly satisfying experience! You won’t believe how delicious warm homemade bread is! If you want the recipe for the basic potato bread, look here on Tanna’s site.

And before I go, I’d like to wish a very happy birthday to Daring Bakers! This not so-little-anymore group turned one this month. Started by Lis and Ivonne, just two buddies wanting to make their own pretzels, the group is now more than 300 strong! To see how we all interpreted this month’s potato bread challenge, take a look at The Daring Bakers’ Blogroll.
Daring Bakers in October: Bostini Cream Pie
October 29, 2007 at 12:07 am | Posted in cakes & tortes, daring bakers, groups, sweet things | 64 Comments
“Hey– don’t you mean Boston cream pie?” you ask. I know I’m a lousy typist, but I do in fact mean Bostini. It is, of course, a take on the traditional Boston cream pie, created by Donna Scala and Kurtis Baguley of Bistro Don Giovanni and Scala’s Bistro in Northern California– an orange-flavored chiffon cake sitting on a bed of vanilla custard and topped with chocolate glaze. Our Daring Baker hostess this month is Mary from Alpineberry, and since she first tried it about 12 years ago, Bostini cream pie has been one of her restaurant favorites. From what Mary whips up in the kitchen I’d say she has impeccable taste, so I was certainly excited to try this when I saw she had chosen it as the October challenge.
Once I got the ingredients together (a whole farm’s worth of eggs and dairy!), the recipe came together pretty easily. No troubles with the cake (I recommend squeezing the orange juice yourself for best flavor and whipping the egg whites by hand to avoid overbeating), and the custard thickened up quickly thanks to the cornstarch. The glaze couldn’t have been easier– just melted chocolate and butter.

This dessert is assembled in a ramekin or custard cup at the restaurants, but we were allowed to play with presentation, provided we didn’t stray from the ingredient list or basic concepts. I thought about putting it together in a wine glass or bowl, but wanted to put some cute new teacups to use, so I really didn’t play too much. I baked my chiffon cakes in a muffin tin rather than using the same cups I assembled the cake in (as the recipe instructed). I don’t know if my teacups are oven-proof, and didn’t want to chance blowing them up the first time I used them! Also, I liked that the muffin-sized cakes were a bit smaller than the cups, so that all the drippy glaze could run into the custard instead of just down the outside of the cups.

Boston cream pie is R’s number one dessert, and he really liked this version of it. And my brother, who is visiting from Seattle, just loved the custard. I am one of those weirdos who doesn’t like the combination of fruit and chocolate, but the orange flavor was pretty subtle and fresh, so I didn’t mind it here. This dessert is super-rich, so you can get away with a small portion, even though the recipe yields quite a lot. (I actually halved the custard and glaze amounts. I made the full recipe of cake and froze what we didn’t eat right away.) As you can see from the top picture, my oranges were larger than my dessert, and it was plenty!
Thanks to Mary for picking another winning DB challenge! You can check out the recipe over on her site. Don’t forget to look at all the other Bostinis out there by visiting the Daring Bakers’ Blogroll. From some sneak previews I’ve seen, they look pretty good…
Daring Bakers in September: Cinnamon and Sticky Buns
September 30, 2007 at 1:56 pm | Posted in breakfast things, daring bakers, groups, sweet things, sweet yeast breads | 56 Comments
What smells better than bread, cinnamon and sugar baking in the oven? Not a whole lot, really. And that’s why I was so pumped to see that Daring Baker Marce, aka Pip in the City, chose cinnamon/sticky buns for the September DB challenge! She went with a recipe, which you can see here, from Peter Reinhart’s The Bread Baker’s Apprentice. The recipe gives instructions for making a cinnamon-swirled dough that can be customized into either basic cinnamon buns with a white fondant glaze or sticky buns with a caramel/nut topping.

We could pick either variation (cinnamon or sticky), but why make one when you can make both? I thought they would be a great weekend breakfast, but I didn’t want to wake up at 4:00 AM on Saturday to start the long dough making and proofing process. The recipe says that unbaked, formed buns can be retarded for up to two days in the refrigerator, and since I’ve successfully employed this method with other types of bread dough, I thought I’d make this my plan of attack.
On Friday evening, I made the dough (using mostly AP flour combined with about 1/2 cup of bread flour) and gave it it’s first rise. The dough really a cinch to make, and once risen, was beautifully silky smooth and easy to roll up with cinnamon sugar and form into large buns. Half of my rolls were put, just as they were, into a baking dish for cinnamon buns. The other half were put into a separate dish slathered with a sugar, butter and pecan mixture that would bake up into a gooey sticky bun topping. (In other words, I prepared the recipe through Step 4 of the instructions.) Then they both when into the refrigerator for a good night’s rest.
On Saturday morning I pulled out the cinnamon buns to come to room temperature and proof for a couple hours before baking. On Sunday morning I did the same thing with the unbaked sticky buns. I admit that I did get up early both days to do this!

The baked and slightly cooled cinnamon buns got a healthy drizzle of powdered sugar and milk glaze, flavored with a vanilla. The warm sticky buns were turned out to reveal a buttery caramel topping. Both variations were great with a cup of coffee, but which were better? I’d say the sticky buns. The cinnamon rolls were a bit dry inside, but with the sticky buns, the topping oozed into the dough, eliminating any dryness problem there.

I don’t make this kind of thing often (my real buns don’t need this kind of breakfast every week), but when I do, I normally make a sort of hybrid variation of the two…I make a cinnamon swirl using brown sugar instead of granulated and add chopped nuts to it. The brown sugar makes the cinnamon buns bake up caramely and gooey on the inside. Then the baked buns are frosted with a heaping amount of glaze. I’d like to retry Reinhart’s dough recipe using that filling.
Thanks for a great challenge Marce, and if you want to see some more hot buns, be sure to visit the ever-expanding Daring Bakers’ Blogroll!
Daring Bakers in August: Milk Chocolate and Caramel Tart
August 29, 2007 at 4:56 pm | Posted in daring bakers, groups, pies & tarts, sweet things | 49 Comments
I was just a lil’ bit excited to see that for this month’s Daring Bakers’ challenge, our co-hosts Veronica and Patricia chose a milk chocolate and caramel tart from Eric Kayser’s book Sweet and Savory Tarts. Not only do I love chocolate and caramel (who doesn’t, really?), I love making tarts, especially when they have a few different components like this one. And, although we were warned from the get-go that the directions were sparse and we’d have to read between the lines, at least there would be no fiddling around with agar-agar like last time.
The first part of the recipe to tackle was the pastry dough. The recipe described it as a “chocolate shortbread pastry,” flavored with cocoa powder, ground hazelnuts and cinnamon. Some bakers who tried out the recipe early in the month found the cinnamon to be overwhelming, and it was later deemed optional by the Veronica and Patricia. I followed these bakers’ advice and opted out of the cinnamon in my batch. I chose to make my dough in the KitchenAid (with the paddle attachment), rather than in the food processor. It just seemed less messy, and came together easily in the mixer.
After my dough had an overnight rest in the fridge, I found it to be quite malleable and very easy to work with. The dough really didn’t resemble shortbread though, and neither the finished product, but it did bake up nice and crisp. I decided to go the mini route and used my 3.5″ fluted tartlette pans to form the shells. I docked them well and blind baked them with beans, thanks to the advice of those bakers who had made the recipe early on. Even though they were small, my shells did take several minutes longer to bake than the recipe stated. And I had to be more careful than I would have liked removing the parchment and beans from the baked shells, because the dough wanted badly to stick to the parchment. With a little patience though, everything was fine. I made eight little tartlettes and put the extra unbaked dough in the freezer for another time.
The next step was to make the caramel layer hidden in the middle of the tart. I must admit here that I only made a half-batch of caramel, since I didn’t make the big 10″ tart. R and I can’t finish a whole tart ourselves, but I promise I was true to the ingredients, techniques and proportions. Our co-hosts did give us a choice when it came to the caramel: while the recipe called for using the dry technique, we could switch that to a wet caramel if we were more confident with the wet method. I have actually made an unusual amount of caramel sauce in my time, and am comfortable with both ways, so I went ahead with the dry version before adding butter and cream. I took it to the edge of dark-but-not-burned, so it would be a bit more flavorful and wouldn’t cause a toothache in combination with the milk chocolate. (To make a dry caramel, I add the sugar in stages, starting with just enough to cover the bottom of the pan. When that melts and begins to color, I add a little more.) To the cooled caramel base, eggs and flour were added so it would set up into a soft but firm candy-like layer in the oven, rather than remain an oozy sauce.
Once again, the caramel in my little tarts had to spend about five minutes longer in the oven than the recipe stated to set up. I baked them until the caramel looked well set around the edges and was no longer jiggly in the center. After cooling down on the counter for about 30 minutes, I popped them in the fridge to thoroughly set for a few hours and charged on with the caramel decorations.
I was hoping to do sugar curls or something fun, but I made this recipe during a patch of rainy days here in Sydney. Humidity and sugarwork are archenemies, so my experiments were just a sticky mess. I resorted to the basic caramel fragments suggested in the recipe, but even they stuck together in little clumps after I broke them up. I liked them though…they looked like sparkly jewels.

For the last step before decoration (and eating!), I made the “chocolate mousse” layer. It was just melted milk chocolate folded together with whipped cream. I just had to be sure to let the chocolate cool to about body temperature before combining, so it wouldn’t melt the cream. I used Green & Black’s organic milk chocolate. They claim to use more cocoa solids than other brands, making it a “darker” milk chocolate. I had never tried it, but as a dark chocolate freak, I was interested in finding something a little less sweet. As luck would have it, it was also on sale!

Eight mini tarts equals four days of dessert for R and me, so I made scaled back amounts of the mousse as well…just enough to fill two each day. After piling on the mousse and letting the tarts chill for a bit, it was time to decorate and try. Boy, were they good…almost like a candy bar, but not too sweet. I tried to get fairly equal layers of caramel and chocolate, and was really surprised by how nicely the tarts cut. All in all, I’d say this one’s a keeper, and it wasn’t even too complicated– thanks Veronica and Patricia! I am interested in trying it with dark chocolate though…
You can find the recipe here or here. If you’re nosey like I am, check out the Daring Bakers’ Blogroll to see how everyone else attacked this month’s challenge!
Daring Bakers in July: Strawberry Mirror Cake
July 30, 2007 at 3:43 pm | Posted in cakes & tortes, daring bakers, groups, sweet things | 50 Comments
Sometimes when a challenge is thrown my way, I shake my Magic 8 Ball to predict the outcome. But here, I think I’ll take a cue from the Queen in Snow White: “Mirror, mirror on the wall. Will I skate through my first Daring Bakers challenge, or will I fall?”
Yes, that’s right. I’m now a whisk-wielding member of Daring Bakers. For months I’ve read about the escapades of this group, and I’m very pleased to be able to display the logo myself. Isn’t she cute?
Our hostess of the month, Peabody from Culinary Concoctions by Peabody, had us tackle a strawberry mirror cake. I’ve actually made a similar cake once before (in culinary school…I think we called it “fruit mousse miroir”), so I was reasonably familiar with its components– sponge cake Bavarian cream and gelée. I knew that gelatin is what makes this cake possible, but I don’t eat red meat, so I also do my best to avoid gelatin. One of the hard and fast rules of DB membership is that you must make the recipe the way it is written, and resist the urge to tinker and tweak. An exception is allowed for food allergies or strong aversions, so the green-light was given to use agar-agar as a gelatin substitute.
Armed with my agar powder, a whole bunch of eggs and several baskets of surprisingly nice-looking winter strawberries, I set out to make the cake.

I started by making the sponge cake, which was easy and really delicious. I had a fair amount of scrap left over, so I stuck it in the freezer where it is waiting to be reincarnated, possibly as a trifle….mmm.
From there, however, things took a turn for the difficult. I had never actually used agar-agar before, and really had no idea how. I did some reading on the subject, but perhaps too much, because I wound up confused. You can substitute powdered agar-agar for powdered gelatin in equal amounts, but strawberries are acidic, so they might require more agar…you need to boil it, but it sets at room temperature, blah blah blah. What did I get myself into?
In terms of dissolving the agar-agar in boiling liquid, I did what I thought was best without altering the amount of liquid in the recipe (that was my real concern with using the stuff). Everything looked the way it was supposed to, which was a good sign. So I crossed my fingers and slid the cake tin in the fridge for a nice long rest. When I popped the cake out of the tin, I couldn’t believe how big it looked on the stand–with only two of us in the house, I’m used to just making little six-inchers. It was quite shiny and splendid in all its red and pink glory, and I could actually see a bit of my reflection on the surface!

It’s not all about looks here, though. What’s inside counts, too. I knew I had to bite the bullet and cut the cake, and I was nervous. The Bavarian cream was a bit softly set, but held up fine. Sadly though, it had a bit of a pasty texture that I wasn’t too fond of. I know that had nothing to do with the original recipe. It was the fault of the agar, or more likely, the fault of the person using the agar.

I’m not too keen to blindly experiment with agar-agar again anytime soon, but I have a packet in my pantry in case the urge surfaces. I am a Daring Baker now, after all.
To see how the other DB members tackled this assignment, visit the Daring Bakers’ Blogroll. And if you know of any worthwhile books with recipes designed specifically for agar-agar, or if you’ve had good luck with any of the Kosher gelatins available, please let me know!
Baked Fresh Weekly

Blog at WordPress.com.
Entries and comments feeds.
