Daring Bakers in May: Opéra Cake
May 28, 2008 at 5:16 am | Posted in cakes & tortes, daring bakers, groups, layer cakes, sweet things | 81 Comments
This May, the Daring Bakers’ challenge had a quartet of hostesses– a four-part harmony, featuring founders Ivonne and Lis and newer members Fran of Apples Peaches Pumpkin Pie and Shea of Whiskful. In voices heard across the world, they sang out this month’s challenge: an opéra cake.
A traditional opéra cake is a thing of delicious beauty, carefully orchestrated with alternating layers of sponge cake, coffee buttercream and ganache, topped off with a dark chocolate glaze. As part of the challenge this month, our hostesses tasked us with rewriting the opéra for spring– the same basic components, but lightened up in flavor and color. For me, part of this challenge lay in that we are fast approaching winter here in Australia. While you can see from the flowers I pinched from a neighbor’s lawn, that I am by no means in a bare, frozen tundra, a lot of the things I may have chosen to flavor this cake are kinda off limits right now.
I’m no stranger to making opéra cake. At the first restaurant I worked for, we used little tiny pieces of the traditional version as a petit four. At least every other day for a few months, I’d make and assemble an opéra (and the scraps are dangerous– I would devour them as I portioned the cake into pieces!). Despite this, I did hem and haw my way through the month, wondering what to do flavor-wise. This past week, though, it was time to get down to business. Looking through my pantry, I realized I could easily make something that would pair perfectly with the Middle Eastern dinner I mentioned I would be making. My opéra would be composed of almond joconde moistened with lemon syrup, pistachio buttercream, lemon-rosewater mousse and white chocolate glaze.

I will make the same confession that I do with every DB challenge– I drastically scaled back the recipe. I made just one pan of joconde (the recipe halves perfectly), and only used half of that to assemble the cake. The rest I froze to use for other things, like the base for a meyer lemon bombe. My one-quarter sized opéra was small, but big enough to give the two of us dessert for three nights, and that’s about my maximum tolerance for any one particular thing.
We were allowed to use any buttercream recipe we liked…I used a whole-egg buttercream that I’ve made before, so as not to be suck with any bothersome extra whites or yolks. To turn it into a pistachio buttercream, I first eyeballed an amount of pistachios and blanched them so I could slip off their brown skins and expose their bright green insides. Then I roasted them in the oven just enough to dry them out, but not to color them, before grinding them in my mini food processor with a little bit of almond meal and drizzle of plain simple syrup. This formed a rough, homemade paste that incorporated easily into the buttercream and gave it pretty green flecks throughout.
I flavored the simple syrup used to moisten the cake layers with a few drops of lemon extract. I also used the lemon extract and rosewater to flavor the white chocolate mousse, which was the cake’s top layer, just beneath the glaze. I did this to taste–enough to make the flavor pronounced, without tasting like I swallowed a jar of perfume. (A chef that I used to work for once said that rosewater reminded him of “grandma’s panty drawer”–what?? And how the hell did he know what that smells like anyway??)
I must say that I was really pleased with how this cake came out. The joconde baked up to be my idea of the perfect height. Too thin and the joconde can be rubbery…too thick and you wind up with an opéra that’s crazy tall. I am quite particular and like all of the layers to be the same height, without feeling like there is too much of one component, and I was able to achieve that here. And the flavors were delicate, but wonderful. I was a little worried that the whole thing would be a bit too girlie for R’s tastes, but he loved it!
I tried sooo hard to get a photo of the whole cake, but it just wasn’t working for me. I couldn’t squeeze the whole thing into the frame without going on a weird angle that made it looked lopsided. That was a bummer, especially since I had bought a new platter to display it on. But it sliced really nicely, so at least I was able to get some good shots of individual pieces.

Last, but certainly not least, the Daring Bakers have dedicated this month’s challenge to Barbara of winosandfoodies.com. Even if you don’t know Barbara, it’s evident through her words that she lives everyday to the fullest and she lives strong. I think we can all sing to that.

If you haven’t had your fill of opera-related metaphors after that post, check out the DB blogroll! And visit Ivonne’s post for the recipe (which was adapted from two sources, Dorie Greenspan’s Paris Sweets and Tish Boyle’s and Timothy Moriarty’s Chocolate Passion).

Tuesdays with Dorie: Traditional Madeleines
May 20, 2008 at 3:37 am | Posted in cakes & tortes, cookies & bars, groups, simple cakes, sweet things, tuesdays with dorie | 55 Comments
I’d been crossing my fingers that Tara of Smells Like Home would choose a cookie for this week’s Tuesdays with Dorie recipe. Then Tara picked Dorie’s Traditional Madeleines–score! I know that a madeleine is really cake in cookie’s clothing, but after all the hard-core desserting I’ve been doing (and still have left to do this month), I was happy to have something that’s just a sweet bite.
I have fond voluntary (as opposed to Proustian-ha!) memories of these little scalloped-shaped cuties. Actually my memories are quite recent, as we made madeleines as part of the petits fours plate at the restaurant I last worked for. That recipe uses browned butter and almond flour, and we made a variety of flavors, from lavender to lemon-thyme, depending on what we felt like or what we had available.

Dorie’s recipe is flavored with lemon zest, and even though she doesn’t instruct you to brown the melted butter, I went ahead and did it anyway. Browned butter just has such a beautiful flavor, I used my non-stick mini madeleine pan (which is the only one I have, and trust me, you still need to grease it well) to bake them off, and made half of Dorie’s recipe. Rather than sprinkling them with powdered sugar before serving, I tossed the still-warm madeleines in some finely ground vanilla sugar.
I will say that these make very good little lemony tea cakes. They are soft and light and tasty (do bake them right when you are ready to eat them though, as they stale quickly). But I have one gripe. If we are talking about “tradition” here, then madeleines are supposed to have a bump on their backsides. We learned in culinary school that the bump is desirable, and our instructor said that madeleines are often presented with their bums in the air (rather than scalloped side up) to show them off. Dorie calls for chilling the batter for at least three hours to help form this bump. The same day I made the batter, I baked up half of it after letting it chill for several hours. No bump. The next day, I baked up the remaining batter (it had now been chilling overnight). Two madeleines had the bump…the rest didn’t. Ah well…after conferring with other TWDers, this seemed to happen to most everyone. And as Ulrike pointed out, even the Traditional Madeleines pictured in Dorie’s book don’t have bumps!

If you’d like to try your hand at baking madeleines (and see if you get the coveted golden bump!), you can find the recipe here on Smells Like Home or in Baking: From My Home to Yours by Dorie Greenspan. Don’t forget to check out the TWD Blogroll!
SHF#43: Lemon Yogurt Cake with Marmalade Glaze
May 18, 2008 at 7:57 pm | Posted in cakes & tortes, events, simple cakes, sweet things | 28 Comments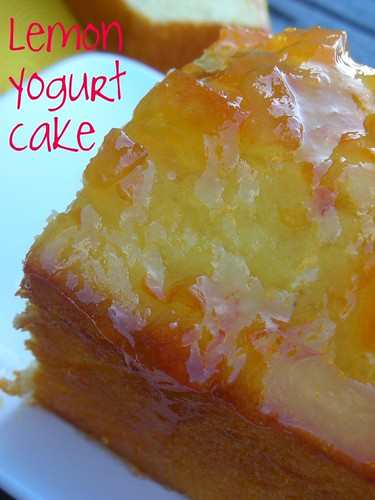
Do you ever find yourself with one or more of the following things in your refrigerator?:
- An extra lemon that you bought a week ago, and is now just rolling back and forth every time you move something around it
- A huge tub of plain yogurt (because the plain only comes in huge tubs, but that’s what you like to eat on your granola) that you don’t know if you’ll be able to finish before it turns icky
- A jar of grapefruit marmalade that looked so beautiful, you had to buy it at the farmers’ market, but now it’s been open forever because it’s actually too thick-cut to be enjoyable on your toast or PB&J
Well, today I realized I had all three and I needed to do something about it. That something was to bake a lemon yogurt cake with marmalade glaze. Yogurt cake is a cousin to pound cake…the cousin you call on when you don’t quite need all those pounds, if ya know what I mean. The yogurt keeps it tender and a little oil keeps it moist. It has a light texture that’s a bit spongier than pound cake.
This is particular recpie is one that my friend P photocopied for me from Bon Appétit magazine a few years ago. I only have the recipe itself, and not the article associated with it, but I noticed that it bears a striking similarity to a recipe I’ve seen in Baking: From My Home to Yours by Dorie Greenspan. After a little Internet research, I found that it is in fact a Dorie recipe– a slightly altered version of what’s in her book. While I’ve made another lemon yogurt cake here before, I’ve actually baked this one a few times, too, with assorted maramalades on top, making my own small tweaks along the way. I prefer to cut down a bit on the oil in the original version and ramp up the lemon. I’ve made those changes in the recipe below, but I link to the original as well.
This cake is happy and sunny; sweet but with a little pucker from the marmalade. And loaf cakes are easy to make, giving you the sugar high you’re after with minimal effort. Speaking of which, I’m sending this over to Tartelette who’s hosting a sweet-tart, citrusy version of Sugar High Friday (started by Jennifer The Domestic Goddess) this month!

Yogurt Cake with Marmalade Glaze– makes one loaf pan
modified from a recipe in Bon Appétit by Dorie Greenspan, February 2005
For the cake:
1 1/2 c all-purpose flour
2 t baking powder
1/4 t salt
1 c plain yogurt (whole-milk or low fat)
1 c sugar
3 large eggs
finely grated peel from 1 lemon
juice of half a lemon
1/3 c vegetable oilFor the glaze:
1/4 c lemon, orange, or grapefruit marmalade
1 t water
-Position rack in center of oven and preheat to 350°F. Generously butter 8 1/2×4 1/2×2 1/2-inch metal loaf pan.
-Sift flour, baking powder, and salt into medium bowl.
-Combine yogurt, sugar, eggs, lemon peel and lemon juice in large bowl; whisk until well blended. Gradually whisk in dry ingredients. Using rubber spatula, fold in oil.
-Transfer batter to prepared loaf pan. Place cake on baking sheet in oven and bake until cake begins to pull away from sides of pan and tester inserted into center comes out clean, about 50 minutes.
-Cool cake in pan on rack 5 minutes. Cut around pan sides to loosen cake. Turn cake out onto rack. Turn cake upright on rack and cool completely. (Can be made 1 day ahead. Wrap and store at room temperature.)
-Stir marmalade and 1 teaspoon water in small saucepan over medium heat until marmalade melts. Brush hot mixture over top of cake. Let glaze cool and set before cutting.
Tuesdays with Dorie: Peanut Butter Torte
May 6, 2008 at 4:27 am | Posted in cakes & tortes, groups, sweet things, tuesdays with dorie | 65 Comments
There are a few recipes in Baking: From My Home to Yours whose pictures and titles are so alluring, I’ve been surprised no one’s chosen them for TWD yet. Well, the time has finally come for one of these, as Elizabeth of Ugg Smell Food has picked Dorie’s Peanut Butter Torte as our recipe of the week! Kind of like the Snickery Squares, I think Dorie has played candy bar dress-up here, except this time the candy in question is a Reece’s cup. I don’t mean to sound like a buzzkill, but the ingredient list is a little frightening, I have to tell you…Oreos, peanut butter, cream cheese, heavy cream, chocolate and peanuts. April was my busiest posting month to date, so that means it was also a very busy eating month. If I didn’t want to feel my heart racing (in a bad way) with each bite, I knew I had to tweak this torte a bit.
It was a given that was not going to make a full-sized torte. I rarely make a full-sized anything for the two of us. My six-inch springform would be prefect for a half recipe, and I’d still get six pieces out of it, but even a half batch seemed like so much cream and peanut butter. After some intense volume calculations (not really), I decided that I could still use my six-inch pan and get away with just a quarter recipe of the filling. Sure, it wouldn’t be as high as the one in Dorie’s picture, but I didn’t mind if my torte looked more like a tart.
I am a peanut butter fanatic, and I love the sugary, salty, junky stuff. I am sorry to say though that I don’t think the Aussie peanut butter is very good…it’s pale and doesn’t have peanuty specks in it. That may explain why, according to an informal poll taken by yours truly, it doesn’t seem to be a popular food item here (I was even told by someone that my favorite lunch, PB&J, is gross!). No matter–I’ve been “importing” my own peanut butter since my first trip back to the States. My current PB of choice is reduced fat Jif (smooth, never crunchy) so that’s what I decided to go with in this torte.

Back in the US, I wouldn’t think twice about swapping full fat cream cheese for the light Philly they label “Neufchâtel.” Here, though, the light Philly doesn’t have the same consistency at all…it tastes good, but even straight out of the fridge, it’s incredibly soft. Further inspection of the package says that it’s a blend of cream cheese and cottage cheese, so I guess that’s why. I didn’t think my filling would set up properly if I used it, so I went with the light version of a New Zealand brand called Mainland.
I also decided that rather than using Oreos to make my crust, I’d save a few more fat grams and use some almond cookie crumbs that I had in the freezer already. Adding cocoa powder turned them into chocolate crumbs.

I’m happy to report that my filling set up nicely after several hours in the fridge, and although I can imagine how wonderful the full blown PB torte would be, the skimpy version was still great! I loved the chocolate-peanut crunchy bits throughout the filling. Now you know my tricks, but you can find the original version of this recipe in Baking: From My Home to Yours by Dorie Greenspan, and on Elizabeth’s site. Don’t forget to go check out the TWD Blogroll!
Tuesdays with Dorie: Fluted Polenta and Ricotta Cake
April 29, 2008 at 4:18 am | Posted in cakes & tortes, groups, sweet things, tuesdays with dorie | 45 Comments
This cake reminds me of the kind of thing my Italian nonna would make, if I had an Italian nonna. No wonder my husband, who is half Italian, scarfed this up! Caitlin of Engineer Baker chose this, Dorie’s Fluted Polenta and Ricotta Cake, as our TWD recipe of the week.
Polenta in this case is just another name for yellow cornmeal, so the cake had sort of a sweet cornbread feel to it, but combined with ricotta and honey, it was quite moist. And you can’t tell from the outside, but hidden in the cake are…dried figs! Normally, I am not a fan of dried figs (a lasting side effect of my childhood aversion to Newtons), but they work really well here. Their little seeds give a pleasant crunch to the cake. I did use a couple less than the recipe called for, though, and I chopped them into quarters so I could more evenly scatter them throughout the batter.

I wanted to follow Dorie’s suggestion to put a few thyme leaves into the batter, but then of course I forgot! So I made thyme whipped cream instead, by rubbing thyme leaves into the sugar that sweetened it. Please, no judgements about the massive amount of cream in that photo–I know I went a little overboard!
This was a lovely cake…simple and homey and good for breakfast (maybe without the mountain of whipped cream). I made a half batch, which fit perfectly into my 7 1/2-inch tart pan. Early reports from some other TWDers were that the cake was a bit too sweet. I went a little skimpy on the measurements for both the sugar and honey, and it came out just right. The only thing that left me scratching my head was the extra little hunk of butter that gets dotted on top of the cake before it goes into the oven. It didn’t seen to do much but make some pale colored spots on top…I think I’ll leave it out if I make the cake again.
You can find this recipe in Baking: From My Home to Yours by Dorie Greenspan, and on Caitlin’s site. Now go check out the TWD Blogroll!
Daring Bakers in April: Cheesecake Pops
April 27, 2008 at 2:10 pm | Posted in cakes & tortes, cheesecakes, daring bakers, groups, sweet things | 51 Comments
I must admit that I almost skipped making these cheesecake pops, this month’s Daring Bakers challenge. Even though I went out and searched around for lollipop sticks at the beginning of the month, I hadn’t really been in a cheesecake mood. Then I realized that the photo opportunities here were too good to be missed! The recipe, from the book Sticky, Chewy, Messy, Gooey by Jill O’Connor, was chosen by co-hostesses Deborah from Taste and Tell and Elle from Feeding My Enthusiasms.
I found a recipe calling for five bars of cream cheese to be a bit much to swallow (literally). I scaled the recipe way back to just one bar and baked it in a small loaf pan. I put the batter together my favorite way– in the food processor. As long as all the ingredients are room temperature, you will never get a lump. It baked up nicely, but even the tiny amount that I made took about 20 minutes longer than the suggested time.

After a night in the fridge, I used an ice cream scoop to form the set cheesecake into rough balls, and put them into the freezer for half an hour before reshaping them a bit. They still came out looking a bit…ummm….individual. Not that that’s a bad thing! The sticks are really wooden craft sticks (I had no luck finding the paper ones here), and I loved their fun colors. The packet said non-toxic, so let’s just hope that’s right!

I’m not embarrassed to say that hundreds and thousands are my favorite cake decoration! Just looking at them makes me smile!

I decided to roll a couple in some almond cookie crumbs mixed with a little cinnamon to get kind a cheesecake crust thing going on. In the center of these ones, I managed to hide a blob of strawberry jam. Sneaky!

The cuteness factor is unbelievable, and they taste pretty good too! Just what I needed put myself into a cheesecake mood! Thanks Deborah and Elle! You can find the recipe for the pops on Deborah’s site. I’ve looked at a bunch of posts, and the DBers did a beautiful job this month, so please check out the DB blogroll!
Speakeasy Cake
April 26, 2008 at 3:20 pm | Posted in book review, cakes & tortes, sweet things | 14 Comments
Here’s the third recipe I made from Melissa Murphy’s cookbook The Sweet Melissa Baking Book (well actually the fourth–the ice cream in the photos is her brown sugar vanilla ice cream, and it is divine). It’s a dense, moist chocolate cake that she calls the “Speakeasy” because of a whopping 2/3 cup of brandy in the batter!
It’s a cousin of Dorie’s Almost-Fudge Gâteau, but not quite as dark and fudgy. If you prefer semi-sweet chocolate to bittersweet (and like a little booze with your chocolate), then you will like this one.

Speakeasy– makes one 8-inch cake
from The Sweet Melissa Baking Book by Melissa Murphy. All rights reserved. Copyright © Melissa Murphy, 2008
For the cake:
6 ounces best-quality semisweet (58%) chocolate
10 tablespoons unsalted butter
2/3 cup brandy
4 large eggs
1 1/3 cups sugar
1 cup plus 1 tablespoon all-purpose flour
1 teaspoon ground cinnamon
¼ teaspoon salt
For the chocolate glaze:
6 ounces best-quality semisweet (58%) chocolate
½ cup heavy cream
1 tablespoon light corn syrup
Before you start:
Position a rack in the center of your oven. Preheat the oven to 350°F. Lightly butter an 8 x 2-inch round cake pan. Line the bottom with an 8-inch round of parchment paper.
To make the cake:
– In a medium bowl set over a pot of simmering, not boiling, water, melt the chocolate with the butter and whisk until smooth. Whisk in the brandy until smooth. Set aside to cool.
-Separate the eggs. Place the yolks in a large mixing bowl, and the whites in an electric mixer bowl.
– Add half of the sugar to the bowl with the yolks and whisk until thick. Add the chocolate mixture to the yolks and whisk to combine. Sift the flour, cinnamon, and salt over the chocolate batter and stir to combine.
-In the bowl of the electric mixer fitted with the whip attachment, make a meringue by whipping the egg whites until foamy. In a slow steady stream, add the remaining sugar. Whip until the whites hold stiff but not dry peaks.
-Briskly stir one-third of the meringue into the chocolate mixture to lighten the batter. Gently fold the remaining two-thirds of the meringue into the batter until no streaks remain.
– Pour the batter into the prepared pan. Spin the pan to level the batter. Bake for 80 to 90 minutes, or until a wooden skewer inserted into the center comes out clean. (Do not do the skewer test until the cake has been baking for at least 70 minutes or you will deflate the batter!) Remove to a wire rack to cool before glazing. (Steph’s note: I made a half-recipe in a 6-inch cake pan and it took only 40 minutes to bake.)
To make the glaze:
– When the cake is cool enough to glaze, coarsely chop the chocolate and place it in a medium bowl.
-In a small saucepan over medium heat, heat the heavy cream until scalding, or until the cream is steaming and tiny bubbles have formed along the edges. Do not boil.
-Pour the hot cream over the chocolate. Let stand for 5 minutes, then whisk until smooth. Stir in the corn syrup.
To complete the cake:
-Place the cake upside down on a rack set over the prepared cookie sheet.
-Pour the glaze over the cake, letting the glaze spread itself. You may have to push it over the sides a bit, and use a small metal spatula or butter knife to smooth the sides. Try not to touch the top though, so it will be glossy and unmarred. Let the glaze set at room temperature for at least 30 minutes. Once the glaze is set, transfer the cake to a serving plate.
*The cake keeps in a cake saver at room temperature for 2 days. For longer storage, refrigerate for up to 1 week.
Tuesdays with Dorie: Bill’s Big Carrot Cake
April 22, 2008 at 5:08 am | Posted in cakes & tortes, groups, layer cakes, sweet things, tuesdays with dorie | 47 Comments
Carrot cake with cream cheese frosting…I probably don’t need to say much more than that.
But of course I will. Carrot cake is a favorite here, but not made nearly enough, so I was glad when Amanda of slow like honey gave me the excuse I needed to get grating, by choosing Bill’s Big Carrot Cake as this week’s TWD recipe. This one is *big* and loaded with carrots (of course), coconut, walnuts and dried cherries.
As per usual, I set out to do a half recipe of this cake, only to realize that I don’t have three 6-inch cake pans. Crud. I thought about making two larger layers and possibly splitting them into four, or using my 6-inch springform as the third pan, but I decided that this amount would probably fit perfectly into my quarter-sized sheet pan (my favorite and most useful sheet pan). So instead of a round cake, I baked a sheet cake that I cut into three strips (the baking time was reduced, of course). Once layered up with icing, it made a rectangular cake that I could cut into thin slices or chubby squares.

Armed with some tips from a great post by Joy, I made a gorgeous cream cheese frosting. I flavored mine with vanilla bean paste and orange zest, rather than the lemon juice that Dorie uses. This cake is tall, and moist and delicious…a winner of a carrot cake. And since I just did a half recipe, I made the whole thing, cake and frosting, easily by hand.
You can find this recipe in Baking: From My Home to Yours by Dorie Greenspan, and on slow like honey. Thanks Amanda, and of course thanks Bill! Now go check out the TWD Blogroll!
Mom’s Banana Apple Bread
April 20, 2008 at 5:35 pm | Posted in book review, breakfast things, cakes & tortes, events, muffins/quick breads, simple cakes, sweet things | 58 Comments
Well, not my mom’s. I’m guessing Melissa Murphy’s mom’s, since it’s in her new cookbook The Sweet Melissa Baking Book. You know, I really don’t like bananas in their raw form (not even in smoothies), but once they are baked into something sweet, it’s a whole ‘nother story. R does like to have bananas in his cereal, but sometimes he buys more than he can eat. When that happens, I wrap them up and stash them in the freezer…after I’ve accumulated a few, it’s time for banana bread, cake or muffins!
What makes this particular banana bread extra-special are the bits of caramelized apple throughout. Most banana bread has a pretty good shelf life and can even get better after a day of so. This one is no exception, as the sweet apples just meld more into the spiced bread.
I was so happy with this, that I’m entering it into Sydneysider Not Quite Nigella’s Banana Bread Bakeoff event. If you have a favorite banana bread recipe, go check out her bakeoff, too.

Mom’s Banana Apple Bread– makes one 1 1/2-quart loaf pan
from The Sweet Melissa Baking Book by Melissa Murphy. All rights reserved. Copyright © Melissa Murphy, 2008
For the apples:
2 tablespoons unsalted butter
3 tablespoons firmly packed dark brown sugar
2 Granny Smith apples, peeled, cored, and cut into 1/2-inch pieces
½ teaspoon ground cinnamon
½ teaspoon pure vanilla extract
For the banana bread:
2 cups all-purpose flour
1 teaspoon baking soda
½ teaspoon ground cinnamon
¼ teaspoon ground cloves
¼ teaspoon freshly ground nutmeg
½ teaspoon kosher salt
8 tablespoons (1 stick) unsalted butter
1 cup granulated sugar
2 large eggs
¼ cup fresh orange juice
1 teaspoon pure vanilla extract
1 ¼ cups very ripe mashed bananas (2 to 3)
Before you start:
Position a rack in the center of your oven and preheat the oven to 350°F. Lightly butter and flour a 1 1/2-quart loaf pan.
To make the apples:
Preheat a medium skillet over medium-high heat. Add the butter and brown sugar and heat until bubbling. Add the apples and cinnamon and sauté until golden and tender, about 5 minutes. Stir in the vanilla. Remove from the heat and set aside to cool.
To make the banana bread:
-In a medium bowl, whisk together the flour, baking soda, cinnamon, cloves, nutmeg, and salt.
-In the bowl of an electric mixer fitted with the paddle attachment, cream the butter and sugar until light and fluffy, 1 to 2 minutes. Add the eggs, one at a time, mixing well after each addition. Scrape down the sides of the bowl.
-In a small bowl, combine the orange juice and vanilla.
-Add the flour mixture to the butter mixture in three batches, alternating with the orange juice mixture, mixing well after each addition. Scrape down the sides of the bowl after each flour addition. Stir in the mashed bananas until combined. Then stir in the reserved apples.
-Pour the batter into the prepared loaf pan. Bake for 55 to 60 minutes, or until a wooden skewer inserted into the center comes out clean. Remove to a wire rack to cool for 20 minutes before unmolding onto the rack to cool further.
*Serve slightly warm or at room temperature. The banana bread keeps well wrapped in plastic wrap at room temperature for up to 3 days. For longer storage, freeze well wrapped in plastic wrap and then aluminum foil for up to 3 weeks. Defrost (still wrapped) at room temperature.
TWD Rewind: Gooey Chocolate Cakes
April 11, 2008 at 12:55 pm | Posted in cakes & tortes, groups, sweet things, tuesdays with dorie | 11 Comments
This cake was not too photogenic, but it sure was delicious. While I was away, the Tuesdays with Dorie gang, led this time by Leigh of Lemon Tartlet, made Dorie Greenspan’s Gooey Chocolate Cakes. I knew I wanted to whip them up myself as soon as I was back home. And poor R hadn’t had a homemade dessert in weeks, so a little chocolate gooeyness seemed like a good place to start.
In her opening description, Dorie notes that these cakes are fairly ubiquitous at this point. In fact, at one restaurant where I used to work, we had a very similar molten cake on our menu for private parties. We’d do up giant batches (sometimes over 100, depending on the size of the party) of individual ones, also using disposable aluminum cups as Dorie suggests. Here, quantities were a bit more manageable…I only made two!
If you’d like to make up these little ultra-chocolatey cakes yourself (and it’s easy, I promise!), the recipe is on Lemon Tartlet and in the book Baking: From My Home to Yours by Dorie Greenspan.
Baked Fresh Weekly

Blog at WordPress.com.
Entries and comments feeds.
