CH#5: Cappuccino Cupcakes
January 21, 2008 at 11:11 am | Posted in cupcakes, events, sweet things | 25 Comments
In my dream life, I spend my mornings sipping cappuccinos in a café while reading The New Yorker and watching the world go by. In my real life though, The New Yorkers pile up on the kitchen table, and a cappuccino is a rare treat usually consumed on the go. Laurie of Quirky Cupcake had her husband, Jaos, pick Cupcake Hero’s theme this month. He chose coffee, so I thought I’d celebrate my favorite morning drink in cupcake form.
Now, I heard that Jaos likes his cupcakes kept simple, and since it is his birthday (happy 29th!), I kept that in mind. This is a simple little cupcake (no filling this time), but it has great flavor, thanks to a double shot of espresso in the batter. A little bit Kahlúa soaking syrup boosts the flavor and keeps them really moist. The “foam” on top is just whipped cream, sweetened and flavored with an extra splash of Kahlúa. And finally, because I like cinnamon and coffee, I sprinkled a bit on top. I made a small batch of just six cupcakes, but the recipe could easily be doubled for a whole tin.

Cappuccino Cupcakes– makes 6 regular-size cupcakes
-Start with a batch of Kahlúa syrup (recipe below).
-Bake the espresso cupcakes (recipe below). Lightly brush warm cupcakes with Kahlúa syrup, then cool completely.
-Whip some cream, sweetening to taste and adding a splash of Kahlúa (or other coffee liqueur) to flavor. Note that, because whipped cream doesn’t keep well, it’s best to just top the cupcakes you will be eating that day. If you have extras, make new whipped cream to top them as needed.
-Top with whipped cream and garnish with a sprinkle of cinnamon.
Kahlúa Syrup– makes more than you will need, but keeps for a long time and has many uses (like sweetening iced coffee)
1 cup sugar
3/4 cup water
splash of Kahlúa, or other coffee liqueur
-Combine sugar and water in a small saucepot. Mix gently with your finger so sugar isn’t stuck to bottom or corners of pot. Try not to get a lot of sugar on the sides of the pot above water level (cooking time is short, so it shouldn’t crystallize, but just to be safe…)
-Bring just to a full boil, at which point all the sugar should be dissolved. Shut off heat and add in a splash of coffee liqueur to taste.
-Transfer to a jar or airtight plastic container for storage. This will keep in the refrigerator for weeks.
Espresso Cupcakes– makes 6 regular-sized cupcakes
1/2 c plus 3 T all-purpose flour
1/4 t plus 1/8 t baking powder
pinch of salt
3 T brewed espresso, cooled to room temperature
1 T milk
1/2 t instant espresso powder
2 oz butter, room temperature
1/2 c sugar
1 egg
-Preheat the oven to 350°F/180°C and line a muffin tin with six paper cups.
-Whisk together the flour, baking powder and salt. Set aside.
-Combine the espresso and milk. Dissolve the instant espresso powder in the mixture and set aside.
-Cream the butter and sugar in a large mixing bowl until smooth, fluffy and pale. Add the egg, beating well.
-Add the dry ingredients and espresso mixture in three parts, alternating and beating smooth after each addition. Add the liquid additions a little at a time to avoid splitting the batter.
-Divide the batter among the paper cups, and cook for about 20-25 minutes, until a toothpick comes out clean. Cool in the tins for a few minutes and then transfer to a rack to cool completely.
Daring Bakers in December: Yule Log
December 22, 2007 at 9:25 am | Posted in cakes & tortes, daring bakers, groups, sweet things | 54 Comments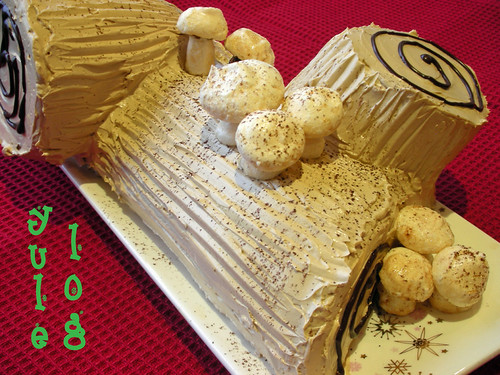
‘Tis the season…to eat cake shaped like tree branches! I love holiday baking (wish I’d gotten to do more of it this year) and I absolutely love yule log, or Bûche de Noël. If you were wondering what the Daring Bakers would be up to for the holidays, this is it! Or hosts, the co-founders of the group, Ivonne and Lisa chose a yule log, a symbol of light and warmth for this month’s challenge.

A Bûche de Noël is usually a genoise sponge cake rolled up with a filling, cut to resemble a log and frosted with buttercream. Then it gets all kinds of slightly wacky decorations. Mushrooms are a traditional yule log decoration. Don’t worry–I’m taking about sweet sugar mushrooms! We were able to chose to make our ‘shrooms from either meringue or marzipan. Not being a huge marzipan fan, I went the meringue route. I dusted them with cocoa and a little gold luster dust. My log came from a magical, sparkley forest!

I have made a couple of yule logs in the past, so I knew the general drill. The genoise sponge we used was slightly different from ones I’ve made in the past. This one had no butter and used cornstarch…more like a ladyfinger recipe I’ve used many times. I decided to keep my sponge plain in flavor, but I was worried it would dry out in the fridge, so I soaked it with a rum simple syrup before rolling it. We had to use coffee buttercream to frost the cake (which was fine by me), and it was made Swiss-meringue style.
I didn’t have any real problems making the yule log. The most difficult part was deciding on a filling, as we could chose whatever we wanted to roll our cakes up with. I decided to do a chocolate mousse filling. It set up nicely and went well with the coffee and rum flavors in the other components. Decorating the cake was a lot of fun, and we certainly had no difficulty eating it up!

I am flying to the States today for the holidays. I’m very excited about the trip, but it means I may not be able to comment on as many of my fellow DBer’s posts as I would like. I apologize for that, but do check out the Daring Bakers’ blogroll and see all the beautiful Bûche that were made! Ivonne has the recipe on her site. Happy holidays!

CH#4: Minty Chocolate Cupcakes
December 17, 2007 at 10:02 pm | Posted in cupcakes, events, sweet things | 19 Comments
Mint is a really friendly herb. It gets along with so many things…coconut, almond, citrus, berries, melon, blah blah blah. So when Laurie of Quirky Cupcake announced that this month’s Cupcake Hero theme is mint, I really had a hard time deciding what to pair it with. In the end, I maybe went with the most predictable thing–chocolate– but only because I love it so.
The combination of chocolate and mint around the holidays makes me think of Andes mints. My mum rarley bought us candy, but for some reason every Thanksgiving and Christmas, she’d bring out Andes with dessert. My brother and I would go nuts and eat them by the dozen, accumulating a huge mound of the shiny green wrappers next to our plates. I haven’t had them in at least a decade…I wonder if they would taste so good to me today. They probably would.
I made a plain chocolate cupcake, from a recipe (called “Peerless Chocolate Cake”) in The Fannie Farmer Baking Book that I have made a zillion times. I worked the mint flavoring into both a white chocolate whipped ganache frosting and a pudding filling. For the ganache, I infused a bunch of fresh mint into the cream. I swirled a couple drops of red gel coloring gently through the finished frosting before putting it into a piping bag in hopes that it would look a little candy cane-like.

For the pudding, I’m not embarrassed to admit to taking a shortcut (hey–cupcakes should be easy, right?). I have this giant tub of Bird’s custard powder in my pantry from when I made Nanaimo bars. I followed instructions on the package to make what I needed for filling, and then mixed in some melted bittersweet chocolate and a couple drops of mint extract. At that point, it tasted pretty good on its own. You could use any brand of packaged mix, or make homemade if you can’t stand the thought of it.

This cake recipe makes a great cupcake. And mint and chocolate really are perfect together. The frosting had an earthy mint flavor from the fresh herbs, while the pudding had a snappy mintiness to it.
Natalie from Bake and Destroy! is co-hosting with Laurie this month. Thanks Natalie and Laurie…I’m looking forward to the round-up!
Minty Chocolate Cupcakes– makes 12 regular-size cupcakes
-Make and chill some minty chocolate pudding, using your favorite chocolate pudding recipe with mint extract added to taste, or prepare custard powder according to package instructions, flavoring with melted chocolate and mint extract.
-Bake and cool a batch of chocolate cupcakes (recipe below).
-Make the minty white chocolate whipped ganache frosting (recipe below).
-To fill the cupcakes, use a small knife or round cookie cutter to cut a plug out of the center of each (going in from the top). Save the top bit of each plug. Fill each cavity with minty chocolate pudding. Cover with the top bit so the filling is not exposed.
-Top with whipped ganache and decorate as you see fit.
Chocolate Cupcakes– makes 12 regular-sized cupcakes
adapted from Marion Cunningham’s The Fannie Farmer Baking Book
1.5 oz unsweetened chocolate
1/4 c water
1 c plus 2 T all-purpose flour
1/2 t baking soda
1/4 t salt
1/2 c butter, softened
3/4 c sugar
2 eggs, separated
1/2 t vanilla extract
1/2 c buttermilk
-Preheat the oven to 350°F/180°C and line a muffin tin with paper cups.
-Combine the chocolate and water in a small saucepan. Over medium heat, stir until chocolate is melted and mixture is smooth. Set aside to cool.
-Sift together the flour, baking soda and salt. Set aside.
-Cream the butter and sugar in a large mixing bowl until smooth and well-blended. Add the egg yolks, one at a time, beating well. Add the vanilla and chocolate mixture and beat until blended. Add the sifted dry ingredients and buttermilk in three parts, alternating and beating smooth after each addition.
-In a separate mixing bowl, beat the egg whites until they are stiff but not dry. Gently stir one-third of the beaten whites into the batter. Fold in the remaining whites.
-Divide the batter among the paper cups, and cook for about 20 minutes, until a toothpick comes out clean. Cool in the tins for a few minutes and then transfer to a rack to cool completely.
Minty White Chocolate Whipped Ganache– makes enough to generously frost 12 cupcakes
1 cup heavy cream
couple handfuls of fresh mint leaves, picked from stems
7.5 oz white chocolate, finely chopped
7 T butter, very soft
-Put mint leaves in a medium bowl. Bring cream to a simmer in a small saucepot. Pour hot cream over the mint leaves and let stand until room temperature to infuse.
-Strain the cream into a measuring cup, pressing gently on the leaves to extract as much cream as possible. Discard the leaves. Measure the infused cream…if you have less than 1 cup, add cold cream to make up the difference.
-Put chopped white chocolate in a medium bowl. Reheat the cream to a simmer in a small saucepot. Pour hot cream over the chocolate and let stand for 5 minutes to begin to melt. Gently whisk chocolate and cream together to form a perfectly smooth ganache. If the taste of mint is not strong enough for your tastes, you can boost it with a couple drops of mint extract.
-Cover and refrigerate for about 45 minutes, until the ganache is cool and begins to firm up, but is still soft enough to whip.
-By hand with a whisk or with an electric mixer, whip until fluffy frosting consistency. Whip in the soft butter, piece by piece. If it starts to look split (mine did), chill it a couple more minutes and it should come together with a bit more persistent beating.
CH#3: Cranberry Bliss Cupcakes
November 30, 2007 at 2:47 am | Posted in cupcakes, events, sweet things | 26 Comments
A couple of months ago, my cherry lime rickey cupcakes were chosen buy Quirky Cupcake Laurie as the winner of the first-ever Cupcake Hero event! What an honor! Unfortunately, I wasn’t able to come back and defend my title for last month’s clove edition. I did make two different types of cupcakes for it and both were awful! Well, I’ve put that mess behind me and come back with a vengeance for this month’s event with a cranberry theme.
My inspiration for these cupcakes is the Cranberry Bliss bar that Starbucks sells around the holidays. Yes, even in Australia you can find these in the display case at this time of year. If you are a seasoned Cranberry Bliss bar eater, you will probably recognize me for the fraud that I am. I have never had one…don’t even know what’s actually in one. So this is a loose interpretation, containing things that I think are blissful with cranberries!

I seem to be a fan of filled cupcakes lately (there were the rickeys, the Bostinis and the linzers), and I knew I wanted to make a cupcake that would be filled with Thanksgiving-style cranberry sauce. I actually even used my leftover sauce for this! The bar from Starbucks has a cake or cookie base that looks to contain brown sugar, so I went poking around for a brown sugar cupcake recipe. I found one from Nigella, the beautiful Domestic Goddess, for burnt butter brown sugar cupcakes. I liked the sound of that–brown butter gives beautiful flavor to baked goods. I also liked that the batter is quickly blitzed together in the food processor…not a lot of technique involved there.
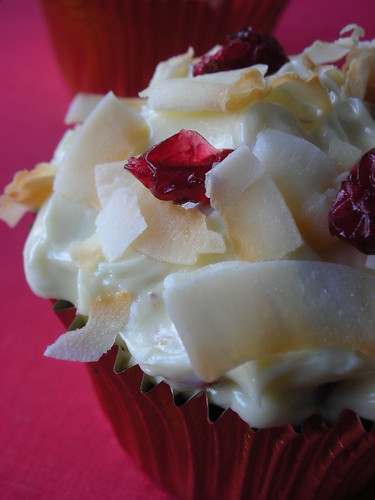
The Bliss bars also appear to have a white chocolate topping, so after baking and filling my cupcakes, I frosted them with a white chocolate whipped ganache, into which I had folded toasted pecans and dried cranberries. I sprinkled some toasted unsweetened coconut flakes and more dried cranberries over the top to finish. Lush! The tart cranberries really balance out the sweet frosting and cake. And the next day, cold out of the fridge, OMG! My brother declared the cold cupcake to be “f-ing amazing” (please excuse his language).
I don’t find the pictures of cupcake insides to be all that appealing, but here’s a picture of the “guts” anyway…

Thanks, Laurie, for another fun event! Can’t wait to see December’s theme!
Cranberry Bliss Cupcakes– makes 12 regular-size cupcakes
-Make and chill the cranberry sauce filling (recipe below).
-Bake and cool a batch of burnt butter brown sugar cupcakes (recipe below).
-Make the white chocolate whipped ganache frosting and flavor it with pecans and dried cranberries (recipe below).
-To fill the cupcakes, use a small knife or round cookie cutter to cut a plug out of the center of each (going in from the top). Save the top bit of each plug. Fill each cavity with cranberry sauce filling. Cover with the top bit so the filling is not exposed.
-Top with whipped ganache and garnish with lightly toasted unsweetened coconut flakes and more dried cranberries.
Cranberry Sauce Filling– makes about 1 cup
just under 1/2 cup sugar
just under 1/2 cup water
2 t orange zest
pinch of salt
6 oz whole cranberries, fresh or frozen
-Bring sugar, water, orange zest and a pinch of salt to a boil in a medium saucepot. Reduce the heat to a simmer and add in the cranberries.
-Simmer about 10 minutes, stirring occasionally until the cranberries pop.
-Transfer to a nonreactive bowl and cool to room temperature. Refrigerate until using.
Burnt Butter Brown Sugar Cupcakes– makes 12 regular-sized cupcakes
modified from Nigella Lawson’s How to be a Domestic Goddess
1/2 cup plus 2 T unsalted butter
3/4 cup self-rising cake flour
3 T sugar
5 T brown sugar (I used dark, but light would be fine, too)
2 large eggs
1 t vanilla bean paste (can substitute vanilla extract)
1 t baking powder
pinch of salt
2-3 T milk
-Preheat the oven to 400°F/205°C and line a muffin tin with paper cups.
-To brown the butter, put it in a small saucepan on medium heat, leaving it until it turns light golden and has nutty-colored brown bits on the bottom (will only take a couple of minutes). Take the pan off the heat and pour the butter into a bowl or cup, scraping the brown bits (if you have accidentally gotten your butter too dark, strain it, leaving the dark sediment behind). Let the butter begin to solidify again, but you need it to remain soft for the cupcakes. You can do this by either leaving it at room temperature, which will take awhile, or putting it in the fridge for about 10 minutes. You want it to be the consistency of regular softened butter.
-When the butter is solid but still soft, put all the cake ingredients except the milk in a food processor and blitz to a smooth batter. As normal, add the milk down the funnel, pulsing sparingly to form a soft, dropping mixture.
-Divide among the paper cups, and cook for 15-20 minutes. FYI, this does not make much batter, and the cups will not be very full. Don’t worry, as the combination of self-rising cake flour and baking powder give it a lot of oomph in the oven. They should rise to normal cupcake size!
White Chocolate Whipped Ganache with Pecans and Cranberries– makes enough to generously frost 12 cupcakes
7.5 oz white chocolate, finely chopped
1 cup heavy cream
7 T butter, very soft
handfull toasted pecans, cooled and roughly chopped
handfull dried cranberries
-Put chopped white chocolate in a medium bowl. Bring cream to a simmer in a small saucepot. Pour hot cream over the chocolate and let stand for 5 minutes to begin to melt. Gently whisk chocolate and cream together to form a perfectly smooth ganache.
-Cover and refrigerate for about 45 minutes, until the ganache is cool and begins to firm up, but is still soft enough to whip.
-By hand with a whisk, whip until fluffy frosting consistency. Whip in the soft butter, piece by piece. If it starts to look split, chill it a couple more minutes and it should come together with a few more strokes. Don’t overbeat the frosting, however, or it may make it too firm.
-Gently fold in pecans and dried cranberries before topping the cupcakes.
Raspberry Cheesecake
November 15, 2007 at 5:16 pm | Posted in cakes & tortes, cheesecakes, sweet things | 25 Comments
For my final project with the homemade graham cracker crumbs in my freezer, I decided to bake cheesecake. It had been forever since I had made or even eaten cheesecake, and luckily Philly is sold over here, so it sounded like a good plan. And I thought I would make it pink by adding some raspberries.

I started with a recipe for blueberry swirl cheesecake from Donna Hay’s Modern Classics Book 2, which I’ve made several times and particularly like because the mixture comes together lump-free in the food processor. Then I added a vanilla bean to the cream cheese mixture, changed the fruit swirl to raspberry, changed the base and changed the baking method. Now is it my own recipe? I think so.

Raspberry Cheesecake- makes a 6-inch cake
Note: If you want some extra sauce to top your finished cheesecake, make a double batch of the raspberry swirl sauce. Then use half in assembling your cheesecake and save the remaining half in a jar in the fridge for when you serve the cake.
for the base:
2-3 T unsalted butter, melted
2 T sugar
1/8 t cinnamon (optional)
pinch of salt
3/4 cup graham cracker crumbsfor the raspberry swirl:
110 g fresh or frozen raspberries
2 T sugar
small splash of water
for the filling:
300g cream cheese, softened
1/4 cup plus 2 T sour cream
1 egg
1/2 cup superfine sugar
seeds from 1/2 vanilla bean
-for the crust: Preheat oven to 350°F/180°C. Combine melted butter, sugar, cinnamon, salt and crumbs in a bowl. Press into the botton of a 6-inch springform pan and bake for about 10-15 minutes. Cool crust slightly.
-for the raspberry swirl: In a small pan over medium low heat, gently cook the raspberries with the sugar and water until the berries begin to break down, the sugar has dissolved and the mixture has thickened a bit. Squish up the berries a little and push the mixture through a sieve to remove the seeds. Set aside to cool.
-for the filling: Process the cream cheese in a food processor until smooth (don’t forget to scrape!). Add the sour cream, egg, sugar and vanilla bean seeds and process until smooth and fully combined.
-to assemble: Brush sides of the springform with a little softened butter. Wrap the outside of the pan with a double layer of foil. (The cake bakes in a water bath, and doing this will help keep water from seeping into the cake as it cooks.) Pour the filling over the graham cracker base. Drizzle the raspberry sauce over and swirl gently with a butter or pairing knife. Create a water bath by placing the cake tin in a slightly larger roasting pan or baking dish. Carefully pour hot water halfway up the sides of the springform. Bake at 280°F/140°C for a little over an hour, until the edges look set but the center jiggles slightly. Let cool on a rack, then cover and refrigerate for several hours before serving.
Leftover Bostini Cream Cupcakes
October 31, 2007 at 6:58 am | Posted in cupcakes, sweet things | 12 Comments
Boy, even though I scaled back that Bostini cream pie recipe I made along with the Daring Bakers, I still had a ton of stuff leftover! Enough to make Bositini cream cupcakes! I had baked my chiffon cakes in a muffin tin, so they were in cupcake form already. I just cut a bit out from the center of each, filled them with leftover custard and topped them with glaze that had cooled to frosting consistency.

I may be too old to knock on doors for candy, but I still like Halloween treats!
Daring Bakers in October: Bostini Cream Pie
October 29, 2007 at 12:07 am | Posted in cakes & tortes, daring bakers, groups, sweet things | 64 Comments
“Hey– don’t you mean Boston cream pie?” you ask. I know I’m a lousy typist, but I do in fact mean Bostini. It is, of course, a take on the traditional Boston cream pie, created by Donna Scala and Kurtis Baguley of Bistro Don Giovanni and Scala’s Bistro in Northern California– an orange-flavored chiffon cake sitting on a bed of vanilla custard and topped with chocolate glaze. Our Daring Baker hostess this month is Mary from Alpineberry, and since she first tried it about 12 years ago, Bostini cream pie has been one of her restaurant favorites. From what Mary whips up in the kitchen I’d say she has impeccable taste, so I was certainly excited to try this when I saw she had chosen it as the October challenge.
Once I got the ingredients together (a whole farm’s worth of eggs and dairy!), the recipe came together pretty easily. No troubles with the cake (I recommend squeezing the orange juice yourself for best flavor and whipping the egg whites by hand to avoid overbeating), and the custard thickened up quickly thanks to the cornstarch. The glaze couldn’t have been easier– just melted chocolate and butter.

This dessert is assembled in a ramekin or custard cup at the restaurants, but we were allowed to play with presentation, provided we didn’t stray from the ingredient list or basic concepts. I thought about putting it together in a wine glass or bowl, but wanted to put some cute new teacups to use, so I really didn’t play too much. I baked my chiffon cakes in a muffin tin rather than using the same cups I assembled the cake in (as the recipe instructed). I don’t know if my teacups are oven-proof, and didn’t want to chance blowing them up the first time I used them! Also, I liked that the muffin-sized cakes were a bit smaller than the cups, so that all the drippy glaze could run into the custard instead of just down the outside of the cups.

Boston cream pie is R’s number one dessert, and he really liked this version of it. And my brother, who is visiting from Seattle, just loved the custard. I am one of those weirdos who doesn’t like the combination of fruit and chocolate, but the orange flavor was pretty subtle and fresh, so I didn’t mind it here. This dessert is super-rich, so you can get away with a small portion, even though the recipe yields quite a lot. (I actually halved the custard and glaze amounts. I made the full recipe of cake and froze what we didn’t eat right away.) As you can see from the top picture, my oranges were larger than my dessert, and it was plenty!
Thanks to Mary for picking another winning DB challenge! You can check out the recipe over on her site. Don’t forget to look at all the other Bostinis out there by visiting the Daring Bakers’ Blogroll. From some sneak previews I’ve seen, they look pretty good…
Cupcake Round-Up 2: Linzer Cupcakes
October 19, 2007 at 4:57 pm | Posted in cupcakes, events, sweet things | 12 Comments
I always like making the traditional versions of my favorite classics, but I’m game for a bit of a switch-up, too. Reinvention using seasonal ingredients is actually the theme for the second Cupcake Round-Up, co-hosted by two cupcake bakers extraordinaire: Garrett of Vanilla Garlic and Cheryl of Cupcake Bakeshop. Inspired by a packet of raspberries in the fridge, I thought the flavors of a linezrtorte would translate well into a cupcake.
I admit I’m a little confused about seasonality here in Australia. Things that I would never think I would find at certain times of the year pop up in the framers’ market unexpectedly. And some things, like rhubarb, seem to be widely available year-round. I have started to see Aussie raspberries, while still outrageously priced (I’ve had to get used to the fact that produce in general is much more expensive here than in the US), being sold for about half the super-outrageous price they were sold for a couple of months ago. Based on cost, I have decided that raspberries must at least be coming into season (it is almost summer here). I haven’t had a fresh raspberry since I moved here nine months ago, so I bought a packet.
I began my little linzer cuppies with a recipe for hazelnut cake from Gina DePalma, pastry chef of the excellent Babbo Restaruant in Manhattan. As written below, I tweaked it a bit to incorporate some of the other flavors found in a linzertorte (and to use up some sour cream I had in the fridge), but if you want Chef DePalma’s original recipe, you can find it here on Babbo’s website. The recipe, originally for a single 8″ round, makes twelve perfect cupcakes…I was so pleased. I made sure they stayed moist with a little douse of simple syrup and filled them with fresh raspberries. Topped off with raspberry buttercream and garnished with more fresh berries and candied hazelnuts, they were every bit as good as the real thing, and without any fussy lattice work or soft dough.

The cupcakes take several steps, although none are hard. But, if it’s one of those days, and you don’t feel like futzing with buttercream and candied nuts, everyone will still love you if you do a simplified version…

Linzer Cupcakes– makes 12 regular-size cupcakes
Note: If you don’t have seedless raspberry jam for this recipe, just press jam with seeds through a strainer to remove. Or if you want the seeds, use seeded jam instead.
-Start with a batch of simple syrup (recipe below).
-Bake the hazelnut cupcakes (recipe below). Lightly brush warm cupcakes with simple syrup, then cool completely.
-Make and cool the candied hazelnut garnish (recipe below).
-Make the raspberry buttercream (recipe below).
-Prep the fresh raspberries. Depending on size, estimate 3 or 4 raspberries for filling each cupcake, plus extras for decoration. Loosen few tablespoons (or as much as needed to coat your berries) of raspberry jam with a squirt of lemon juice. Toss the raspberries into the jam, turning them to coat. Keep them whole– try not to smash them up.
-To fill the cupcakes, use a small knife or round cookie cutter to cut a plug out of the center of each (going in from the top). Save the top bit of each plug. Spoon a small amount (about 1/4 teaspoon) of simple syrup into each cavity. This is just to keep the cakes moist…don’t drown them. Put a few jammy raspberries into each cavity. Cover with the top bit so the filling is not exposed.
-Top with buttercream and garnish with candied hazelnuts and jam-coated raspberries.
Simple Syrup– makes more than you will need, but keeps for a long time and has many uses
1 cup sugar
3/4 cup water
-Combine sugar and water in a small saucepot. Mix gently with your finger so sugar isn’t stuck to bottom or corners of pot. Try not to get a lot of sugar on the sides of the pot above water level (cooking time is short, so it shouldn’t crystallize, but just to be safe…)
-Bring just to a full boil, at which point all the sugar should be dissolved. Shut off heat.
-Transfer to a jar or airtight plastic container for storage. This will keep in the refrigerator for weeks.
Hazelnut Cupcakes– makes 12 cupcakes
adapted from a recipe by Gina DePalma
Note: If you can’t find hazelnut flour in stores, you can make your own by toasting 1 cup of skinned hazelnuts for five minutes in a 350°F oven. Cool them completely and pulse them along with 1/4 cup all-purpose flour in the food processor until finely ground but not pasty. Substitute this mixture for the hazelnut flour in the recipe and only use 1 cup of all purpose flour when proceeding with the third step (as the extra 1/4 cup is already accounted for in your hazelnut flour mixture).
1 cup hazelnut flour
1 ¼ cups unbleached, all-purpose flour
10 T (1 ¼ sticks) unsalted butter, softened
¾ cup sugar
1 t ground cinnamon
1/4 t ground cloves
1 1/2 t lemon zest, finely grated
2 T hazelnut paste or hazelnut butter
3 eggs
1/4 cup sour cream
1 t vanilla extract
½ t kosher salt
1 t baking powder
-Preheat the oven to 325°F. Line your cupcake tin with paper liners.
-In a small bowl or liquid measuring cup, lightly whisk together the eggs and sour cream.
-In the bowl of an electric mixer, cream together the butter and the sugar until very light. Beat in the spices and lemon zest first, followed by the hazelnut paste or hazelnut butter. Then gradually add the egg and sour cream mixture. Scrape down the sides with a rubber spatula and beat in the vanilla extract. In a small bowl, mix together the hazelnut flour, all-purpose flour, salt and baking powder. Beat the dry ingredients into the batter until just combined.
-Divide the batter evenly among the cupcake liners. Bake for 25 to 30 minutes, or until a cake tester inserted in the center comes out clean. Allow the cupcakes to cool in the tin for 10 minutes. Lightly brush tops with simple syrup while still warm. Then gently remove from the tin and cool completely on a rack.
Candied Hazelnuts
handful of skinned hazelnuts
simple syrup to coat (couple tablespoons probably)
-Preheat oven to 350°F.
-Pop hazelnuts in half by sticking the tip of a small sharp pairing knife into the tops of each one.
-Toss them with enough simple syrup to lightly coat (just to make shiny).
-Turn them into a small sheet pan or baking dish, keeping them in a single layer. Bake just until golden and simple syrup hardens, about 10 minutes.
-When cool enough to handle, separate them so they don’t stick together and cool completely.
Raspberry Buttercream– makes about 2 cups
adapted from Cook’s Illustrated’s recipe for vanilla buttercream in Baking Illustrated
2 large eggs
1/2 cup (3.5 oz) sugar
1 t vanilla extract
pinch of salt
8 oz unsalted butter, softened but still cool, cut into pieces
1/3 cup seedless raspberry jam, loosened with a squirt of lemon juice
1/4 t cinnamon
-Bring a few inches of water to a simmer in a medium saucepot. In the bowl of a standing mixer, whisk together the eggs, sugar, vanilla and a pinch of salt. Set the bowl over the simmering water (making a double boiler). Whisk gently but constantly until the mixture reaches 160°F. It should be thin and foamy.
-Transfer the bowl to the mixer and whip until light, airy and room temperature. This should take about five minutes. Reduce the speed and whip in the butter, piece by piece. If it looks curdled halfway through, it should come together as you add the remaining butter.
-Once all the butter is incorporated, beat on high speed for about a minute until light and fluffy. Add the raspberry jam and cinnamon and beat until just incorporated. You can refrigerate, covered, for up to five days.
Leftover Lime Curd Tart
October 15, 2007 at 10:39 am | Posted in pies & tarts, sweet things | 10 Comments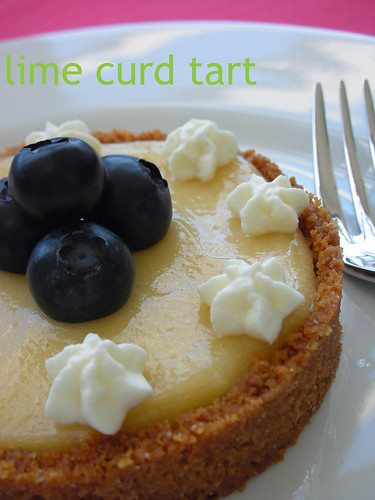
What you do when you’ve started a new job and are working your tail off and don’t have time to cook, bake or post (I will stop there otherwise this will just get all whiny)? You reincarnate what’s already kicking around in the fridge and then post about it two weeks later.
After eating our fill of cherry-lime rickey cupcakes at the end of September, I had a bit of the lime curd filling left. There were also those graham cracker crumbs that had been in the freezer for God knows how long (and even after this, I still have some in there!). I eyeballed a quick crumb crust using sugar and cinnamon to taste and enough melted butter to hold it all together, and then baked off a couple of mini tart shells. I filled the cooled shells with lime curd and added berries and whipped cream on top. Voilà– dessert made in record time.
Stop the Traffik: White Chocolate and Almond Tartufi
October 7, 2007 at 4:40 pm | Posted in events, ice creams & frozen, sweet things | 17 Comments
I haven’t always given as much thought as I do now about where my food comes from, but over the last few years I have tried to become a better educated and more responsible shopper and eater. This is not just in terms of nutrition and what is in my food, but also in terms who is growing, making and selling it, and what is involved in its production. When I saw that R khooks was hosting a Stop the Traffik Chocolate Competition to promote awareness of child labor on cocoa plantations, I definitely wanted to contribute a submission.
How do you know the cocoa beans in the chocolate you are buying haven’t been harvested by the hands of children or forced laborers? One way is to look for the fairtrade label, showing that the product complies with international standards regarding fair prices, labor conditions and environmental sustainability, among other things. There are several brands of fairtrade chocolate that are pretty easy to find, so I went to my local healthfood store to have a look. I saw an organic brand called Cocolo that I hadn’t tried before, and picked up a couple bars of their dark chocolate and a bar of white chocolate with almond crunch. Then I spent some time wondering what I’d do with them. I broke off a teeny sample of each. Truthfully, all white chocolate makes my teeth hurt a little, and eaten straight-up this one was no exception, but the crunchy almond bits were what attracted me to it. At 58%, the dark chocolate was a bit sweeter than I would normally use, but it was smooth and I knew I could put it to good use. My plan for the chocolates would take a couple days from start to finish, but I decided to make tartufi– delicious little balls of chocolate-coated ice cream with a cherry hidden in the center.

First I made a regular custard-style ice cream base, adding in chopped white chocolate and almond extract after it was off the heat. I like to make my base the night before I plan to spin my ice cream, so it can have time to chill really well before I use it. And since I don’t have a self-freezing ice cream machine I put my canister in the freezer at the same time. This way, every thing is good to go the next morning, and I can even churn the ice cream while I’m getting ready for work.
Once I had my white chocolate and almond ice cream made, I put it away to firm up before scooping. It’s a good idea to put a plastic lined sheet tray in the freezer as well, so you have a cold suface ready to go when you form your tartufi. It will take several hours of chilling before the ice cream will hold a round shape (although if you find you’ve jumped the gun and they get a bit melty, just put your ice cream scoops back in the freezer for a couple hours and gently reshape). About ten minutes before scooping, I macerated some drained canned dark cherries with a couple drops of almond extract. I used a spring-loaded 1 3/4-inch scoop to make nice round balls of ice cream, tucking a cherry into each one as I scooped. Then they went back into the freezer overnight.

While there is a lot of wait-time involved in making tartufi, the only challenging part is coating them in chocolate. I saw one recipe that advised skewering each tartufo with a toothpick and dunking them one-by-one in the melted dark chocolate. I managed this for my first one, but after that, the ice cream was sliding around on the toothpick and the chocolate was getting too cold. Potential disaster! On to plan B, which was using a couple spoons to gently coax the glaze onto each ball. There is also plan C, which is just to put a nice spoonful of glaze on top of each tartufo, and let it drip down around it. I did for that about half of my tartufi. While they were not completely encased in chocolate, they still looked pretty.
Made with lousy ice cream, tartufi can be pretty lackluster. But with great-flavored homemade ice cream, I can’t even tell you how *seriously fabulous* these are. And they taste even better knowing you have made them with fairtrade chocolate!

If you want to read more on cocoa production and fairtrade standards, here are a few places to start: Stop the Traffik, Fair Trade Certified and FLO International.
White Chocolate and Almond Tartufi– makes 15 pieces
-Make the ice cream and chill it until it is quite firm (recipe below). Place a plastic-lined sheet tray in the freezer for later.
-About 10 minutes before scooping, drain 15 canned dark cherries. Put into a small bowl and toss with a couple drops of almond extract. Set aside to macerate.
-To form each tartufo, scoop a round ball of firm ice cream (I used a spring-loaded 1 3/4-inch scoop), inserting one cherry in the center as you scoop. Place onto the chilled plastic-lined sheet tray. Repeat for each one, and then return to the freezer for several hours or overnight. You may have extra ice cream (which is delicious as is)…you can can save it in case your scoops melt a little on you. If that is the case, re-form with the ice cream scoop, using extra ice cream if needed, and re-chill before dipping.
-Once your scoops have chilled firm, make the chocolate glaze (recipe below). Pour into a cup or a deep bowl. Use the technique that works best for you to coat the scoops in the chocolate. You can either dip them with a skewer, use two spoons to turn them in the glaze or simply spoon the glaze over them. Gently re-heat glaze if you need to.
-As you go, sprinkle each tartufo with toasted chopped almonds before the chocolate sets.
-Return to freezer for at least an hour before eating.
White Chocolate and Almond Ice Cream– makes about a quart
300g heavy cream
300g whole milk
pinch of salt
100g sugar
3 large egg yolks
1/2 t cornstarch
100g white chocolate, chopped (I used white chocolate with bits of almond)
1 t almond extract
pinch xanthan gum (optional, can be found in healthfood stores)
-In a small, heavy bottomed saucepot, combine the milk, cream, salt and half the sugar. Bring to a simmer.
-Meanwhile, whisk the egg yolks, cornstarch and remaining sugar together in a medium bowl until pale and thickened. Also, place your chopped white chocolate into a separate medium bowl and set aside.
-Once the liquid reaches a simmer, temper the yolk mixture and return the whole thing to the pot, whisking. Place over low heat and use a spatula or wooden spoon to stir constantly. Do not boil it, but get it thick enough to coat the back of the spoon/spatula and hold a line if you wipe your finger through it. This will take several minutes.
-Pass through a fine sieve into the bowl containing the white chocolate. Let it sit for a minute or two to melt the chocolate. Whisk to combine and add in almond extract. Also add in the xanthan gum if using (I didn’t measure, just threw in a good pinch. The tiniest amount will help keep your ice cream from getting icy while in freezer, but this is optional.)
-Chill over an ice bath until room temperature. Then cover and refrigerate overnight. (The next day, give it a taste before you churn it and add more almond extract if the flavor is not strong enough for you.)
-Spin chilled base according to your ice cream maker’s instructions. Transfer to an airtight container and freeze for several hours until firm.
Dark Chocolate Glaze
200g dark chocolate, chopped
1 1/2 T unsalted butter
1/2 t vegetable oil
-Melt chocolate with butter and oil over a double boiler or in the microwave, stirring well to combine. This glaze will set crunchy when chilled.
Baked Fresh Weekly

Blog at WordPress.com.
Entries and comments feeds.
